0:00
Hello, in today's video, I'll show you
0:02
how to connect your Lenovo T1S
0:14
In order to do it, you'll need to
0:16
install the app first. Unfortunately,
0:19
for Android phones, it will be a bit
0:21
complicated. So, first, I'll show you
0:23
how to do it on an iPhone because it's
0:25
easier, and then I'll explain how to do
0:30
then we'll connect. So, on iPhones, as
0:32
you can see, you can just find it in the
0:34
App Store and install it.
0:37
Then, on Android phones, you'll need to
0:41
browser and download it from there.
0:45
So, let's open the browser.
0:50
And then, find APKPure.
0:55
This is a website from which you can
0:58
apps from the internet. And you can
1:00
search for Lenovo Cleaner T1.
1:07
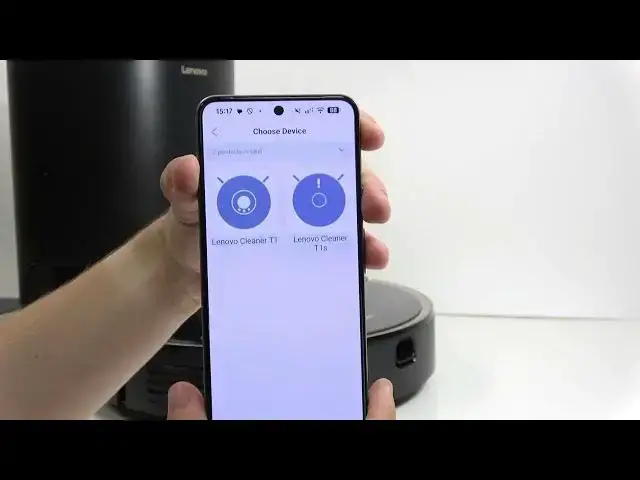
Once you find it, there's a chance that
1:09
there will be Once you scroll find it
1:11
and scroll down, there's a chance there
1:13
will be two very similar apps with that
1:16
logo next to each other.
1:18
In my case, they're not shown, but if
1:20
there are, make sure to select the one
1:22
that says T1 in the top right corner.
1:25
That is the one that is compatible with
1:29
Then, wait a moment until the circle
1:31
loads and you can press on the download
1:35
Scroll down and press on it again.
1:42
you can go to downloads by opening the
1:46
menu of your browser, selecting
1:48
downloads, and selecting the app.
1:52
hold on a second, I'll need to
2:00
Okay, now it'll be fine.
2:03
So, um once you open the file, it'll
2:06
tell you that you need to allow
2:08
installing from unknown sources, so
2:10
click on settings and enable it. On each
2:13
Android phone, it may look a little
2:14
different and there's a chance this
2:17
pop-up window will show up to install.
2:19
If it doesn't show up, go back to the
2:21
same browser and open the downloads
2:26
click on the file again and then you
2:28
will be able to install it once the
2:30
permission is allowed.
2:32
Now you can see I am installing it
2:34
currently and now I can open the app.
2:36
Now, the from from now on it'll be
2:39
similar for both iPhones and Android
2:41
phones. You need to allow the location.
2:44
Uh you can, but don't have to allow
2:47
notifications. Then select your area
2:52
appropriate for your country. Um
2:55
then you can log in if you already have
2:57
an account by entering your email or
3:00
phone number and the password. If you
3:03
don't have an account, you need to click
3:04
on register. Then you'll enter your
3:06
email and password and a verification
3:09
code will be sent to your email. You'll
3:11
need to enter it and then you'll be in
3:14
I'll sign in because I already have an
3:16
account and I'll get back to you.
3:19
Now, when the app is ready to connect to
3:22
the robot, you'll need to click on add
3:24
device and select your robot model. Then
3:30
put it in the Wi-Fi connection mode. To
3:33
do it, you need to press and hold on
3:35
both buttons, the the ones uh
3:39
the the ones in the front, not the power
3:41
button, the two other ones at the same
3:44
time for about 5 seconds.
3:52
Okay, it said the Wi-Fi is reset.
3:55
These are the buttons for
3:58
charging and for partial cleaning. When
4:01
it's done, select the light is flashing
4:04
and then click on next step. Now connect
4:07
to a Wi-Fi network. Make sure that the
4:09
Wi-Fi network you're connecting to is
4:11
2.4 GHz, which means if you have just
4:14
one network at home, it'll work, but if
4:16
you have two networks of a similar name,
4:19
one of them likely will end in 5G or 5
4:22
GHz. And that network won't work, so
4:25
select the other one that either says
4:28
2.4 or doesn't say anything like that in
4:32
Then enter the Wi-Fi password so it can
4:34
be sent to the robot.
4:42
Click on next step. And then wait a
4:45
moment. It will try finding the robot
4:47
nearby and then it'll ask you to connect
4:55
Now let's confirm link and let's connect
4:59
to the Wi-Fi network.
5:05
no matter how many times I click, it
5:09
It just gets to another page and there's
5:11
a button in Chinese. I click on it and
5:13
then I need to connect to a Wi-Fi
5:16
beginning in LNV. Once it's connected, I
5:23
And now it is connecting.
5:28
yeah, let's give it a moment. Okay, now
5:31
it is connected and I can go into the
5:33
robot. I will need to change the
5:35
language, so I'll click on the button in
5:37
the top right corner, go to more
5:39
functions, and change the voice packet
5:44
Now your robot is connected. If you want
5:46
to learn more about it, feel free to
5:48
check out other videos on our channel. I
5:50
hope that this video was helpful. Don't
5:52
forget to like and subscribe, and I'll
5:53
see you in the next one.