0:00
Welcome, here I've got Huawei P40 Pro Plus and I'm gonna show you how to record the timelapse
0:10
video at this device. So at first we have to tap on the camera button here to open it and as you can see for now
0:16
we are in the standard photo mode so let's change it because the Huawei gives us the
0:20
other timelapse mode only to record the timelapse video so this is really cool and we can do
0:25
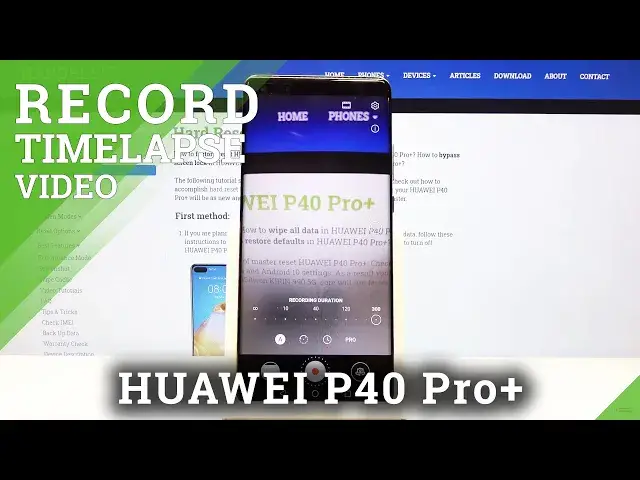
it by using this settings bar and just simply go to the right, do more and as you can see
0:31
here we have access to all of the modes of this camera, one of this is the timelapse
0:35
so by tapping on this we can easily start recording the timelapse video and we can do
0:41
it by using this big button here, we can also adjust some settings of the timelapse so by
0:47
tapping on this button here at the center we get access to it and let's start from the
0:51
left, the first one button here are the auto settings so every time we tap on this we go
0:56
back to the auto settings. The next one button is the speed of the timelapse so here we can change it and as you can see
1:05
we can pick from 15 to 1000 and 800 so this is really cool here and this is how it works
1:13
and let's go to the next one button, this is the recording duration so here we can adjust
1:19
how many time the timelapse video should have in minutes so no limit to 300 of it so
1:31
this is really cool here and this is really pro and the last one button here is really
1:37
pro and this is really cool, I see this at the first time in the smartphone cameras so
1:44
here we can adjust some pro settings about our video, from the left we can change the
1:49
metering from the matrix metering to the center weighted metering and to the spot metering
1:55
so this is how it looks like here. Next one here is the ISO so here we can control the camera's sensitivity to light, by using
2:03
this slider we can adjust it and we have pretty wide spectrum from 50 to 6000 and 400 so this
2:09
is really really good here. The next one is shooter speed so here we can change the time of the timelapse photos that
2:21
are included in the video so also this is really cool here and we can pick from 1 and
2:27
4000 to 30 so this is really good and the next one is exposure compensation so I guess
2:34
that we should be on auto with the shooter speed or the ISO to unlock this because this
2:42
also control the light of our picture and video as you can see here and we can make
2:47
it just more bright so let's go back to the auto here again and more dark as you can see
2:54
this is how it works here. Now let's move to the next one button here we can change the focusing from the center
3:00
weighted autofocus to the spot autofocus or to the manual focus so by using this when
3:06
we change it to the manual we get access to this slider and we can easily focus in like
3:11
that and the last one button here is the white balance so here we can control the temperature
3:16
of our video we can pick the cloudy light, white fluorescent light, tungsten light, daylight
3:23
and at the last place we have this parameter so here we can control the light, the temperature
3:29
of the video in calving degrees manually and as you can see we can make it just by going
3:35
to the right more warm or cold by going to the left so this is how it works here and
3:43
when we don't need it we can easily by tapping again on this button with A letter go back
3:48
to the auto settings so for now let me stay on this and let's start recording to show
3:52
you how it works. So the timelapse should speed up the original video so I'm going to move this object slowly
4:02
to show you how fast it could be. And stop and now let's go here to the left corner at the bottom this is the quick access
4:22
to the gallery so this is our video and play and as you can see this is how the timelapse
4:28
video looks like on this device and this is how it works thanks for watching subscribe
4:32
our channel and leave the thumbs up