Up next in 10

More tips for SAMSUNG Galaxy S20:
https://www.hardreset.info/devices/samsung/samsung-galaxy-s20-exynos/
Let's check out the best tricks for SAMSUNG Galaxy S20. Find out our list of simple tricks and hacks for SAMSUNG Galaxy S20. If you have brand new SAMSUNG Galaxy S20 you should watch this video in order to find out how to use SAMSUNG Galaxy S20 in the best possible way. Let's use the most helpful options, cools hack and useful tips for new Galaxy S20.
Follow us on Instagram ► https://www.instagram.com/hardreset.info/
Like us on Facebook ► https://www.facebook.com/hardresetinfo/
Tweet us on Twitter ► https://twitter.com/HardresetI/
Show More Show Less View Video Transcript
0:00
Welcome and following this is a Samsung Galaxy S20 and today I will
0:08
show you several tweaks and tricks that you can do on this device
0:12
Now more precisely there is going to be 11 of them and jumping straight to it we're
0:17
going to begin with the gesture navigation which on the newer devices from
0:21
Samsung it's significantly improved on what they were previously offering. So to get started let's go into the settings and then this
0:29
play and from here let's find navigation bar right here and you'll have the
0:38
two options you have the navigation buttons or the full screen gestures and
0:42
when you go into full screen gestures you can see that it automatically puts that
0:46
little bark and like a pill from Apple you can also go into more options right
0:51
here and I would advise on increasing the bug gesture sensitive if you're
0:58
using the screen protector that is on here. Because when you're trying to slide back
1:03
you'll be kind of catching your finger on the screen protector. And it's not the best, I guess, feeling for such a device
1:10
So with this being on high, you can actually swipe from just like not the literal edge
1:16
so you won't have to catch on the screen protector. And also you still have the old Samsung quotation mark gesture navigations
1:26
which were just button substituted for like these bars and you still had to swipe up instead of just tapping on it
1:32
So this is in my opinion trash. This is good. So the way this works if you're not familiar with it, you swipe up to go home, swipe and hold to go into recent
1:43
and swipe from either side of the screen to go back. So we're going to start off with the back button
1:47
You can see that there's a little arrow that appears. One that appears you can swipe it and it goes back
1:53
swipe up to go home and swipe up and hold to open up
1:58
recent as you can see like so I just clear this so this first one
2:03
now moving on the next thing I will go is a simple rotation option
2:08
now to have it functioning you will actually have to turn off
2:13
the outer rotate which is right here so you have auto rotate
2:19
that's usually by default how the device comes so you want to turn it off
2:23
and then when you're using your whatever it is you're watching the display won't be flipping around
2:29
but you still have the option to flip it whenever you actually want to
2:33
so just flip it over and it looks like it only works with a bar
2:40
not gestures so that's unfortunate I'm going to switch it back so I can actually show it
2:45
otherwise I wouldn't really have 11 just 10 so let's go back into bar
2:53
turn this on and now keep in mind this is still locked so the device won't be
3:01
able to rotate and probably also would help if I actually had something
3:06
open that I can rotate with I think Play Store is like that I can rotate so
3:14
if I flip it over there it is so now I can see it it pops up with this little
3:19
rotate icon and after a moment it disappears if you don't tap it
3:23
So, just do it again so you can get a look. So when it's normally in portrait and then you swipe to landscape, you tap on it, and then it flips it
3:36
And automatically it locks the app to the landscape. So if you flip it over, actually have to tap on it again to flip it back
3:44
Alright, so. And keep in mind that the screen is still locked
3:50
So it won't be flipping around whenever you actually don't want it to
3:55
So you got the option to click it I actually going to go back to the gesture just to see if it still works So it was under the display and right here Let open up and see if it still works
4:14
It actually still does. So you get this icon right here the gray. So even in the gesture
4:19
navigation it works. It just I didn't open up an app that would support it
4:25
there we go. There we go. So now it's back to normal
4:33
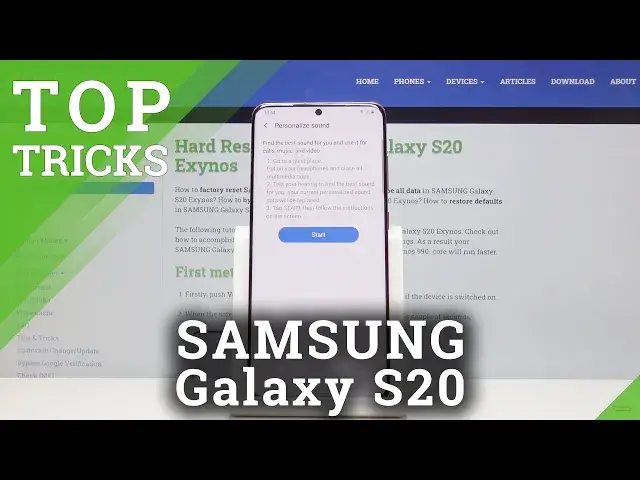
So moving on, we're going to go into the adaptive sound, which I actually won't be able to fully show
4:39
This is something that you'll actually have to do it yourself to get the full grasp on how it works
4:44
But I can show you where it's located and describe what it does. So when you go into the settings
4:50
we will go into sound and vibration right here, then scroll down to..
4:55
sound quality and effects and adapt sound and you have a couple of them right
5:02
here so you have a half no boost you have under 30 30 about 30 to 60 and 60 and
5:07
above now these are just presets but you can create your own personalized
5:12
preset by just tapping on start but because there is no headphones
5:16
connected it will give me a message connect headset to start so that's what I
5:21
mean that I can't really show it even if I would connect it you won't be able to
5:25
hear what it does but what it does is it will start playing super faint
5:31
sound so you want to be in a room that is quiet with fairly decent headset on
5:36
that you can actually hear and then you press start and it starts playing
5:41
either on left or right here a super faint sound just like a beeping or just
5:48
humming noise and what you have to do is select if we can either hear it or not
5:52
and depending on what you select it will actually adjust the equalizer to your specific hearing
5:58
And once you finish up the entire test of it, it will give you a new option right here
6:06
your personal one, and then you can just tap on that one to select it, kind of like you would select these ones
6:11
So then you select it, and automatically it enables your personalized equalizer
6:18
So moving on, we're going to go into a pop-up view, which is just a simple
6:23
I guess I would say improved version of multitasking so when you have some kind of
6:30
app just open up YouTube as a good example so just go into recent from here on the
6:38
top on the icon itself and you will have the option to open and pop-up view and when you
6:42
top on it you get this tiny little window that you can move around you can also resize it to make it super small like this and still interact with it and you can
6:50
open other apps and this will just stay on top of it and you can move it around if it's in your way over to the side now one
6:59
thing that keep in mind I just close it by mistake if you're using the pop-up view
7:05
like it is right now and you're listening to something on YouTube because
7:11
you can actually continue to listen something even though you're interacting with other apps it will continue to play if you go home it will minimize it or
7:23
should minimize it just open up something else and see there we go so it minimizes it into an
7:28
uphead and when that actually happens it will pose your playback of whatever you're listening to
7:34
so if you want to uh kind of like skip this that it minimizes then you have to open it back up
7:41
when you're in the app just swipe it back and that will close it while not actually closing the
7:46
youtube pop-up itself and from here you can resize it also to be bigger
7:53
go full screen or just simply closer by tapping on the eggs that was there. So moving on we going to go into the allowing you to
8:07
basically lock an app from being closed so it will basically be continuously
8:13
loading in the background and it will not like fade just to save on performance
8:19
and also your RAM so for instance I just say some app updates
8:26
while it's in the foreground or when it's like I guess only in the foreground but
8:33
when it's minimized or closed it updates for instance every 10 minutes you can
8:38
force it for instance I'm sure what would be a good example right here
8:42
there be some messaging up which there is none I would say I don't think there
8:48
is any so let's just use any kind of app as an example so when you top on
8:54
again the button right there you have quick open for or keep open for quick lunch
9:00
and when you top on that you have this little lock right here and number one when you clear
9:05
it should believe stay or just keep it open anyway and it will always be basically open
9:12
just for you to quickly access the app and even though for instance it's closed
9:19
it don't need to load I guess I can't close it now
9:23
so it just allows the app to be constantly open and running even though for instance it's not visible right now so like I said
9:33
good option for apps that basically refresh only when they're open now moving on
9:40
we're going to go into the dark mode which this device has built an option too so let's go
9:45
into the settings display and you have it on top right here so you can choose between
9:50
light or dark and it automatically changes and that is basically system wide so
9:56
Also, other apps will be supported by this, as you can see, once they actually load up
10:02
So you can see almost everything is supported. And also another thing to keep in mind, with pure black backgrounds, for instance, like it's right here
10:12
the battery actually gains on that as well because the black pixels that are right now displayed
10:19
they don't actually need to be lit up. The device doesn't need to waste as much energy on lighting up the basically inactive areas
10:26
so it will save on battery. So it's just a nice way to also have pleasant to the eye display at night and also save the
10:36
battery on top of that. And then moving on we're going to go into something that has been active for this entire
10:43
video which is the 120 frames display. Although because I'm recording at only 60 you won't actually get to see it to the full potential
10:55
on the video it's only going to be visible on the device so it's basically all the key part of this
11:04
display which is the high refresh rate of the display and to enable it you would go into the display
11:09
and it's right here just i'm going to switch it to light just right here high refresh rate right
11:17
here and by default is going to be set to 60 and also shows you a animation and compares
11:25
comparison to 60 to 120 but honestly 60 is already smooth so this comparison has super exaggerated and
11:34
it doesn't look as jaggedy as it normally does but when you switch to 120 and top on apply
11:40
basically everything becomes butter smooth the display looks so nice sadly like I said it's not very
11:49
visible on the camera because it's only recording at 60 so basically
11:55
it will look like this would normally look like So when you have the device and you switch this on you immediately see the difference So moving on we going to go into the resolution which is another option that is a little bit lower
12:13
So screen resolution and by default it's set to full HD. So you can see 2400 by 1080
12:22
But it can change it to the 1440. the 1440p stop on okay and now the image will be sharper so yeah now it also
12:36
changes the resolution right here or actually lacks it so you can't use it looks
12:41
like you can't use the 60 frame or 120 frames with the higher resolution but you
12:48
have the option right here to change it up if you wish to yeah so moving on we're
12:55
going to go into the, again, the display section, so display mode and I actually
13:00
by accident topped on it so you have the screen mode right here and right now I
13:10
have set to natural but by default it's set to vivid so it looks like this
13:15
Now some colors in my opinion on the vivid look a little bit too unreal so
13:23
like the oranges they almost look like they're glowing. I'm not sure if that's how we would be perceiving this
13:28
but in my opinion, it's just way to saturate it and exaggerated on that
13:33
So natural seems to be more accurate representation of how the real-world oranges actually look like, in my opinion
13:43
And I have a couple other ones that can just switch between. Now, keep in mind that vivid does look nice
13:50
when it doesn't actually need to represent some already, bright objects so like oranges and grapefruits are relatively bright while aurora borolus
14:02
well seems a little bit faint and with the vivid it actually just adds way more color to it and it looks
14:09
more vivid like the mode states and it can also right here make it a little bit warmer or colder
14:18
basically what it does is just adds either orange color or bluish color or bluish color
14:23
depending on which spectrum you go. So, nice. And the last thing that I want to show is something that I find very useful
14:34
which is the notification panel for you to be able to pull it from anywhere on the screen
14:38
So normally when you pull down, you get the uptray and you pull up and you also get uptray
14:43
So no matter which way you pull up, you always get the uptray. And you can actually switch it up
14:50
So when you pull down, it will pull down the notification. panel as though you were pulling it right from the top but you don't actually
14:56
have to do it from the top now so let's go into the settings and then we're
15:02
gonna go into again display and from here we're gonna find home screen so
15:08
home screen right here and swipe down for notification panel you have it right
15:13
here enable that and now we can go back and I'm just gonna swipe as low as I
15:17
can and you can see that it opens up the notification panel so as long as you
15:23
space to swipe down it will open up the notification panel so you don't have to
15:29
reach all the way to the top when you're holding the phone and do some finger gymnastics to reach there and this is especially helpful when you're
15:36
using bigger device than the S20 like S20 plus significantly bigger than this
15:43
and it will help you dramatically but this would be all 11 tweaks that I had
15:50
and if you found any of them helpful don't forget to hit that like button and thanks for watching
#Online Video
#Consumer Electronics