0:00
Welcome here I've got Sony Expeerra 1 3 and I'm going to show you the overview of camera auto mode at this device
0:13
So let's start by tapping on camera button to open it and for now as you can see in the left corner we are in basic mode so let's begin to change it to the auto
0:22
And here we are, this mode has more settings than the basic one and as you can see
0:29
It looks like the real camera. The really cool thing is also that we have the only button here to take pictures
0:36
so we don't have the standard smartphone shutter. And when I tap on it, I can easily take a picture now
0:43
And we have settings from the left and also this advanced panel from the right
0:47
So let me start with that. As you can see, most of these settings is locked
0:52
because they are available in half manual or only manual mode. But we have access to a few of them
0:59
Let's start with this one. Here we have the drive mode. So the mode when we want to decide how we need to take picture
1:07
we can pick single shooting. So for now when we take a photo and tap on the shutter a little bit longer
1:13
we can take only one picture. We can change it to continuous shot with high speed
1:20
So now we get access to bars shot when we tap on the shutter a little bit longer
1:26
We can take the series of pictures in a really, really fast way. And we have also here access to continuous shooting with low speed
1:36
So the same thing happens when we tap on the shutter a little bit longer, but in a slower way
1:41
Another tap here and we can pick also the self-time wheel with 10 or 3 seconds
1:47
So let me pick for example with 3 seconds. Now when we take a photo, we get access to the countdown and we can delay taking of picture
1:57
For now let me turn this off. and go back to single shooting
2:01
And let's move to the second option. Here we can also pick the focus mode between continuous and single shoot
2:08
So this is useful when we want to improve your skills with the bars shot
2:13
For example with continuous shooting So it just focusing better when we need to take many pictures at once And now let go to focus area We can pick between white and the center
2:26
And here we get also access to flash mode between auto, so the camera should recognize
2:33
when we need to use it when it's too dark. We can pick feel flash, also red eye reduction
2:43
We can turn it off. it off or pick the torch so we have now the feel light here now let me keep it turn it off
2:50
and let's move to the next one option we have face eye autofocus we can turn it on and turn it off
2:57
so when we have it turn it on and need to take the portrait it should automatically detect the eyes
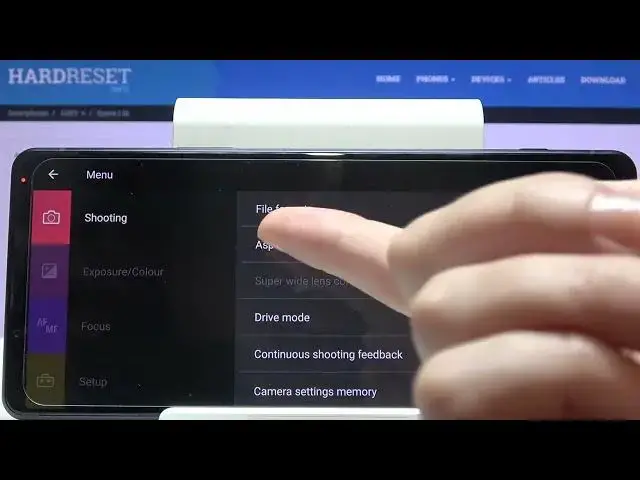
3:04
and face and also let's move to the next one option here we have file format and this is really
3:10
professional because we have jpac raff plus jpac or the same rave. So the rough format is used by professional photographers to saving more details at the pictures and post-practing them in graphic programs
3:24
We can pick whatever we need here or save this on both ways
3:30
So in the basic usage of the camera, let's stay on the JPEC
3:35
And the next one option here we can manage its aspect ratio
3:39
So our photo size connected with megapixels, we are in foreign I've changed it accidentally to 16 and 9 and as you can see the background has changed it to the longer one we can pick also the square one so one and one and three and two and this is how to manage the settings on this panel we have also here a lock option but in this auto mode we don't able to use this
4:06
so for now let me move to menu when we pick it we get access to more options about the camera as you can see some of them
4:14
are the same like in this right panel because this is the short access to them
4:20
so here we can also manage the file format aspect ratio the drive mode in this shooting options
4:26
we can also adjust the zoom so this is one extra thing here between digital and
4:34
auto intelligent super resolution zoom so I think this may be useful to improve quality of our zoom when we use it on the auto
4:45
And now let's move to exposure and color. Here we can also pick flash mode or turn on soft skin effect when we need to take the beautiful portrait, for example
4:56
The next one options here from the right are options about the focusing
5:01
So of course we can pick the focus mode with between, single shot and continuous shot, focus area like in these short settings from the right
5:10
focus area color between white and red, and this face and I autofocus
5:17
But when we go here to the setup, we get access to more options
5:21
The first one is touch to adjust, object tracking, autofocus and focus on brightness
5:26
So my favorite here is object tracking because now when we need to take the picture to some object that is in move
5:34
when we adjust for example focus on it it follows us as you can see this is how it works
5:40
so let's move to this menu to set up the next one option here we can adjust are the gridlines
5:47
we can turn them on and off easily and here in the preview they are appearing
5:53
they are useful when we want to use the rule of ferdin photography or making experiments
5:58
with composition at our picture and let's again go to setup settings
6:04
And let me focus now on use volume key as. When we tap on it, we can decide what our volume keys which are here
6:12
Do with cooperation with the camera, we can pick between zoom, volume and shutter
6:18
So let's stay on zoom. Because now when we tap on them, we should get closer to our subject
6:25
And as you can see, this is how it works. And also go back
6:29
Let's move again to menu to set up. setup. Here we can also manage the sounds of our photo and camera we can turn them all, we can turn on only shutter or just turn them off so let's stay for example on shutter only. Now we can hear it
6:51
And let move here we can also decide where we save our pictures to internal storage or SD card and also here you can read some short tutorial how to use this camera so i think this should be useful or reset all of the settings so when
7:13
we tap here we can reset them to default so let's wait a while now we should go to the short tutorial
7:25
tutorial also. Again we are on basic so let me change it to the auto after resetting this
7:30
when we tap to menu and go again to setup I want to show you also that here we should have
7:36
the safe location option so here we can turn it on and off when we have it turned it on we should
7:43
save the location of our picture in the details about it so if you need this you can turn it on
7:51
here and now let's move back to this view I want to show you that when we tap
7:55
to Disp, we get access to more options. So more short info about what we have, the leveler and the histogram
8:04
So let's focus now on leveler because this is useful when we want to be sure that we hold our device steady
8:10
And as you can see, this is how it works. When we have green line, we can take straight picture
8:18
And also here the really cool thing is that we can manage the lens from the left so we can pick
8:25
16 millimeters 24, 70 and 105 so we can get closer to our subject by using the lenses of this camera
8:35
So maybe let me show you them here. And in each of these lenses we can get access to that type of panel also to get access to zoom
8:50
So these are really pro settings about using zoom here. And when we tap to the disk we can turn all of these settings
9:01
and this is how this camera auto mode looks like. Thanks for watching, subscribe by our channel and leave the thumbs up