Up next in 10

How to Remove Factory Reset Protection on SHARP Aquos Sense2 – Skip Google Verification
Jul 15, 2024
Read more about SHARP Aquos Sense2:
https://www.hardreset.info/devices/sharp/sharp-aquos-sense2/
When it comes to Google Verification on SHARP Aquos Sense2 device, then here’s what you should know about. Learn how to get rid of factory reset protection to set up your smartphone without Google Account. Apart from this, you will be able to find out more about established security verifications on your SHARP Aquos Sense2 device. If you have forgotten your password, let’s directly jump to the tips that will help you to activate your device without this basic verification.
How to unlock FRP in SHARP Aquos Sense2? How to remove Google protection on SHARP Aquos Sense2? How to remove factory reset protection on SHARP Aquos Sense2? How to skip FRP on SHARP Aquos Sense2? How to activate SHARP Aquos Sense2 without Google account?
Follow us on Instagram ► https://www.instagram.com/hardreset.info
Like us on Facebook ► https://www.facebook.com/hardresetinfo/
Tweet us on Twitter ► https://twitter.com/HardResetI
Show More Show Less View Video Transcript
0:00
Welcome
0:02
I film is a sharp AQUIS Sense 2 and today I'll show you how to bypass the Google Verification
0:14
And to get started you will need to connect to Wi-Fi, which I'm going to do right now
0:21
So let me put in a passcower. Now right now I just want to show that the device is locked
0:37
But in any case, once you already know that your device is locked, what you want to do is go
0:44
to the first page. Now as you can see for me, there's the verification pattern
0:48
Now keep in mind that there's a pattern right now because we're going to change it
0:53
So I can use it either unlock it using a pattern or using the Google account
0:58
And assuming we don't know either of those, we're going to go back. back to the first page right here
1:02
Change the language to any kind of language that uses a different keyboard
1:07
So if I scroll down, basically anything from here downwards will work
1:15
So select whichever language you want. And from here you want to proceed through the setup
1:30
And now once you top on a field it will bring up a keyboard and right next to the space you should see a globe icon
1:48
which is basically for the different languages. Now if you don't see it because that sometimes happens for no apparent reason what you want to do is just go back and change it to another language
1:59
once you do it should then bring that option right here. So what you want to do is hold it
2:06
From here once you hold it you'll have a bunch of keyboard as you can see but you want to top on the last option
2:11
this text at the bottom of the window and then choose add keyboard and from here select any
2:18
keyboard that... Let me do that again because for some reason it just glitched out So from here select any keyboard that doesn have an arrow As can see there several width arrow so you want to choose the ones without it So right there once you tap on one of them choose to add which is this button right over here
2:40
And once you add it you want to then, oops sorry, once you add it you want to go back
2:51
and you want to go back to the beginning of the setup, the first page
2:55
page and from here choose your desired language which for me it's going to be
3:00
English and again we're going to go through the setup now by adding English or
3:09
by adding another keyboard that we have just added this option with the globe
3:14
will remain even though we're back in English and it should remove it so that's
3:20
again top on the field as can see there it is so you want to hold it again and
3:24
start off by changing it the QWERTY alphabet, which is the second option, then hold it again, and go to language
3:30
settings, add keyboard, and this time around you want to choose an option with an arrow
3:34
So as can see, in English, Albanian is the first one right here, so let's just choose it
3:39
And from here, tap on a three dots. Go to help and feedback. And then describe your issue, you want to type in Morse code or just first two letters
3:48
seems to bring it up as a suggested. As you can see, use Morse code
3:53
Stop on it. tap on play and once it loads you on top on at three dots
4:06
and go to watch later which in turn will open up web browser
4:10
so it's good to accept and continue and no thanks we don't want to sync
4:15
and from here tap on the third bar at the top and navigate to hard reset.com
4:24
So, like so
4:34
Now, if you need a moment to write it down, pause the video
4:39
Otherwise, I'm just going to continue here. And there we go. Once you're on that website, what you want to do is scroll down to the settings application
4:51
open it up then you want to scroll down to security and location scroll again down top on advanced and you should see screen pinning as an option once you tap on it you want to enable it and it will bring up the second option so lack device
5:12
when unpinning so when you enable it it will bring up the ability for you to set up a screen
5:18
lock and this right here will basically override the previous screen lock that we need to
5:24
basically used to verify the account or verify the reset. So like I said, at the beginning, we did have a pin, or not pin, what I'm saying, a pattern
5:36
So I'm going to set it up to be a pin just to keep it a little bit different. So let's go to pin, and I'm going to change it to something really simple, like one, two, three, four
5:47
Next, one, two, three, four to confirm, and it's now set. Once you set it up, hold the power key and simply tap on restart
5:59
Okay, so from here let's unlock it and again it will now bring out that passcode that we have said
6:09
So we need to confirm it by tapping one, two, three, four, confirm to unlock and let's give it a moment
6:15
Okay, and from here simply let's go to go to do. Simply let's go through the setup as we did before
6:39
And as can see now the verification changed from the pattern to pin
6:43
And obviously we know the pin because we have set it up ourselves. So one, two, three, four, and unlock it
6:51
Now I'll mention that this No way did unlock the device but it is still recommended that you finish up the setup
7:03
and perform a factory reset through settings just to remove any kind of leftovers from the
7:08
old account that was blocking us So that's basically what I'm going to do right here
7:13
I'm going to quickly finish up the setup and from here let's go to the settings
7:22
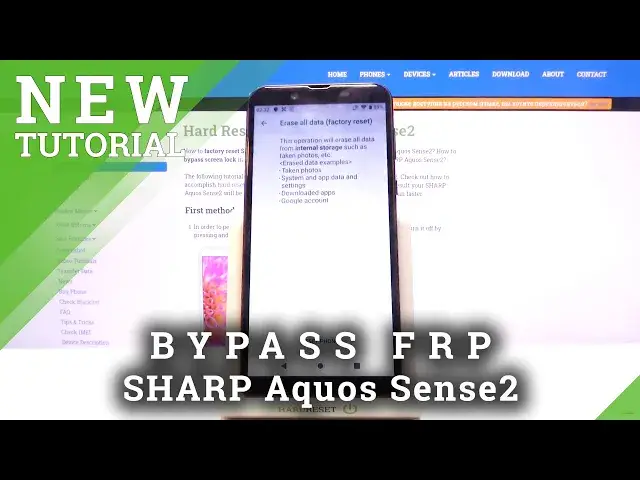
scroll all the way down to system to system advanced reset options and choose erase all data factory reset
7:42
and in here it will give you a message that this will basically remove things like your photos and other well
7:48
redundant stuff but the thing that interests us is the last option so google account will be removed
7:59
account will be removed and even though we don't have any and it's not really showing
8:03
any here it will still clear out the data from the account that we basically had on the
8:09
setup screen that was blocking us from finishing it up so let's choose reset phone and again
8:15
insert the pin that you have set so one two three four erase everything and the process will
8:21
now begin now this will take a couple minutes again and once it's finished we should be
8:28
back in the setup screen, at which point the device will be fully unlocked and you can set it up as however you like
8:34
connect to Wi-Fi or do whatever you want. It basically is fully unlocked at that point
8:40
So while this is proceeding I'm just going to let it run and come back once it's actually finished
8:58
Okay, so as you can see, the process now finished and we can now continue the setup
9:05
So once more I'm going to select English as my language and from here I'm basically going to skip everything that I can just to save a little bit on time
9:14
But I'll quickly mention while I'm already setting it up that Wi-Fi is skippable and if the device would be locked it would not be
9:23
I would have to connect to Wi-Fi but because I can skip it, as you can see the device
9:28
is now unlocked. And throughout the setup you will see that there is nothing
9:32
really stopping me. So, should be right about done. And there we go, as can see we're
9:47
now on the home screen with the device fully unlocked. And if you found this very
9:51
helpful, don't forget to hit like, subscribe and thanks for watching
#Mobile Phones