Up next in 10

How to Unlock FRP in BLACKVIEW BV6600 - Skip Google Account Lock / Bypass Google Verification
Jun 30, 2024
BLACKVIEW BV6600 Factory Reset Protection:
https://www.hardreset.info/devices/realme/realme-c25s/faq/bypass-google-verification/oppo-android-11-google-account-bypass/
In this video, you can find the way to remove factory reset protection on BLACKVIEW BV6600. Let's follow our steps and skip Google account verification on BLACKVIEW BV6600. If you forgot the Google password, the only way to activate BLACKVIEW BV6600 is by unlocking FRP.
How to remove factory reset protection on BLACKVIEW BV6600? How to bypass screen lock on BLACKVIEW BV6600? How to unlock FRP on REALME C25s? How to activate BLACKVIEW BV6600s without a Google account?
#BlackviewUnlock #BypassGoogleVerification #RemoveFRP
Follow us on Instagram ► https://www.instagram.com/hardreset.info
Like us on Facebook ► https://www.facebook.com/hardresetinfo/
Tweet us on Twitter ► https://twitter.com/HardResetI
Support us on TikTok ► https://www.tiktok.com/@hardreset.info
Use Reset Guides for many popular Apps ► https://www.hardreset.info/apps/apps/
Show More Show Less View Video Transcript
0:00
Welcome
0:08
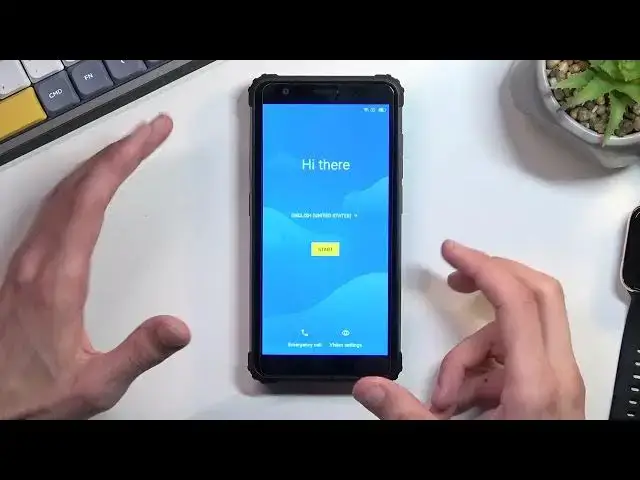
Infanomy is a Blackview BV-6600, and today I'll show you how we can bypass the Google verification on this phone
0:18
So you can clearly see that the phone I have right here is locked. It's only only only to verify in the previously used pattern
0:24
And I can also stop right here to verify the previously used Google account. so now assuming we don't know either of those we can just bypass this
0:32
and you want to start off by progressing a little bit through the setup
0:36
till we get to the Wi-Fi connection page like this one you want to connect to some network this is required
0:42
once you have connected to your network you will go back to the first first page and from here we're going to select vision settings
0:49
talk back we're going to enable it Not back. Welcome to John back
1:03
There we go. Now, muting it is not required, though it is annoying, so if you want to you can mute it just as I did
1:11
Anyway, once you have gotten to this page right here, you will want to draw a
1:18
mirrored L on the screen, just like this. This will ring up this a little window right here, so you
1:27
The first option is already selected with this green outline, which is good. Right now we can't really use a display normally
1:34
so if you want to accept this first option, which we need to do, you will first need to have it selected as it is
1:40
and then double-top it to confirm it. This will bring up this option
1:45
Right here, use voice commands to control the talkback, so you want to select the voice commands, selected once
1:50
And then before you tap on it twice, I'll quickly go into the process that we need to now follow up
1:55
So when you double top on it, you will hear a beep. And when you hear that beep, you want to say open Google Assistant
2:02
This will open up Google Assistant. And this will give you another beep
2:06
Once you hear that one, the second one, you want to say Open YouTube. So I'm going to do this right now
2:12
And you can find those see and hear how it's done. Open Google Assistant
2:21
Okay, and then open YouTube. Opening, YouTube. I was certain that it failed The sound kind of suggested that it didn recognize my voice but apparently it did because as you seen it opened up YouTube which I did follow up with open YouTube
2:43
This wasn't necessarily the most perfect way of going about it, but I guess it works
2:49
So anyway, from here, we will now want to suspend talk back, so we're going to hold volume up and down at the same time
2:57
You want to select turn on, double top, then hold those two keys again
3:07
and now we can use our display normally. So from here you want to select your account, icon, go to settings
3:14
about Google Privacy Policy, select Chrome, accept and continue, and no thanks
3:26
then right at the top you want to navigate to hard reset that info slash bypass
3:32
I'll write it down and you can pause the video if you need a moment to copy it
3:36
so now it be the time to pause
3:51
Anyway from here you will scroll down to settings and once in settings we will now navigate to
4:04
ops and notifications from here you want to select seal 49 apps
4:13
and then you want to topple net three dots and select show system
4:19
and now we're going to start off by selecting the first android setup there is two of them as you can
4:23
see so select the first one select disable, disable app, force stop, and okay
4:30
Go back, go to the second Android setup, for stop it. Go back again, scroll down to Google Play Services
4:42
There we go. As can see, it's like a little bit past like half point
4:48
So once you find your Google Play Services, click on it, and again, disable, disable up, for a stop, and okay
4:54
we're going to go back, we're going to go back once again and again to the main settings page
5:01
and from here we going to navigate down to accessibility Now we looking for Accessibility Mini
5:21
Oh, it's right at the top. How did I not see it? It's literally the first option
5:33
Accessibility Mini. Then you want to select this checkbox right here. Then we'll
5:39
or non-accessibility menu, it gives us a guide on how to use it, so we'll need to use two fingers
5:44
swipe up, to access it. So just to showcase this, that's how it looks like
5:50
Anyway, once you have enabled the accessibility mini shortcut, you will now just spam the back
5:56
button until you get to the setup, the first page of the setup. there we go
6:10
So from the first page right here you will now want to progress through the setup
6:15
because we are already connected to Wi-Fi, it skips that page and goes automatically to the next one
6:22
which is this, I believe. Yep, checking for updates, just a second again checking updates
6:29
So that's what you're looking for. Once it's stuck on this page, which it will be stuck if everything is done correctly
6:34
you will now want to use the accessibility menu, so to swipe up, two finger swipe up
6:42
You'll select assistant, then press settings. Come on
6:59
Interesting. There we go. There we go
7:21
I don't know why I didn't want to open up sooner. Now this is kind of random, so I guess it's to be expected
7:28
So as you think there was a settings page show up. This should show up once you press the Accessibility or the Assistant button
7:38
It shows up settings, you want to press on the settings and then you want to select Enable as I did
7:44
Now at any point throughout any of these steps either pressing the settings trying to press enable or going to do the Assistant this will close off and you just kind of have to keep repeating this until you manage to do the entire process
7:58
until you get to enable this button, or press enable here. Once it's enabled, as you can see, it switches to disable instead, which is fine
8:06
So once it shows disable, you want to go back. I'm going to close out the talkback right there
8:12
and we can now finish up the setup. Now at this point you want to just kind of blast through the setup right here
8:21
skipping everything that you can. It does not matter whatsoever what you select right now
8:26
because the device is still locked. So choose whatever. You can even choose bang as a search engine
8:31
because it's going to be resetted anyway. I'm going to skip adding fingerprint and pen pattern password, whatever
8:39
Let's select, I agree. Can I select next? As you can see, we are now on the home screen
8:49
So from here, you want to navigate to your settings. Scroll all the way down to system
8:59
Scroll again all the way down to... Oh, there we go. Reset options
9:06
Erase all data factor reset. Erase all data. and then I believe once you press on this erase all data or the next one
9:14
the process of factory resetting your device will begin. Now, I'm not going to go through this on the video
9:20
just because once you press that button, the process is done. The phone will automatically go through the factory reset of it
9:27
which you can't really do anything throughout it, and once it's finished, you will be taken back to the setup of your phone
9:34
But at that point, the device will be fully unlocked, so you can set it up however you want
9:39
So, yeah, the setup will be basically, as you would expect from any typical setup on any kind of, like, brand new device where you can skip connecting to Wi-Fi's and all that stuff
9:49
But like I said, I'm not going to go through it. It's just going to waste time. I'm pretty sure you're not going to get much from seeing a black screen when it's factory resetting
9:57
And set-up screen is a normal one, so I'm confident enough if you went through the bypass, you can most likely finish up the setup by choosing whatever you want to do
10:07
So, anyway, that being said, this is how you could bypass the Google verification on this phone
10:14
and if you found this video helpful, don't forget to add like, subscribe, and thanks for watching
#Hacking & Cracking
#Mobile Phones
#Science