0:00
Welcome, in front of me is a OPPO Reno6 Pro and today I will show you how to record screen
0:13
on this phone. So to get started, all you need to do is pull down your notification panel, locate the toggle
0:19
which for me is right here, that is the default location of it, and once you find it you can
0:24
simply tap on it, select continue, if you're doing this for the first time you will get
0:29
this pop up as well. Allow screen record, take pictures and record videos, allow while using up, access to audio
0:40
so it can actually record microphone and just the phone sounds, show while using up
0:47
Now I'm not exactly sure why it would need access to things like phone calls so I'm just
0:52
going to deny it and in terms of storage obviously it needs a place to be saved so
0:59
allow, and let's see, straighter toggle again. Apparently without allowing it to manage phone calls we can't record screen, I'm not sure
1:12
why so I guess fine I'm going to agree to it, it sounds like I have a choice here
1:18
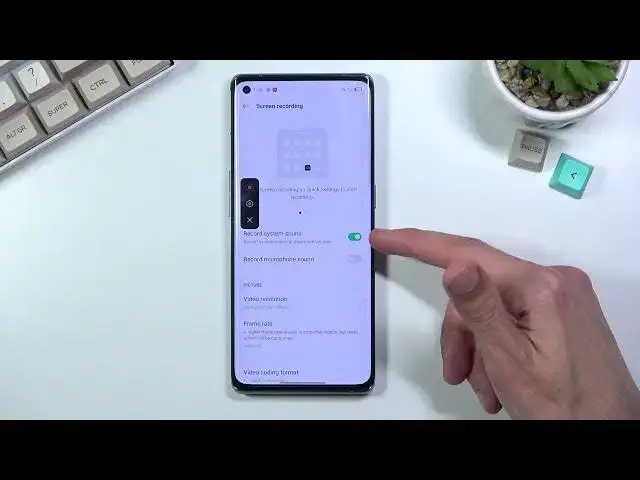
And this will bring up this little panel on the side so we have tap to record, we also have the settings button and close so I'm going to start off by going into the settings
1:26
right here where you will have two options right here, record system sound and record
1:30
microphone sound so you can record both of them, although if you're planning to record
1:34
both I do recommend you to use headphones for that, otherwise you will get an echo effect
1:42
And additionally under more settings we'll have additional settings for video recording
1:46
so as an example video resolution, it is set to be medium right now but we can either make
1:52
it high which will increase the quality of it and also take more space once saved
1:59
And what else we got, frame rate, we have dynamic, I'm going to move this around, so
2:05
dynamic automatically adjusts frame rate based on the content being recorded so if the content
2:11
is being shown at 60 it's going to record at 60, if an image is being shown it's probably
2:15
going to record at like 15 frames. So this is probably the best option to keep and then we have front camera so you can add
2:24
a front camera recording to the screen recording if you want that, I don't, what else we got
2:32
we have again the sound system so record system or microphone or both and yeah, once you go
2:38
to the settings you can basically leave this and simply start recording here, as you can
2:44
see it will record, there is a timer right here, so whatever you will do right now will
2:48
be recorded by the device, minus, it will record applications minus things like for
2:55
instance Netflix. Now once you're done with it you can interact with the panel right here and select the red
3:02
square or pause depending if you want to pause it or completely stop the recording which
3:07
will, if you stopped it, it will save it in your photo application, if you pause it it
3:11
can open up some kind of application, resume it again but if you want to save it you always
3:15
have to press the red square and once we go into the photo application you should be
3:20
able to see that recording somewhere in here and there it is and obviously you can also
3:29
see that the little overlay that we've seen here for the video recording is not visible
3:34
on the recording itself. So anyway, this is how you record your screen and also where you can find the recording
3:41
after you're done and if you found this very helpful don't forget to hit that like button
3:45
subscribe and thanks for watching