Up next in 10

Find out more info about APPLE Watch 9:
https://www.hardreset.info/devices/apple/apple-watch-series-9/
Applying a screen protector is a straightforward process, safeguarding your APPLE Watch 9 from scratches and minor damages. Follow our steps and apply screen protection on your watch. Visit our YouTube channel if you want to know more about APPLE Watch 9.
How to apply screen protection on APPLE Watch Series 9? How to install screen protection on APPLE Watch Series 9? How to add screen protection on APPLE Watch Series 9?
#ApplyScreenProtection #ScreenProtection #APPLEWatchSeries9
Follow us on Instagram ► https://www.instagram.com/hardreset.info
Like us on Facebook ► https://www.facebook.com/hardresetinfo/
Tweet us on Twitter ► https://twitter.com/HardResetI
Support us on TikTok ► https://www.tiktok.com/@hardreset.info
Use Reset Guides for many popular Apps ► https://www.hardreset.info/apps/apps/
Show More Show Less View Video Transcript
0:00
Welcome. And follow me, I have the Apple Watch Series 9 and today I'll show you how you can apply a screen protector to your brand new watch
0:13
Now, this one will be a little bit interesting because the watch or screen protector that comes here is made out of plastic or like, you know, the flimsy ones
0:21
And this display is, as you can see, a little bit curved. So it's not completely flat
0:26
So I'm curious how that will actually turn out to be placed on this display
0:32
For the Ultra one, obviously the display there is completely flat, so it's completely different
0:36
But here, this will see once I place it on there. So anyway, let's get the package out
0:43
Now I am using whatever this is the H-O-F-I of the, how do you want to read this
0:51
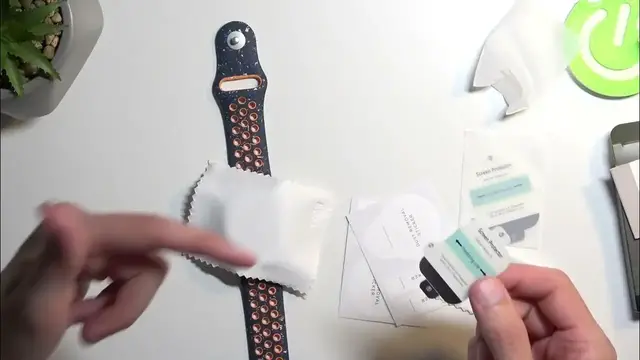
And in general, the packaging that you get, or the content of the package that you get, it's pretty good
0:56
We have a little kind of thingy thing to just smear it here so we can flatten this protector
1:02
We have two of them included. We also have two different wipes included
1:12
There we go. There's the second one. And we also have these stickers, two of them
1:19
Now these seem a little bit extensive, considering the same ones, come for devices with a massive displays
1:29
And what these are used for is, this one is for removing dust
1:33
So you just kind of peel that off and then you stick it onto the display to get rid of any kind of dust
1:36
that will settle on your screen right before you apply your protector
1:41
And then we have guiding stickers which you would basically place on a phone doesn't really apply to a watch like this
1:46
So you place these on edges right here. And when you're slapping on your tempered glass
1:50
and it's kind of crooked a little bit, you can then use that guiding sticker
1:54
to lift it up and this will lift up the tempered glass and you can reposition it with hopefully better results
2:00
Now obviously the guiding stickers for the watch are absolutely useless. The dust sticker might be useful
2:07
It literally covers the entire display. But let's start off by cleaning it up
2:12
So we do have these wet wipes right here. I also have one that I have from the previous Ultra video
2:20
which is still wet because it was literally recorded five minutes ago. So we can start to clean it off
2:25
It is on alcohol basis so it basically gets rid of any kind of like oils that you might have that the watch surface might have from you touching it Once it cleaned off you can then grab one of these microfiber cloths
2:45
and then clean it off so it's dry and clean. Now the thing that I recommend doing is keeping that cloth over your screen
2:55
After all, you cleaned it. There is no dust on it right now, hopefully. And by you cleaning or keeping this little cloth right here
3:02
you're basically preventing any kind of feature dust from settling on the display because
3:05
right now it will be settling on this little cloth. Now in here we have our flimsy little protector as you can see it is completely plastic
3:15
and it just kind of weird shifts. Anyway, so we have screen protector position lines cool like I'm not really sure what their
3:26
position lines are for but whatever now we have three different numbers right here
3:32
That's the first. So I'm pretty sure, even though I haven't done this yet
3:38
but I guess if I mess it up, I still have the second one. So we have the number one which you most likely peel off first
3:46
which will then reveal the sticky side on this little protector, which you then slop it down
3:52
And then we have two and three for some reason, which I'm not exactly sure what's the difference here
3:57
Oh, I think I might have an idea. So you place it, then you remove the second one
4:01
you probably then do this and then you move the third one because you might actually
4:06
scratch it up with this kind of smearing on with this so anyway let's get to it it
4:31
So it looks like it's actually the upside down like this. I'm trying to position it correctly but I'm getting a little bit messed up by the
5:06
fact that the display is a little bit curved so I'm constantly like lifting it up and
5:11
repositioning it so I can find what would be considered the middle of the display literally the middle And I think I just got it So now we going to grab this
5:30
If I'm doing this correctly, obviously. Which I don't think I am
5:43
Okay, so, how did I look at it? I think it's going to go this way actually
5:55
So, let's see, do I want to peel off the number one or number two
6:03
Because I did peel off apparently number three first. So I'm not sure if it's visible
6:14
Come on, camera. So we have a little bit of a cut right here
6:19
And these are the two different separate parts. So this on the top will be what you actually will be pressing on once it's applied
6:27
And we want to now remove I presume number one right here. And then align it just at the very bottom right here and then remove number two and just kind of like flop it on
6:36
I'm struggling with removing just the number one. There we go
6:51
Oh boy my shaky hands aren't helping me
7:10
Yeah, that's not straight, obviously. So I'm going to attempt to put it on completely straight
7:21
Oh, I think that's how it's going to go. Yep
7:38
It seems pretty good. As you can see, the spacing right here is pretty well kept all around
7:47
So now the very bottom of it is already glued so we going to now just grab that flip it up and do this
8:22
I did mess it up a little bit when I was fiddling around with it because we do have
8:29
an annoying little line right here which is what I presume just a little bit of like messed
8:36
up glue when the two parts were rubbing against each other so this is on the other side
8:43
and I actually have no way of cleaning that off so it will have to stay but now I could
8:49
technically replace it with another one and have a much better result now that I actually know what I'm supposed to do here
8:56
Considering I was kind of getting messed up by how you're supposed to peel those off. Anyway, so there we go
9:04
Once you get just to kind of go over this and recap it, considering it was a little bit weird how it's coming off
9:10
So you start off with the number one which, yeah, it's basically from this side
9:14
So you try to peel it off from the bottom side. So you have the writing here, flip it over, and you try to peel off only
9:22
the number one so with this tiny little portion this one again it's kind of hard to show it off so
9:29
you peel that off and then like you've seen you start off by placing it and then you flip off the
9:34
two and using the this once it's flipped over you just kind of like push it onto the display just
9:42
take time to align it correctly with it on the display so once it gets placed it's evenly spread
9:49
out all around the bezels now that being said Apart from this line, I can genuinely not tell that there's anything applied to this display
9:59
It's very hard to see. You can see it maybe at an angle right here. This kind of line right here, which shows you that something is on there
10:07
but in typical looking at it, I just actually don't see it
10:11
Apart from this annoying line, which I did screw up myself. But anyway, as you can see, the application went pretty well apart from this line
10:19
So yeah, hopefully you found this video helpful if you did, Don't forget to smash like, subscribe and thanks for watching
#Consumer Electronics
#Other