Up next in 10

Find out more info about DOOGEE X100:
https://www.hardreset.info/devices/doogee/doogee-x100/
Check out the tutorial, where we present the best camera functions available on DOOGEE X100. If you want to discover top tricks for the DOOGEE X100 camera, follow the attached instructions and take a perfect picture using the presented camera functions. Let’s follow the uploaded video guide and any camera functions won't be a tringle for you. Visit our HardReset.info YT channel and discover many useful tutorials for DOOGEE X100.
How to use DOOGEE X100 camera? How to find the best options for the DOOGEE X100 camera? How to make usage of the DOOGEE X100 camera easier? How to open camera settings in CAT S52s? How to use top and tricks for the DOOGEE X100 camera?
Follow us on Instagram ► https://www.instagram.com/hardreset.info
Like us on Facebook ► https://www.facebook.com/hardresetinfo/
Tweet us on Twitter ► https://twitter.com/HardResetI
Show More Show Less View Video Transcript
0:00
Welcome here I've got Doji X100 and I'm gonna show you the top tricks of this camera
0:10
So at first we have to tap on a camera button here to open it. And for now as you can see we are in the standard photo mode so let's see what we've got here
0:19
And let me start by tapping on the screen anywhere like that. As you can see we have access to this square so this is the focusing and we can focus like that anywhere we need
0:29
So this is how it works. Now let's have a look how to zoom. We can do it by using two fingers like that
0:35
And by doing this I can get closer to my subject and also go back
0:42
So this is how it works. Now let's have a look on these three buttons here
0:47
We can change the modes of this camera here. Here we have panoramic mode, the face beauty mode and also the normal mode
0:55
So let me stay on this and let me show you this button here for this. this button here from the right. When we tap on this we can manage the flash. For now, this is the
1:03
flash turn it on every time we take a picture. Now when I tap on this I go to the turn it off
1:10
flash and to the auto flash so the camera recognizes when it's in it. So for now let me tap on this
1:17
again and again to turn it off and let me stay on this and now let's move to the
1:23
settings in the left corner at the bottom. When we tap on this we can open the
1:28
advanced camera settings and now let's have a look at this settings bar here
1:33
As you can see here we can change some parameters and these are the general settings, then
1:39
the photo settings and the video settings so we have three options we can manage
1:45
So for now let me stay on the general settings and let's focus at the first option here, GPS
1:52
location info. So this function allow us to save the location of our
1:57
picture with using the GPS location so by using this button as you can see we can
2:04
turn it off and turn it on and also the important information is that to make it
2:09
work correctly when we really want to save the actual location of our picture we
2:13
have to be connected with the internet for example the Wi-Fi and we have to turn
2:17
on the location of this device so remember about these two parameters to make it
2:22
work so for now let me keep turn it on all of these options and Let take a picture Now let go here to the right corner at the bottom When we tap on this we get quick access to the gallery
2:35
So this is our picture. And from here let's go to the right corner
2:41
Check the location. So let's pick this and from here let's pick the details
2:45
And as you can see here we have the location with full address
2:49
So look greetings from Krakow. This is how it works. And let's pick this
2:53
go back to the camera and to the settings in the left corner at the bottom
2:59
And now we focus on the exposure. So we are again in the general settings
3:05
When we tap on this we can add just the light of the picture and by using these buttons we can
3:11
make it more bright as you can see. Now it's darker so when we go up we can make it more
3:20
dark the background has changed it and when we go down, we go down. down here we can make it more bright
3:26
As you can see again the background has changed it so now we have a pretty bright picture
3:33
and when I go to the minus 2 we get this picture more darker so this is how it works
3:42
So let me stay on the zero now and let's move to the color effect
3:49
So when we tap on this we can pick some filter and so we can make our picture with some effect before we take it
3:58
And we can pick the mono for example and also the background is changing now
4:05
Let me show you for example sepia also. So this is how it looks like
4:11
So this is really cool that we have this here. Also the aquas is the blue one
4:16
Let me stay for now on the known. And let's move to the scene mode
4:22
When we tap on this we have also the scene we want photo and as you can see we can pick what we want
4:33
From the night sunset party, portrait, landscape, night portrait, beach snow, steady photo, fireworks, sports and candlelight
4:45
So this is really cool here and it automatically adjust the parameters sorry not this this to the area we have so this is really cool so this is kind of scene detection So let me stay on the auto now
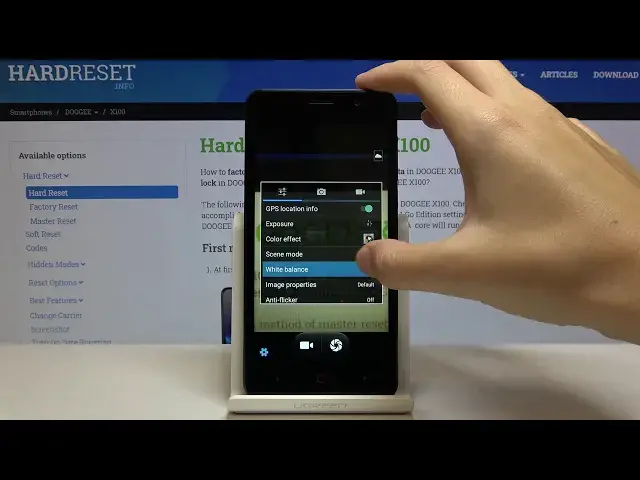
5:04
And let's go to the white balance. So this is also really pro here that we have the control temperature option
5:12
and it depends from the light we have in the area we take the picture
5:18
we can pick the incandestine light and as you can see the background is. see the background is changing to the more blue light
5:24
When I tap on this we can change it to the daylight also
5:28
So this is more normal. We can pick also the fluorescent light
5:35
Then the cloudy light. Twilight shade
5:46
and warm fluorescent. and warm fluorescent so I suggested to make experiments with that and just have a good fun
5:55
and for now let me stay on the auto white balance and let's move to the image properties by tapping on this we get also some
6:04
things we can manage this is also really pro like in the advanced camera
6:10
we can pick the sharpness from low medium to high and also hue saturation brightness and contrast so this is how to
6:18
manage this, this is how to change this so we can create some kind of our own filter by using this
6:29
For now let me keep this on the medium and let's go back again to the settings and let's move now
6:37
to the photo settings. And here I want to show you the self timer. When I tap on this I can
6:44
change the delay of taking picture. We can pick two or ten seconds so let me pick two seconds. So let's
6:48
me pick two seconds to show you how it works and now let me take a photo
6:54
And as you can see the picture was taken with two seconds delay. So this is how it works. For
6:59
now let's keep this turn it off. And once again we can..
7:12
Sorry, I want to show you the capture number but from some for some reasons
7:18
This is turned off maybe because I accidentally turned on the auto scene detection Oh now I turned this off so let focus on the capture number now here we can manage the sound of burst shots so we can make
7:35
many pictures when we tap a little bit longer the shoter we can pick from 40 shots
7:40
or 99 shots so this is a really lot number let me pick 40 shots and let's try to do
7:47
it when I pick this a little bit longer As you can see here I've got the countdown so I can take 40 pictures in a really short time with just one tap
8:01
So this is really cool we have this here in this camera
8:05
And now let's move to the picture size. So again we are in the photo settings and let's pick this
8:11
As you can see here we can change the quality of our photo from the lower to the higher
8:18
And of course I suggested to keep this on the photo. to keep this on the best possible which is 5 megapix here
8:24
And also here we have connected thing, the preview size. So here we can change the ratio of the picture
8:31
We can pick the full screen ratio. As you can see, the background has changed it now
8:36
And the 4 and 3 which was the original one. Here we have also one cool thing
8:43
This is ISO. So this is advanced light managing. So the camera is sensitive, it will..
8:49
sensitivity to light is here and we can pick from 100 of ISO to the 1 and 6 thousands of it
8:57
so this is a really lot and this is kind of pro tip here and promote so this is really cool
9:05
and the last thing here in the photo settings is shooter sounds so by tapping on this we can turn it off
9:10
and also turn it on like that so this is how it works and now let's have a look at the video settings
9:19
As you can see here we can adjust the electronic image stabilization by using this button
9:26
We can turn on and turn off the microphone, so this is how it works
9:31
And we have also access to the video quality. So this is how to change this
9:38
And that's all, thanks for watching, subscribe by our channel and leave the thumbs up
9:49
You know
#Consumer Electronics
#Camera & Photo Equipment