Up next in 10

Learn more info about SONY Xperia 1 II:
https://www.hardreset.info/devices/sony/sony-xperia-1-ii/
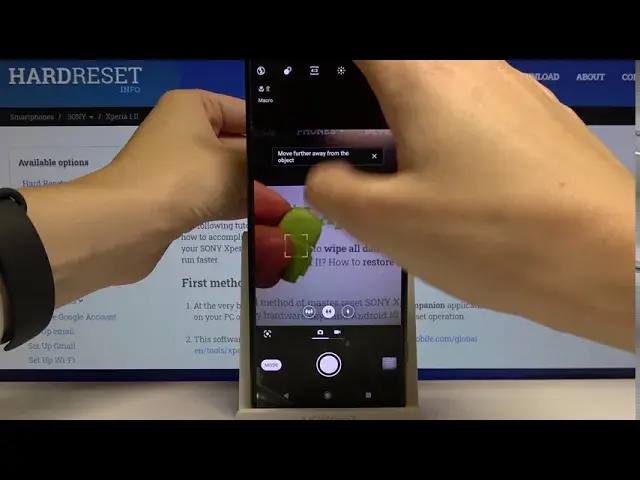
Make the most of your camera, take great photos and shoot amazing videos - feel like a professional photographer. See what the camera in SONY Xperia 1 II hides, how to change the ISO, where are the white balance settings, how to change the resolution, aspect ratio and much more.
How to Use Camera in SONY Xperia 1 II? How to Find the Best Options of Camera in SONY Xperia 1 II? How to make usage of Camera in SONY Xperia 1 II? How to Open Camera Settings in SONY Xperia 1 II? How to Use Tricks for SONY Xperia 1 II?
Follow us on Instagram ► https://www.instagram.com/hardreset.info
Like us on Facebook ► https://www.facebook.com/hardresetinfo/
Tweet us on Twitter ► https://twitter.com/HardResetI
Show More Show Less View Video Transcript
0:00
Welcome here I've got Sunny Experia 1 2 and I'm going to show the top tricks of this camera
0:09
So at first we have to tap on a camera button here to open it and as you can see we are in the standard photo mode so let's see what we've got here
0:17
and let's start with this button here at the left corner at the bottom by tapping on this with modes we get access to all of the modes of this camera
0:26
and we can pick from Photo Pro, Google Lens, Slow Motion, Portrait selfie
0:29
creative effect and panoramic so I suggest you to making experiments with that and just have a fun
0:36
and we can also change by using these two buttons here the photo mode to the video mode so this is
0:42
the quickest way to do it like that by using these two icons and now let's move to these buttons
0:50
here at the app so let's start with this button this is the flash here we can turn on the auto flash
0:58
we can turn on the flesh, feel flash so it's use flash every time we take a picture
1:04
We can also change it to the red eye reduction function here and we can turn it off
1:10
and we get access to the torch also here. So this is how it works
1:15
For now I'm going to keep turning it off. And the next one button here is the blur
1:20
So here we can blur the background of our picture by using this slider
1:24
We can manage this like that. So this is how it works here
1:28
To turn it off we'll just simply tap on this again. Now let's move to the next button here by tapping on this we can change aspect ratio of our picture
1:36
and we can pick from 4 and 3 which is now 16 and 9 which looks like that
1:42
and also 1 which looks like that this is more square ratio here
1:47
So for now I going to stay on the original 4 and 3 ratio and let move to the next button here with the sun icon When we tap on this we get access to these two sliders The first one is the white balance
1:58
So here we can make our picture just more warm by going to the right or more cold by going to the left
2:07
So this is how it works here. Here we can control the temperature of our picture
2:12
And the next one button is the exposure compensation, sorry, button slider
2:16
and we can make our picture just more bright by going to the right or more dark by going to the left
2:23
So this is how it works. And of course to turn it off we just simply tap on this icon again and it's gone
2:29
The next one button here we can change the back camera to the front camera
2:33
So hi, this is how it works. And now we're focus on these buttons here so here we can manage the lenses
2:41
As you can see here we have the lens correction. We can read about it and land
2:46
from this this is the ultra white lens when we tap on the center we get access to the
2:53
to the white lens and the next one here is the matrix lens so this is how it works here
3:02
and now let's have a look how to zoom we can do it by using two fingers like that and we can get
3:07
closer to subject and also go back so this is how it works and now let's go to this button here
3:14
in the right corner when we tap on this we get access to advanced camera settings and as you can see here we have the photo settings and the
3:21
command settings so let's start with photo settings the first one function here is the self
3:26
timer so here we can change the delay of taking picture and we can pick from three seconds and 10
3:32
seconds so for now i'm going to stay on three seconds to show you how it works and let's go back
3:36
to the camera by tapping on this we can take a picture and as we can see the picture was taken with three seconds delay so let let go back to this button in the right corner to turn it off we can also pick the off function here
3:51
The next one button here function is the still image size so here we can also manage the ratio
3:57
and it shows us that this is connected with the quality of the picture
4:01
4 and 3 ratio has 12 megapixels quality and 16 and 1 and 1 ratio has 9 and 9 mega
4:10
quality so this is how it works here and now let's go to this button object
4:15
tracking by tapping on this we can turn on and turn off this function this is
4:20
very interesting so let's go back to the camera and let me show you how it works
4:24
when we want to take a picture and we have the object in move the tracking is the
4:30
best way to do it when we tap on this object it follows us as you can see this is
4:35
how it works And now let's go back here. Also interesting thing here at the last position is the QR code reader
4:48
By tapping on this button we can turn on and turn off this function
4:52
But I suggest you to keep turning it on because this is the quickest way to scan QR codes
4:58
At this device, when we have this turn it on, we don't need any other app to do it
5:03
So this is the simplest way to scan QRs here. And now let's move to the common settings and start with this
5:10
button save location by tapping on this we can turn off and turn on the saving location info
5:16
at our picture so this is how it works and also the important information is that to make it work
5:23
correctly we have to be connected with the internet for example the Wi-Fi and we have to turn on
5:28
the location of this device so remember about these two parameters to make it work and now let move to this function touch capture by tapping on this we can turn it on turn it on only to the front camera and turn it off
5:43
So for now I'm going to keep turning it on to show you how it works. And this is the simplest and quickest way to take a picture
5:50
When we have this function turn it on, we can take a picture by it just want to anywhere on the screen
5:56
So this is how it works here. And let's go back to the static city red corner
6:01
and let's move to this function grid lines so by tapping on this we can turn on and turn off the camera grid lines at this device
6:09
I'm going to keep turning it on and let's go back to the camera so these are these lines
6:14
This is not visible at the picture. This is only help for us to making experiments with composition or use the rule of ferdin photography for example
6:24
So it generates us these lines and of course when we don't need it we can turn it off easily by tapping on this button again
6:31
And as you can see for now it's gone. So this is how it works here
6:37
And let's move to this function. Use volume key as for now it's zoom
6:42
So volume keys are here we can pick from zoom volume and shutter
6:45
For now I'm going to be shorter to show you how it works and let's go back to the camera and try to use this
6:52
And as you can see now we can use the volume buttons here as a camera and just shoot
6:59
So this is how it works. And let's go to the last parameter here
7:05
This is the option with reset settings, so when we turn on all of these settings and want
7:10
to go back to the auto settings, we can use this by tapping on this
7:14
We get the question to reset Kamira's settings to default and okay
7:20
So this is how it works. Thanks for watching, subscribe by our channel and leave the thumbs up
#Consumer Electronics
#Camera & Photo Equipment