0:00
Hello. In today's video, I'll show you
0:03
how to um set up you how to use the best
0:07
video settings for beginners on your um
0:19
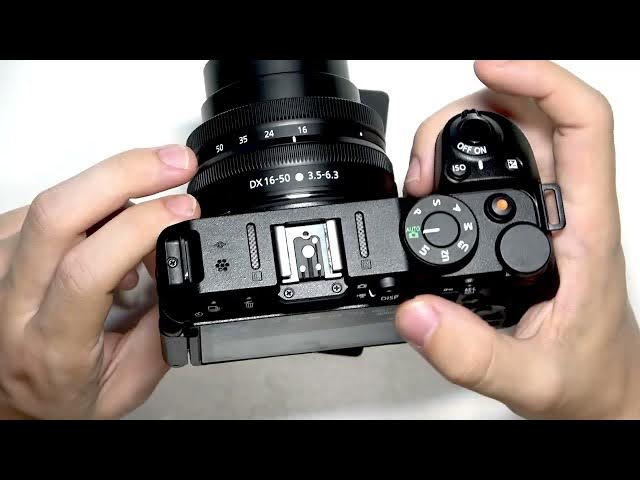
Okay, so I have the camera right here
0:21
and uh let's uh see the modes. First of
0:24
all, the mode dial. It is pretty
0:26
important. The most automatic mode, the
0:29
easiest one is going to be this green
0:31
auto mode. Um, it is great for beginners
0:35
because it doesn't require you to adjust
0:38
anything. I mean, none of the modes do
0:41
besides the manual, but this one is
0:43
actually like you can't really adjust
0:46
anything. you just point and shoot,
0:50
which may be great for beginners because
0:53
you just take photos or videos uh
0:56
depending on what you need and you don't
1:06
like care about anything. So,
1:09
uh now let's talk about the um other
1:12
modes. This is programmed auto. So, it
1:15
basically has almost the same things as
1:18
auto, but when you click on the I
1:21
button, you have a bit more functions.
1:24
Let me show you. In auto mode, some of
1:27
these are grayed out like the white
1:29
balance, the picture control, um,
1:33
metering, and active D lighting. And
1:36
then when you switch to programmed, you
1:38
can adjust active D lighting to low,
1:41
normal, high, or extra high. Um you can
1:45
also adjust metering to matrix center
1:47
weighted or highlight weighted metering.
1:51
Uh so uh the camera knows like how to
1:54
adjust the settings automatically based
1:56
on what to adjust it. Then there's a
1:59
white balance that you can set. You can
2:01
set it to auto, natural light, auto
2:04
direct sunlight, cloudy shade, um
2:08
fluescent flash. You can choose the
2:12
color temperature or use presets. Uh
2:15
I'll leave it on auto for now. And this
2:17
picture control you can set it to auto,
2:20
standard, neutral, vivid, monochrome,
2:24
chromatic, morning, dream, pop,
2:26
whatever. So the filter is basically
2:29
when you set it to standard uh then it's
2:32
basically in standard. Um yeah, so that
2:36
is the mode. Now uh the the other modes
2:39
may also be useful even for beginners.
2:41
Uh the S which is shutter priority auto.
2:45
Uh in that mode you can actually adjust
2:53
so uh yeah that may be useful. Hold on a
2:58
second. Yeah. So in uh shutter priority
3:03
I can't really do anything in video
3:05
mode. So, I would need to flip this
3:07
switch. And now I can simply adjust the
3:12
um shutter. So, as you can see, as I'm
3:15
changing the this dial right here, then
3:19
it adjusts the shutter and then adjusts
3:22
the ISO automatically accordingly and
3:26
the uh aperture. But the shutter is the
3:29
thing that I'm adjusting manually.
3:33
So, that's what you can do. Um basically
3:37
uh then there's a which is aperture
3:40
priority auto and then when I'm uh
3:43
adjusting the switch I'm actually
3:44
adjusting the aperture
3:47
somehow it's not doing anything
3:52
it is absolutely not doing anything. Um
3:56
yeah I don't know why. I'm not sure.
4:01
But as I'm zooming in, it changes the
4:05
aperture and I'm zooming out, it changes
4:07
it. But I can't really change it with
4:13
Okay. But you know what? Uh without me
4:16
um switching this, I can still change
4:19
the aperture by clicking here on this
4:22
button right here and then change my
4:23
aperture like so manually. Uh and then
4:27
it adjusts it of course um it affects uh
4:32
the aperture affects uh the lighting
4:36
uh but it also affects the blur in the
4:39
background. So when you're trying to
4:45
of the aperture will will blur the
4:47
background more like the lower aperture
4:50
will blur the background more. Um but
4:54
then uh some higher settings of the
5:00
affect the lighting. So uh that is
5:03
important to understand uh that yeah it
5:08
of course makes the ISO higher if it's
5:10
in auto mode and makes the make make the
5:14
shutter speed higher as well. Um
5:18
but um so it may loosen the quality
5:23
especially considering the ISO being uh
5:26
higher. The higher the ISO is the lower
5:28
the quality may be. It may become the
5:31
photo may become grainy and stuff like
5:34
that. So you may want to um
5:39
you may want to just uh like avoid that.
5:42
But it's just up to you depending on
5:45
what you actually need. Um, and then
5:47
there's uh manual mode which is for
5:50
professionals. It has all those settings
5:52
that you may not want to adjust if
5:54
you're a beginner. So that may be
5:57
explained in another video on our
5:59
channel. But for now, let's focus on
6:01
these four modes here.
6:04
So this is the first thing that is
6:08
important to know. Now, uh the other
6:11
settings to adjust are like uh quality
6:14
and everything else. So, let's go to the
6:16
menu. By the way, remember that you can
6:19
switch between photo and video modes
6:21
like so. Um because this is pretty
6:24
important to know that if you're trying
6:26
to shoot a photo, you need to be in the
6:28
photo mode, then click on this button to
6:30
take that photo. Uh if you are in video
6:33
mode, then you click on this button to
6:35
start recording. Of course, I'm enabled
6:37
because I don't have a SIM uh SD card
6:41
inserted. To insert an SD card, you
6:44
should do it right here on the bottom.
6:47
Um yeah, right here, right next to the
6:51
Now, uh let's go to the menu and change
6:54
a few things. So, uh since this video is
6:58
about video settings, let's go to video.
7:01
And now, let's change a few things. So
7:03
video file type you can set it to MP3 or
7:06
MOOV. I think MOOV is better but MP4
7:11
I I think I said MP MP3 earlier. MP4 is
7:16
better uh for like compatibility. It's
7:18
available on more devices. Um MP4 may
7:22
not be playable on Windows without like
7:25
a VC player or something like that or
7:28
any other like external third party
7:31
player. So, uh, yeah, but is I think
7:35
superior. It compresses less and it's
7:38
just like better to be honest. Then, um,
7:43
there is, um, video quality. You can set
7:46
it to normal or high. I'd set it to high
7:49
to be honest. Then this is important,
7:51
the frame size and frame rate. So here
7:55
um you have all these different settings
7:58
and um the first one is quality on the
8:01
left side and that is uh this setting
8:04
right here. You can see it at the top.
8:06
This is 4K, so it's the best quality.
8:09
And 4K on this camera lets you set to
8:12
30, 25, or 24 uh frames per second. Um,
8:17
which is okay for movies, but it won't
8:20
let you uh do a slow-mo later. You won't
8:25
be able to slow it down later because it
8:31
not smooth enough. Uh then you have
8:34
1080p and you can set it to 120 frames
8:38
per second, 160, 50, 30, 25, 24. You can
8:45
also do slow motion automatically. So
8:47
once you record it, it's already slow
8:49
motion. And these modes are available in
8:51
1080p. It's 30p* 4. So it'll be like
8:55
times for slow motion, times for slow
8:57
motion for 25p and times 5 slow motion
9:03
Uh so yeah, these are the options here
9:10
depending on what file size you may want
9:13
to achieve because shooting in 4K is
9:16
great because it's great quality, but if
9:18
you don't need the quality, you may want
9:19
to set it to 1080p so it saves storage
9:22
on your SD card. Um so these are the
9:26
settings that are pretty important. Uh
9:29
besides that, I don't think the other
9:31
ones are important for beginners. Um
9:34
they are more like for um for like more
9:39
professionals. Um and that is basically
9:42
it for this video. Uh I hope that this
9:46
video uh was helpful. Don't forget to
9:48
like and subscribe and I'll see you in