0:05
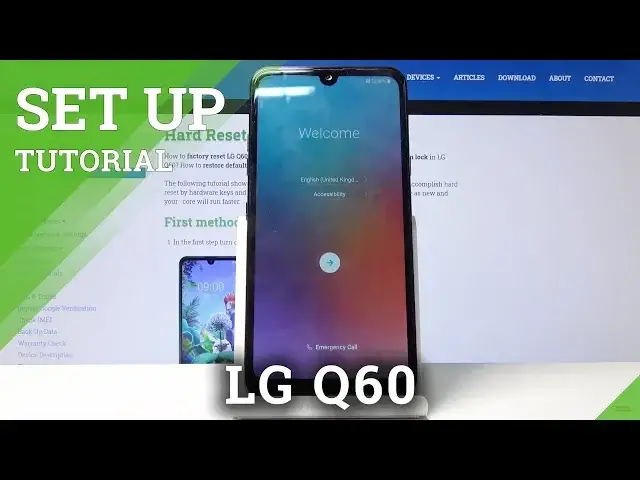
In front of me is an LG Q60 and today I will show you how to go through the setup process of the device
0:11
So, to get started, once you power on the device for the first time, you will be presented with this welcome screen
0:16
So, number one, choose your language by tapping on the language right there
0:21
And you have, well, choice from basically most of the languages I would assume
0:27
Now I'm going to stick with English, considering that's what I use
0:32
And then let's tap on the arrow right here and keep on going with the setup
0:36
So, new second screen. Now you can choose if you want to see the notch or not and you get immediate result on how it differs between
0:46
So, choose which one you want. I'm just going to stay with this, well, I guess teardrop or whatever it's called
0:53
Then you have insert SIM card. Now, this option is basically optional
1:00
You can insert the card right now, 10 seconds later or completely next month and it will literally not change anything
1:08
It will work the same way the moment you insert it. Then you have the connection to Wi-Fi
1:15
I'm going to skip this, considering it's going to start looking for updates and stuff like that, which I want to preserve on time
1:22
But if you choose to enable it later on, you can log in to Google. And without SIM card and Wi-Fi, the only thing that you won't really get is the date and time being set automatically
1:37
The moment you put in either SIM card or connect to Wi-Fi, the time will be set automatically from the web
1:44
Otherwise, you would have to put it on manually. So, I'm going to keep it as it is right now. It doesn't really matter
1:50
Because the moment I would connect to anything, it will be set to correct one
1:55
Then you have Google services. So, from here, I have localizations from Google and a couple of other services
2:01
You can read all of them and, for instance, disable them if you want to. If you don't like Google spying on you and your localization
2:07
Now, keep in mind, later on you can enable that in the notification panel anyway, if you wish to
2:12
So, go accept. Secure your phone. Now, here you can add a fingerprint or a PIN pattern or password, whichever one you choose
2:24
Or both. So, I'm just going to use only this one. And I'm going to stick with pattern as an example
2:33
Screen startup. Now, this, I would say, no thanks. What it does is, when your device turns on, it will request, well, the pattern in my case, to turn on the device fully
2:47
Now, I consider this to be completely redundant. Because you will have to put it before the device powers on
2:53
And then, once it powers on, you still will be on the live screen. So, you have to put it on again
2:58
So, it's just a little bit annoying. And I prefer to have it off
3:03
So, from here, let's draw the pattern that I will use. I'm going to redraw it once more
3:08
And confirm it. No legal document, so I'm in one of these localizations right here
3:19
So, next. Again, more. Agree to all. And more. And done. And you're done with the setup
3:30
So, if you found this video helpful, don't forget to hit like, subscribe, and thanks for watching