0:00
Hello! In front of me I have Garmin EPIX Gen 2 and I'm gonna show you how to
0:11
set up a watch face with the custom image on this device. Before we start
0:16
your watch needs to be paired with your phone via the Garmin Connect application
0:21
Once the devices are paired, you need to download and install the Connect IQ
0:28
Store on your phone. To do it, open the App Store on your phone, tap on the
0:33
search bar, type in Garmin IQ and then tap search. You should see this
0:42
application Connect IQ Store. Select it, tap on the install button to install it
0:49
and wait until the app is done installing. Once the app is done installing, you can tap on open to open it. In the app, tap on
1:11
welcome. You can use your own account that you used to pair the devices via
1:17
the Garmin Connect app. This is the account I am using in the Garmin Connect
1:21
Or you can tap on switch accounts and use the different account. But I'm just
1:25
gonna tap on continue, check the boxes and tap next. And here we have the IQ Store. As you can see. Now, to install or rather set up
1:45
the watch face with the custom image, tap on the face it icon right here. Here tap
1:53
on the plus button and now we can either select camera or gallery. If you select
1:59
the camera, it will redirect you to the camera app. You can take a
2:04
picture with the camera and use it as a watch face. If you select the gallery
2:08
basically you will open the gallery app and you can select the photo from your
2:11
phone. I'm gonna use the second option, so gallery. Allow the permission. And here
2:19
we have the file manager. As you can see, we are in the download folder. We can
2:25
select the picture right here or you can browse through different folders if you
2:29
want to, basically by browsing through the file manager. Find the photo you want
2:34
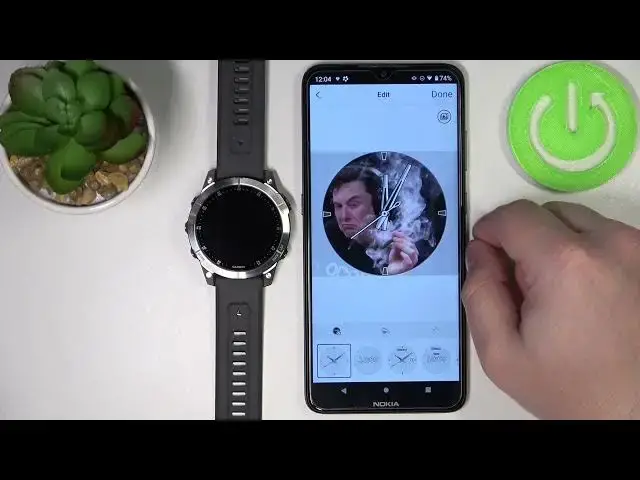
to use, tap on it, select it and here we have the, basically, option to customize
2:40
the watch face. We can zoom in and zoom out the picture, basically. Make it like
2:49
that by pinching and unpinching the fingers. We can move it around
2:53
Basically, we're cropping the image, so whatever is gonna be on this highlighted
2:57
area right here, it's gonna be on the watch face. So let's crop it maybe like
3:01
this. Now we can select the type of the clock right here at the bottom. As you
3:06
can see. Then we can tap on this icon to change the color of the clock. As you can
3:17
see. And then we can tap right here to change the type of hands or type of
3:27
clock. As you can see. And once you're done customizing your watch face, you can tap
3:35
on Done button right here. Name it. And then tap Save. And here we have the
3:49
preview, how it will look. Then tap on Install button. Tap on OK and wait
4:06
And once it's done installing, the watch face will appear on your watch, as you can
4:10
see. And that's how you set up a watch face with the custom image on this
4:15
device. Thank you for watching. If you found this video helpful, please consider
4:20
subscribing to our channel and leaving a like on the video