0:07
This is Realme 7, and today I'll show you how to record a screen on this device
0:13
And it's a fairly simple option, which can be found in your notification panel
0:17
If you extend it, you'll see the toggle right over here. So you can hold it
0:22
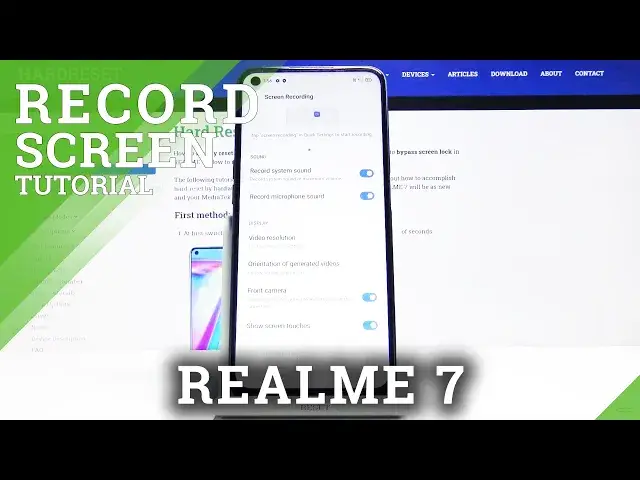
This will take us to the settings where we can customize a couple of settings. So you have record system sounds
0:28
If you want this, you can enable it. You also have record microphone
0:32
Now I will mention that if you're planning to record both of them, I would strongly suggest
0:36
for you to use headphones. Otherwise, you will have an undesirable echo, because the microphone will be also picking
0:43
up the speakers itself. While if you use headphones, the microphone cannot hear the headphones that are in your ear
0:50
So yeah. But the recording will still keep the sound system as well, even though it's in your ear
1:02
It's just going to basically create two different tracks of audio, which do not overlap
1:09
Something that if you use microphone, they will overlap, and that's where you get the
1:13
echo effect. Now below that, we'll have the display, so video resolution
1:19
Here I would suggest you to go for 1080p. This will ensure that you have highest quality video
1:24
You can also go to custom and set it up yourself. So resolution
1:29
Now it looks like the resolution doesn't really change the size right here, which is a little bit weird, considering normal circumstances it should
1:38
But the bitrate does. Now the higher the bitrate you put in, the clearer the image will look
1:44
But as you can see, also going from 8 to 16, you get double the size
1:48
So obviously it is twice as much, so twice as much space it will be taking
1:55
And from testing, that is fairly accurate. For 5 minutes of video, you take about 600 megabytes
2:01
So yeah. Now if you want to record something and you don't actually have space for it, you can
2:09
also just drop it down, like I said, to a lower bitrate
2:14
But like I said, the quality will suffer a little bit. Now in terms of the bitrate, the quality will be only seen in objects that are moving
2:21
So anything that you will be moving on your screen will have this weird artifact effect
2:27
But the moment it's stationary as it is right now, it will look clear. It will basically have a 1080p resolution that is fairly clear
2:35
So yeah. And from there, once that's set, you also have front camera
2:39
So if you want a camera, you can enable it. If you don't, keep it off. I'm going to just enable it for demonstration purposes
2:47
And from here, show touches. So this will basically show a grey dot, semi-transparent, wherever you press your finger to the display
2:58
But you can select it on or off. Again, however you like
3:02
And once you leave this, after you set it up, simply tap on the toggle. Agree. Allow. Allow. Allow. Allow
3:13
And you will have this toggle appear right over here. So it gives you a brief guide on it
3:19
So obviously the red button for recording. The middle one is the settings that you can also access by simply holding the toggle
3:27
And then close to basically close it. So from there, let's tap on record
3:33
And as you can see, there I am. You can move that around and also you can see that grey dot following my finger
3:40
So that is that. And whatever you do, now it will be recorded
3:45
As you can see, now it looks like the notification panel goes over the camera
3:51
So that's one thing. But yeah, once you're done with recording, simply click right over here to expand the
3:57
toggle and close it off. And your video will be automatically saved to your gallery
4:03
So let's open that up. And there is the recording. Now I'm going to also mute it so I don't actually hear myself
4:21
But clearly you can see that it is a recording which I have just created
4:28
And that is how you would record your screen. So if you found this video helpful, don't forget to hit like, subscribe and thanks for watching