0:07
Infronomy is a Hawaii Shai How we pronounce this name right here, iPadX
0:18
and today I will show you how we can bypass the Google verification on this tablet
0:23
Now you can see that the one that I have right in front of me is unlocked using a pattern
0:27
And I can also unlock it using the Google account if I click right there
0:31
As you can see, there we go. Verify your account. And lastly, you can also see this tiny little icon right here that obviously signifies
0:38
the device is locked. So anyway, to get started with the bypass, you want the number one connect to some kind of network
0:46
I have already done so, as you can see, based on a tiny little icon next to the battery
0:50
If I back out, you will be able to see it right here that I'm connected
0:55
So once you connect to your Wi-Fi, go back to the first. page and from here you will want to select the emergency call emergency
1:02
information top on the edit icon right here and select add contact top on a
1:09
search bar and this will bring up right here your keyboard and you want to
1:14
click on this microphone that is part of the keyboard now it should show you
1:19
this kind of little here a page allow a keyboard to record audio you want to
1:26
select deny now before I progress any further I'll mention that there is a
1:33
chance that this does not show up and it will automatically start listening to
1:37
you without giving you this pop if that is the case for you go back again to the setup page and start over The second time around when you get back here it should give you that pop So again
1:50
we're going to do that once more, tap on a little icon right there, and then we're going to select
1:54
deny and don't ask again. And then we're going to press on it again and select allow here
2:02
As you can see, this opens up an app info page right here, so what we want to do is
2:09
is, type on permissions, and you want to click on the search, and you will type in settings
2:22
You can search. You want to scroll all the way down and you will find just as settings, just simple settings
2:36
as you can see there are settings storage and so on. Looking for this one right here
2:41
Once you click on it, you'll select Open. This will take us to the settings
2:47
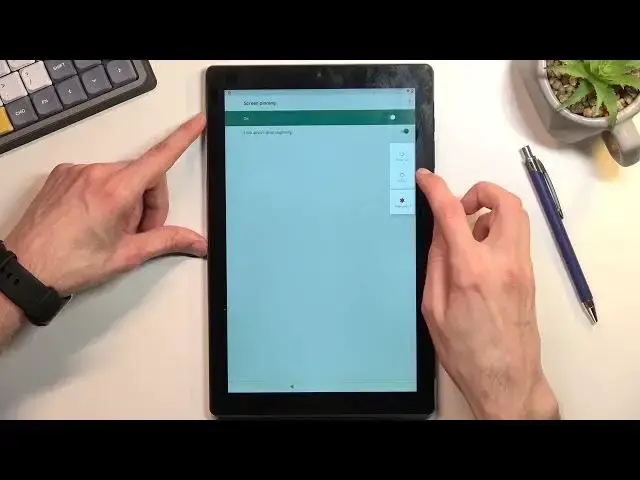
From here, you want to navigate to security right here, screen pinning
2:58
enable it, and also enable lock device when unpinning. Now, if you recall
3:04
and if you don't, you can go back to the beginning of the video. My way of verifying the previously used protection was through a pattern
3:14
So I could use a pattern to verify it. Right now I'll set up something completely different just to..
3:19
Just so it differs so you can see the difference. So I going to select pin Now I do also recommend you to choose the same thing as I do It will make it a little bit easier when I going through and putting my pin in You can put the same exact pin
3:34
So I'm going to select pin. I'm going to make it one, two, three, four
3:40
There you go. Select next. Repeat it. Confirm. Now from here, we can now hold a par key
3:53
once we have enabled that and we're going to select restart. This will reboot the device
4:01
and once it's backup, we can then progress through the setup and you will notice that verification will now give us an option
4:09
to verify it instead of a pattern using a pin. so we're just going to put that pin that we have literally set up now to explain what has happened
4:20
as once you set up that pin the device can only keep one at a time one pattern pin or password so
4:27
basically only one unlocking method and once you set up a screen pinning it forces you to set one up
4:34
because there is no pin set up but once you add it it replaces the old one so right now the device
4:41
put it back up we'll need to unlock it so again one two three four and we can
4:49
progress through the setup and as you can see verify pen so again one two three
5:07
four And there we go Now we can now finish up the setup
5:18
and I believe the device is unlocked though just to be certain
5:24
I would recommend performing a factory reset off the tablet through settings
5:29
This will ensure that all the old stuff that might have been kept on this device
5:34
will be removed. So to do so, you just simply navigate into your settings application, navigate to the system, advanced, and then reset options
5:45
and you will select erase all data factor reset. This is just as a last kind of step
5:51
which I recommend doing. You don't have anything on here, so doing this is just a kind of like
5:58
a additional step just to make sure that everything is fully unlocked to remove any kind of
6:06
potential problems in the future. But like I said, I think the device is unlocked
6:13
though I still recommend going through this process right here, just to kind of make absolutely sure that everything is unlocked
6:24
Obviously, this will go to the fact of reset, which takes a couple minutes, and then you will be back in the setup screen
6:29
at which point you will be able to set up your device however you like. It will be fully unlocked at that point
6:34
So, anyway, that being said, this is how we could bypass the Google verification on this tablet
6:41
And if you found this very helpful, don't forget to head like, subscribe, and just thanks for watching