0:00
Welcome here I've got Sony Xpira 1 3 and I'm going to show you how to use Programme Auto mode in the camera app at this device
0:14
So let's start by tapping on the camera button to open it. And for now as you can see in the left corner we are in basic settings, basic mode so let's change it to P from Program Auto
0:25
Now we get access to info from the device that the camera will control
0:30
shutter speed automatically with other settings being left up to you. So in this mode we have half manual settings we can adjust them in this panel from the right
0:40
and the camera should give us the best possible shooter speed automatically
0:46
Let's start with the first one option, the exposure compensation so we can manage the light
0:51
of our picture. By going to the right we can make it more bright, by going to the left we can make it more dark
0:57
At the center we have zero parameters. so there's no problem to go back to auto settings
1:03
Here we have a F on button so we can check where is our focusing
1:08
We have also a AEL button so when we tap on the shutter a little bit longer but half on it
1:16
we can measure the focus and the exposure compensation and change the frame
1:21
for example like that by saving these settings and blocking them kind of
1:27
Now let's turn this off and focus on it. the settings bar the first one option we can add just here is the drive mode so for now we are on
1:35
single shooting which means that when we tap on the shutter we can take only one picture we can
1:41
pick also continuous shooting with high speed so now we get access to bar shot and when we tap
1:48
on the shutter a little bit longer as you can see we can take the series of pictures in a really
1:53
fast way and the same thing happens with continuous shooting but with low speed
2:00
Now we can make it just slower And let move here to self timer We can pick it with 10 seconds or 3 seconds So when we turn it on we can delay taking off picture
2:15
And now let's stay on single shooting. For example, when we tap to the second button
2:20
we can adjust focus mode between single shot, autofocus, continuous shot autofocus
2:26
or we can pick the manual focusing. So for now we get access to the slider
2:30
and we can adjust our focusing like that. Now let's stay on, for example continuous autofocus and move to the next one option
2:38
Here we can pick also the focusing area between white and the center
2:44
The next one button here is, as you can see, we don't access to it on this panel
2:50
but this is the explorer compensation sign so we can manage this here
2:55
And let's move to ESO, we can adjust here camera sensitivity to light
3:00
We are on auto or we can pick between 64 so make it less sensitive or go to the right to more sensitivity
3:08
The highest here is 3 and 2,000. So this is really wide spectrum and white choice
3:14
Now let's move to the next one option. Here we can pick also the metering mode between multi, center and the spot
3:24
And here also the next one option is the flash mode. So the auto is locked because here we can adjust it manually and also the important thing is that we can adjust the exposure manually so the light
3:42
So we can pick only the fill flash, red eye reduction, turn it off and pick the torch so the feel light
3:51
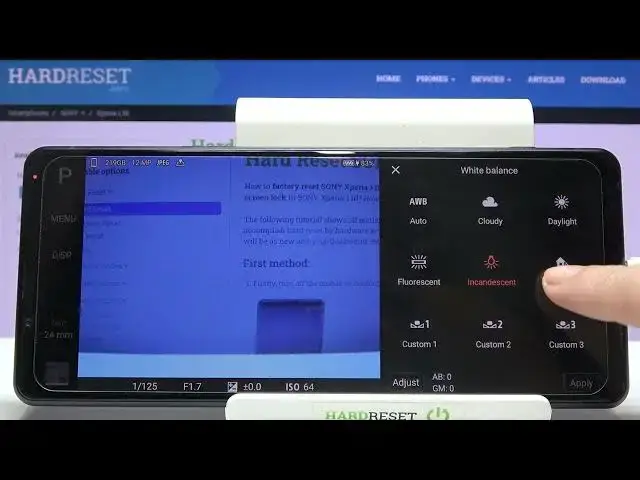
And now let me keep this turn it off and move to the next one option the white balance
3:57
Here we have also really cool settings. because the white balance allows us to control the temperature of our picture the balance between warm and cold tones of our photo So we can pick red lights we have in the area between cloudy daylight fluorescent incandestined and the shade
4:17
Or we can adjust our own custom white balances here and apply it
4:24
Or we can pick also here to adjust and we have really professional panel to do it
4:31
Or we can reset this or stay like that. and save it
4:38
Now let's stay on auto weight balance and move to the next one option
4:43
Here we can turn on and off, the face and eye autofocus
4:48
So when we need to take, for example, the portrait, this option turn it on should recognize the faces and the eyes
4:57
and automatically just focusing to them. Now let's move to the next one option
5:02
Here we can pick the file format. And this is also really professional here because we have the JPEC tree
5:10
So standard photo. We can pick RAF plus JPEC or only the RAF
5:16
So the RAP format is used by professional photographers to saving more details at the pictures
5:21
and post-producting them in graphic programs. But for now to this needs that stay on JPEC
5:29
And move to the next one option, the aspect ratio. Here we can pick camera frame between 4 and 3, 16 and 9
5:35
one and one and three and two so this is kind of picture size and the last one option
5:43
here on this settings bar is the tones of our photo like contrast so we have the range
5:52
optimizer which is helpful when we want to take continuous shot and adjust
5:57
better contrast and bright of our picture we have HDR so it is a useful
6:05
when we want to adjust the parts of our pictures that are in dark or in light better or we can just turn them off as we need Here we have also the lock button so when we adjust the settings we can lock them and save them like that or unlock
6:25
And now let's move to the left side. I want to show that when we tap on this we get access to some more information at the panel
6:37
So we can see how many space we have, how much megapixels have our camera, what is the format
6:47
So this is the quick access to these information that are adjusted here
6:51
We can also see the histogram and the leveler. The leveler is useful when we want to keep our device steady when we need to take straight pictures
7:02
As you can see when we have green line, we can see that we hold it
7:07
steady. And here when we tap on it, we can turn it off and move to lens
7:15
So here we can pick between four lenses. Maybe let me show you them also like that
7:21
This is how this device looks from the back. And this is how to manage them
7:30
We can also tap here to get access to this panel and more advanced use zoom in
7:37
of these lenses so this is really professional and cool thing here and also when we tap
7:45
to many we get access to more options we can pick shooting exposure color focus or
7:51
just set up and most of them are also like in this quick view so you maybe I'm
7:59
not going to focusing on all of that but good to know that we have it here and
8:04
that's all this is how to use this program Auto mode, thanks for watching subscriber channel and leave the thumbs up