Up next in 10

Learn more info about SONY Xperia 1 II:
https://www.hardreset.info/devices/sony/sony-xperia-1-ii/
If you feel that the basic functions of the SONY Xperia 1 II camera are insufficient, discover the Pro Mode. Watch this tutorial carefully and you will learn how to use each of the options this professional mode offers. Discover how to take great quality photos with a SONY camera. If you want to know even more camera functions on SONY devices, visit our YouTube channel.
How to Use Camera Pro Mode in SONY Xperia 1 II? How to Open Camera Pro Mode in SONY Xperia 1 II? How to Use Camera in SONY Xperia 1 II? How to Enter Camera Settings in SONY Xperia 1 II? How to Take Photos in SONY Xperia 1 II?
Follow us on Instagram ► https://www.instagram.com/hardreset.info
Like us on Facebook ► https://www.facebook.com/hardresetinfo/
Tweet us on Twitter ► https://twitter.com/HardResetI
Show More Show Less View Video Transcript
0:00
Welcome, here you have Sony Xpira 1.2 and I'm going to show you the camera promoted this device
0:10
So at first we have to open the camera app and we can do it by two ways
0:14
The first way is the easiest one because the Sony device gives a separate app only to the photo promote
0:20
So by tapping on this button we get quick access to it and can start photographing here
0:25
So this is the easiest way. We can also do it by using this type
0:29
the standard camera app so by tapping on this button here we open the standard camera mode
0:35
and we have to change it by using this button in the left corner at the bottom
0:39
As you can see we have access here to all of the modes of this camera and the photo pro mode is
0:44
at the first position so when we tap on this we can open it so this is the same result as in the first
0:51
way it's just more complicated way. And also the important information is that the photo pro mode works here only in horizontal level
0:59
So let me change the settings of my camera to show you the better view
1:06
So here we are with Sony Xpire 1-2 in the camera pro mode
1:10
And as you can see we have different settings here to manage
1:14
And in the left corner here we can change the modes from the Auto to P or S, Om or M
1:21
So for now I'm going to stay on Auto. This is some kind of basic mode
1:26
And as you can see here we have quick access. Here we have quick access to some of the settings and let's show you how it works
1:33
The first one button here is the drive mode. So here we can pick the single shooting, continuous shooting or the self-timer
1:41
So for now I'm going to pick for example continuous shooting. And as you can see to take a picture we don't have any other button on the screen
1:50
So this only gives us the only button which is here only to take a photo
1:55
So I think this is really cool as in the real camera. And by tapping on this for now, we can take a series of photo
2:01
And as you can see, this is how it works. Of course we can change it, for example, to the self-timer with three seconds
2:08
So here we can change the delay of taking picture. And now when I take a picture, it takes it with three seconds delay
2:15
So this is how it works here. So for now I'm going to stay on single shooting
2:20
And let's go to the next button here. This is the focus mode. So here we can pick the single shot autofocus and continuous autofocus
2:27
Because we are in auto settings here as you can see the manual focus for now is locked
2:32
So this should be unlocked in other modes here so let's stay on continuous autofocus for now
2:39
And now let's move to the next button here we can pick focus area from white to the center
2:45
So this is how it changes here and now let's go to this button this is the flash here
2:51
So we can also as in standard camera modes pick auto flash
2:55
the fill flash so we can The flash is available every time we take a picture
3:00
Red eye reduction function so the soft flash we can pick the torch as you can see here and we can turn it off like that So this is how it works And the last one button which is unlocked here in the auto settings is face detection
3:17
So here we can manage this and we can turn it off and turn it on like that
3:22
So these are the standard auto settings, basic settings here. And now let's change them out
3:28
We can do it by using this button in the left corner and let's go
3:32
Let's go to the P mode here. So this is the program auto
3:38
Here we can change the light of our picture. We can add just the basic one exposure compensation
3:44
So by going to the right we can make our picture just more bright or more dark as we need
3:50
So this is how it works here and this is connected with the ISO
3:54
So ISO helps us to control the camera's sensitive to light and as you can see we can manage this we can pick from 65
4:02
for ESO and let's go to the end to the 3,200s of ESO
4:08
So this is the pretty wide spectrum here and this is how it changes here
4:14
Here as you can see by tapping on this button with autofocusing we get access to manual focus
4:21
So for now let's move from continuous autofocus to manual focus and as you can see we get access to this slider and we can change the focusing like that
4:30
So this is how it works. And let's stay on this. And also as you can see, some of functions are locked or unlocked here
4:40
For example, this is here, but we don't have here the time of taking pictures
4:48
So the shooter speed is locked here. As you can see, it is just automatically clear to settings we adjust manually
4:59
So this is how it works here. Here we have also access to this button
5:04
This is the metering mode. We can pick the multi-mattering, centre matering and also spot mattering
5:11
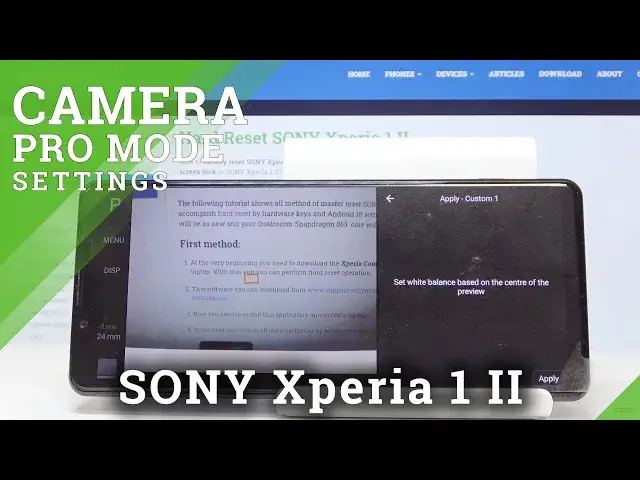
And now let's go to this button here. By tapping on this we get access also to white balance which is not available in standard auto settings
5:19
So here we can manage this. We can be cloudy daylight, fluorescent light, incandestine light, shade and we can add our own custom watermarks with
5:31
when we want to apply this we have to set white balance based on the center of the preview
5:37
so we have to set the white card place here to adjust it and apply done so this is how it works
5:47
here for now I'm going to stay on auto white balance and now let's go to the next
5:55
mode by tapping again on this button in the left corner here to the S so a
6:01
The S, the basic in the S is shooter speed. As you can see, here it is, we can change the time of taking picture
6:08
And let go to the beginning of the slider It one and a thousands of seconds So this is very short here This is short time of taking pictures And when we go to the end here we can take in pictures maximum 30 seconds
6:26
So this is very long. This gives us a lot of spectrum and possibilities to do with that
6:34
So this is the parameter which I can change in as, as a mode, so this is the shooter speed priority
6:43
We can also adjust here the exposure compensation. And let's focus on this
6:48
The ISO here, so the camera sensitive to light is locked. So here this is half automatically mode like then in program auto
7:01
So in P we can add just the light, so exposure compensation and ESO
7:07
And in S we can add just the shooter speed and exposure compensation and ISO is locked. So I remember about it to work with this correctly
7:19
And let's go to the last one mode here. This is the manual mode, so manual exposure. And here we can adjust all of these settings like that. So this is how it works. We have the shooter speed. We have the ISO also
7:39
add these two parameters at the same time not to auto the exposure compensation is locked so
7:46
remember about this this is not so pro as in the standard camera sorry in professional camera
7:54
not in the phone camera so here we can also add just other of these settings like that
8:01
white balance for example so this is available in all of these settings we can also
8:09
So when we adjust the settings we can also lock them like that so no one is and nothing can disturb us when we have locked this
8:19
So this is how it works. Also the important information that is available in all of the modes is that we can change here in the left corner at the bottom the lens
8:32
So here we can manage the lenses of this camera. We can pick from 16mm lens, 24mm
8:39
and 70 millimeters less. And by tapping on this we can also just get access to the zoom
8:46
So this is really cool and this is available in all of these modes here as you can see
8:53
So this is how it works. And also we have access here when we tap on the DSP here
9:03
we get access to the camera leveler. So this is helpful when you want to keep up
9:08
when you want to keep our photographic topic straight and this is how it works here
9:13
And of course to turn it off we go again to the Disp here and it gone now And let move to the menu here Here we can also add just some settings that were in the quick preview here And so this is the quick access to some of settings
9:31
And in the menu we can also adjust it and some more
9:35
For example, the aspect ratio is here the newest. This is not in the quick settings here
9:42
So here we can change the ratio of our picture. As you can see, we can pick from foreign
9:47
3, 16 and 9, 1 and 3 and 2. So this is also connected with the quality with megapixels as you can see
9:55
So for example 1 and 1 is the square ratio here. So this is how it looks like
10:02
So these are the shooting parameters. The drive mode was in the quick settings
10:06
As you can see here also we can pick continuous shooting and self-timer and single shooting
10:12
We can also change here the settings to exposure and color. And also here we have as in the quick access metering mode, we can pick flash mode, we can add
10:24
HDR mode, so improve our brightest and darkest areas of our picture, and also here we have
10:30
access to soft skin effect which is helpful when we're taking a portrait. And let's go to the
10:36
focusing here. We can also pick the focusing mode. As you can see, we can pick single shot
10:42
continuous and manual focus. So this is also available in this quick
10:46
settings. We can pick also focusing area so this is also in quick settings and face
10:53
detection and also let's move to the setup. These are the more advanced settings
10:58
They are also available, most of them are also available in the standard camera. We can
11:05
pick touch to add just focus and brightness or auto focus. Grid lines so grid lines
11:10
looks like that when it's turned on we have these lines. This is helpful for example
11:15
when we want to use the rule of ferdin photography and making experiments with that
11:20
So this is not visible at the picture when we take the picture
11:26
As you can see and go to the preview. It's not visible here. This is only help for us to making better pictures here
11:35
And let's go again to this setup. Here we can also calibrate our lens so we can fix the aviations of our lens
11:45
And also here we can pick where our photos are saved in internal or external storage
11:54
We can also pick here save location info, so when you want to save the place where we take a picture, we have to turn it on
12:02
And this is how it works. At the last position we have the reset settings here, so when we turn on all of these settings and want to go back to the auto, we just simply tap on this and okay
12:14
okay. So this is how it works here. Thanks for watching, subscribe by our channel and leave their thumbs up
#Camera & Photo Equipment