0:00
Welcome! Here I've got
0:07
Xiaomi Black Shark 3 and I'm going to show you the camera pro mode at this device
0:12
So at first we have to tap on a camera button here to open it
0:16
And as you can see for now we are in the standard photo mode so we have to change it to the Pro
0:21
and we can do it by using this setting to the bar and just simply slide to the right to the end
0:27
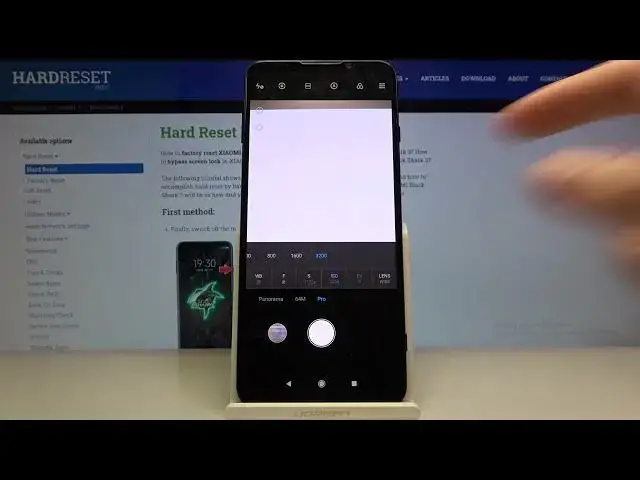
And as you can see this is the Pro mode. This gives us possibilities to choose shooting parameters by ourselves and this is useful when we want to learn photographic skills and making experiments
0:39
So let me start with this settings bar here. The first one button here is the white balance, so here we can control the temperature of our picture and we can pick the tungsten light, daylight, white fluorescent light and the cloudy light
0:55
And the last one button here is the slider. with the numbers, these are the calving degrees and we can adjust here the white balance manually
1:06
and we can make our picture just more cold or more warm as we need
1:12
So this is how it works here. And now let's move to the next button
1:16
This is the focusing here we can change the auto focus to the manual focus and we can do it
1:21
by using this slider like that So this is how it works The next one button here I want to show you is the shooter speed so here we can change the time of taking picture
1:32
And as you can see we can pick from one and one thousandths of seconds which is very short to the 32 seconds which is very long
1:41
So this is the pretty wide spectrum and it gives lot of possibilities to making experiments
1:47
And now let's go to the next button. This is the ISO. So here we can control the camera
1:52
camera sensitivity to light and we can pick from 100 of ESO to the 3,200 so this is also the
1:59
pretty wide spectrum here and this is how it works and now let's move to the next button this is more
2:06
difficult here this is the exposure compensation so here we can also control the light of our picture
2:12
but as you can see for now it's locked because we've turned on the ISO and shooter speed manually
2:18
So one of these two parameters should be on auto to unlock this and as you can see now
2:26
I'm on the shooter speed on auto and I have access to the exposure compensation and
2:32
when I turn on it on manually the exposure compensation is locked
2:38
I can change it to the ISO and go here to the auto ISO and also it gets unlocked so this is important here
2:46
and here as you as I said it shows us the light of our picture and we can make it just more bright or more dark as we need So this is how it works here And the last one button here is the lens So here we can pick between ultra white lens which looks like that to the white lens
3:04
So this is how it works here. And now let's move to these settings in the upper here
3:12
And we start with this button here. This is the mattering. We can pick center weighted mattering, frame average
3:19
maturing and this pot mattering so this is how it works here with this button we also get
3:26
access to the best possible quality of this camera which is 256 megapixels so this is the shortest
3:34
way to click on this and get access to it and now let's move to this button here with the a letter
3:40
these two things are interesting and not popular in all of the smartphones so this is the
3:46
invention of Xiaomi. The first one is the focus picking which is very useful when we
3:52
want to see what area is focused and this is useful when we have the focusing on
3:58
manual so this is how it works here and the other one here is the exposure
4:07
verification so here we can control the light of our picture and when I go to
4:13
the exposure compensation and get too much light As you can see it shows us these lines and this is the area when it too light of our picture And also it shows us these blue lines where it too dark when it too dark on the picture
4:31
So this is how it works here. And when we turn on all of these settings, we may want to go back to the auto settings
4:40
We can do it by tapping on this button here. So this is the shortest way to reset all parameters today
4:47
values. Also the other interesting thing is that when we tap on the screen we get access
4:53
to this ring and this is the focusing. This with a yellow ring is the exposure
5:01
compensation so we can separate this and we can we can separately adjust the focusing
5:07
and exposure compensation. So this is also very useful here and this is how it works
5:11
And now I'm going to take a picture. And that's all thanks for watching subscribe by our channel and leave their thumbs up