0:07
Infronomy is a Xiaomi Me11 Ultra and today I will show you how to record screen on this phone
0:13
So to get started you want to pull down your notification panel, expand it, and look for the screen recorder which for me is right over here as you can see
0:21
Once you find it you can tap on it to immediately start recording or you can hold it and this will take you to the settings where you can actually customize how it will
0:29
record that video with what qualities and so on. So number one we have resolution
0:34
which is set to 1440p. That's a little bit odd of a resolution considering we
0:41
don't actually have a 1080p but I guess it's fine. I would probably advise to
0:47
keep it at 1440p instead of the 720 it will just give you a much better image
0:54
quality in general over the 720. So if you're watching this on a bigger screen like a
0:59
as an example your computer screen. For the majority of the people, you're probably using a
1:06
1080p display, so any higher resolution will be lost, but 720 is lower, so that will be seen on a
1:13
1080p display, the visual degradation. It will look a little bit worse. So that's why I recommend you to go with the higher one, because
1:21
even if someone can't use the higher resolution, they will still have
1:26
maximum that they can use making the image look as crisp as it possibly can on their end Then below that we have video quality So in here we have just megabits per second
1:37
At 1440p 16 might be a little bit low, so I'll probably recommend you to set it up to be either 24 or 32
1:44
Anything above that, I don't really see myself much of a difference
1:49
though I haven't ever really looked like super in depth into it. But I'll be sticking just 24 in here
1:56
Orientation, I would recommend you to keep it as it is. I will define the orientation based on however you're holding the device, which auto, in my opinion, is a little bit better
2:05
Sound source, we have two different options. We have mute, mic, or system sound
2:12
So in theory you have either don't use anything or use mic or the system sound
2:17
which I'll be sticking with just the system sound, which will record the sounds that device is making
2:21
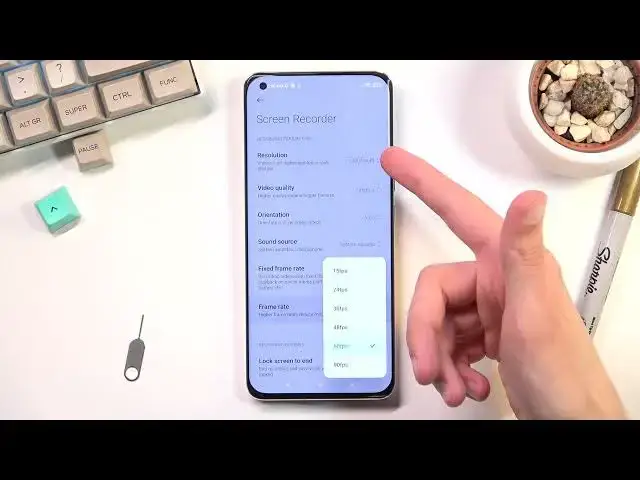
Fixed frame rate just copped the frame rate at a specific, frame rate instead of like if you turn it off it will it can vary so it could
2:31
basically go from 10 to 30 to 120 and then back to 10 or something like that so I
2:38
prefer to lock it and then set up a frame rate of 60 which I consider to be the
2:43
best option the reason why I recommend you to go for 60 instead of anything
2:48
else is because 60 will give you the smooth as possible like visual fidelity
2:54
to it and as an example if you planning to upload this to YouTube just as a example YouTube supports 60 and basically any kind of device and the monitor out there supports 60 frames so it will be utilizing the full potential of everybody phones and screens
3:13
while 90 will not which for kind of kind of goes over the problem that I'm compared to here
3:23
that the resolution is a better option frame rate majority of the people that will be probably
3:27
watching this will most likely view it on 60 frames and it is not worth it but to go to 90 because the video recording will take
3:37
more space on your phone so as an example if a single minute at 60 frames was taking 10
3:43
gigs now at 90 Hertz it will be taking like 13 gigs or something like that this is a super
3:50
exaggerated number but it should be somewhere close to it so yeah just keep that in mind it will
3:58
be basically higher in terms of how much space it will take
4:06
Now going to the rest of the options, we have just a couple different toggles. Luxcreen to end the recording, we have show touch gestures, so whenever I touch the display
4:13
it will show a little indication where I'm touching it. Visualize navigation buttons, just show prompts when home menu and a back button are pressed
4:24
and that's about all the settings we have. So primarily the things that I have right here that I changed to suit recording that I want to have 60 frames 24 megabits and 1440p Once you went through all of those which took me kind of a long time to go over
4:43
we can now jump to recording. So top on a toggle, and it automatically starts recording
4:48
It doesn't even do any countdown. It just straight jumps to it. So whatever you will do right now
4:53
will be recorded. If you try to open some kind of applications, they will be recorded as well
4:59
though not every application will. And once you done, you can tap on the square right here to stop the recording
5:06
There we go. And you can also tap on it again and it will bring it out
5:12
As you can see, we can again start recording. We can view the recordings right here by tapping on this folder and navigate to the settings
5:19
which we already did. So I'm going to tap on the second one to view the recordings, which are located in the gallery
5:25
And I'm also going to close this. So there is the screen recording
5:29
I can tap on it to start. playing it and I'm just going to let it run
5:44
So there we go, there is our recording and it's basically everything that you need to know
5:49
about recording here. So if you found this very helpful, don't forget to hit like, subscribe and thanks for watching