0:27
to the settings after the watch has been already set up
0:30
because you can set up the watch without connecting it to a phone
0:35
First I'm going to show you how to do it through the setup process and then I'm going to show you how to do it through the settings
0:41
OK, let's continue. So the first thing you will need to do
0:46
with your watch, you will need to turn it on and you can turn it on by pressing and holding the upper button
0:52
until you see the Garmin logo on the screen. Zobaczcie, że w tym odcinku jest nowe, czy nowe jest nowe, czy nowe jest nowe, czy nowe jest nowe, czy nowe jest nowe, czy nowe jest nowe, czy nowe jest nowe
1:05
Once you see this message, tap on the screen to continue. And this will bring you to the list of languages
1:13
Here you can scroll through the list by swiping on the screen
1:17
Find the language you would like to use on your watch. Once you find it, tap on it to select it
1:21
And as you can see, now we're being asked if you want to pair the watch with a phone
1:25
We want to do it, so tap on the check mark and the watch will enter the pairing mode
1:31
Now we need to download and install the Garmin Connect application on our phone
1:36
You can do it by scanning the QR code with your phone or simply by opening the Google Play Store and downloading it from there
1:46
I'm going to use the Google Play Store, so let's make sure you have the internet connection and Bluetooth enabled
1:50
on the phone you want to use to pair the devices. Then open the Play Store, tap on Search and type in Garmin Connect
2:26
If you don't have any account, you can tap on create account right here
2:30
I already have one, so I'm going to tap on sign in and enter the email address and password
2:35
But first we need to check the box right here and then tap next. the app will start looking for the nearby devices
3:09
And if it... Oh, never mind. First we need to allow the permission
3:14
So tap on Allow Access and tap on Allow. And after you allow the permission
3:19
the app will look for the nearby devices and it should detect your Vivo Active 5
3:24
If it doesn't, you can always press the lower button, go back and then tap on the jack mark
3:30
to re-enter the pairing mode. And after that, the app should detect your watch
3:35
Once it does, tap on Connected. Tab on allow. Tab on pair
3:47
Next. Here we can set up the sleeping schedule. This is useful if you want to use
3:54
Do not disturb mode during sleep. So basically if you don't want to get disturbed
3:59
by the notifications and stuff like that. If you want to edit the schedule
4:31
Także tak, czy to. Tak, czy to. If you want to edit the goals, tap on edit
4:39
And here enter the values you want to have for your goals
4:46
And once you're done, tap on next. Now we can allow the notification access
4:51
This is useful if you want to receive the notifications from your phone on your watch
4:55
If you don't care, you can tap on skip and keep it disabled. If you want to allow them, tap on allow notification access and tap on allow
5:01
Next we have permission for the location. And this is useful if you want to track your activities on the map
5:12
Something like running, cycling and stuff like that. If you want to use it, allow the permission
5:17
If you don't care, you can tap on skip and skip it. If you want to allow the permission, it will redirect you here
5:25
Tap on permissions. Find the location tap on it and allow it by tapping on allow all the time or allow while using the app Then go back to the app
5:39
Next we have calendar access. This is useful if you want to track the calendar events
5:44
and stuff like that on your watch. If you don't care, you can tap on skip and keep it disabled
5:52
Next we have call log access. This is useful for the notifications about calls and stuff like that
5:59
If you want to use the notifications or see the call logs and stuff like that on your watch
6:05
allow the permission. If you don't care, you can tap on skip and keep it disabled
6:10
Phone call access again. This is useful for the notifications. Allow or deny it. Messages. Notifications for the messages. Allow or deny it
6:23
I once you're done with the permissions, you will see the sync now button. Tap on it. It's going to sync your watch with my phone
6:30
Then tap on finish. And here you can go through the tutorial on how to use the watch
6:36
I'm going to tap on skip, but if you want to go through it, tap on next. Now we can add a Wi-Fi network to our watch
6:45
To do it, tap on add network. It will redirect you to the page with the Wi-Fi networks
6:51
and you can select one and add it. If you don't care, you can tap on Setup Wi-Fi later
6:55
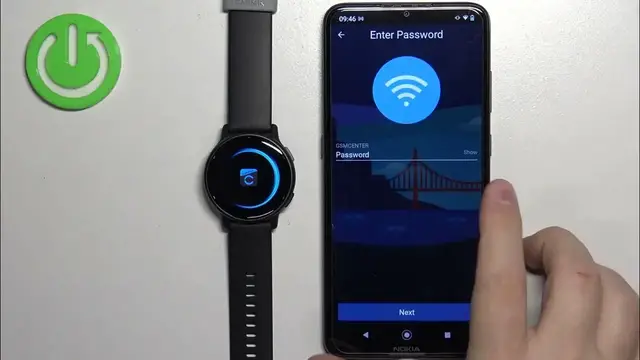
I'm going to add one, so tap on Network. Select the network you want to use
7:03
Tap on Password and enter the password for the network. Okay, then tap on Next
7:20
Now tap on Next. Zobaczcie, i teraz powinno się widzie�
7:30
My Day Page. I will see the icon of your watch on top
7:34
You can tap on it to open the device page or settings for your watch
7:38
Or you can tap on more Garmin devices. And you will see your Vivo Active here
7:44
Tap on it to open the settings page. And on the watch you can tap on the check mark if you want to go through the tutorial
7:52
Or tap on the X to skip the tutorial. Okay, so that's how you pair the watch through the setup process
7:57
Now I'm going to disconnect it from our phone. i we're going to pair it through the settings
9:35
and basically go through the whole setup like we did before. So allow the required permissions if you want to
9:45
I mean, then deny or allow the permissions for the location and stuff like that
9:53
Here tap next, set up the bedtime, preferred wrist, goals, sync now
10:04
now you would need to deal with the permissions but we don't need to because the app
10:09
we already did before so the app remembers the permissions settings tap finish
10:16
go through the tutorial or skip it, tap finish add or not add the
10:24
wifi network finish and then you should see Muzyka