0:00
Welcome, here I've got the Denver device and I'm going to show you the top tricks of its camera
0:11
So at first we have to tap on a camera button here to open it. And as you can see for now we are in the standard photo mode so let's see what we've got
0:19
And let's start by tapping on the center like that. As you can see this square is appearing so this is our focusing here and we can easily focus like that
0:29
by doing this. So this is how it works and now let me show you how to zoom. We can do it by using two fingers
0:37
Like that. And as you can see we get closer to the subject of the picture and also go back
0:45
So this is how it works. And now let's move to this one button here by tapping on this we can manage the flesh
0:54
We can turn on the auto flesh, turn on flash every time you take a picture
0:59
and also turn it off here so this is how it works. Now let's go to this settings bar here
1:04
Here we can change the most of this camera from the left. By tapping on this we get access to the panoramic mode
1:11
At the center we have the face beauty mode and from the right we have the normal mode so this is how it works here
1:17
And for now let's go to this one button here at the left corner at the bottom
1:23
By tapping on this we get access to advanced camera settings and we can pick the general settings
1:28
photo settings and the video settings. So this is how it works here
1:33
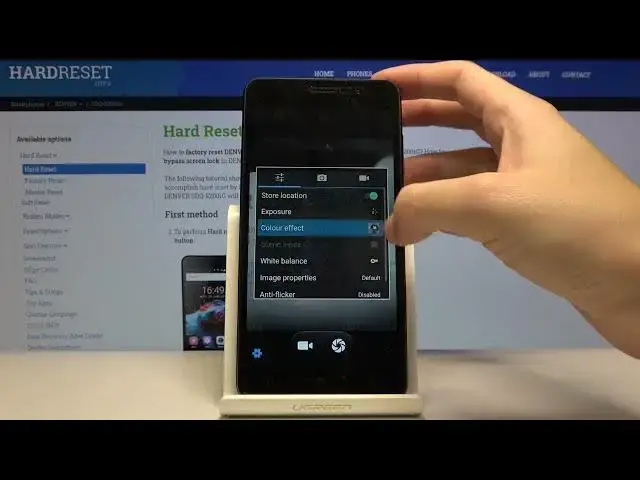
And let me stay on the general settings to show what is here
1:37
At the first place we have the store location option so by tapping on this button we can easily turn on and turn off the saving location info of our picture
1:46
So this is how it works here Also the important information here is that to make it work correctly when you really want to save actual location of your picture you have to be connected with the internet For example
1:58
with the Wi-Fi and you have to turn on the location of this device. So remember about these
2:05
two parameters to make it work correctly. And now let me take a picture to show you how to check
2:10
the location of it. And let's go here to the right corner at the bottom by tapping on this. We get a
2:16
quick access to the gallery. So this is the picture in the gallery and let's move here to this button from the right
2:24
By tapping on this we get access to the details of the picture and when we pick it we can check easily the location of our pictures
2:32
So greetings from Krakow, this is how it works here. And for now let's go back to the camera
2:42
And let's go back to this settings from the left. And let's focus on the camera. And let's focus on the camera
2:46
on the next one button here. This is the exposure. So by tapping on this we get access to
2:51
these options we can change the exposure compensation of our picture and we can make it just
2:57
more dark as you can see at the background or more bright as we can see. So this is how it works. Here
3:05
we can manage the light of our picture before we take it. So let's move to the next one. Color
3:11
effect options so when we tap on this we can pick some kind of filter and
3:16
And as you can see also the background here is changing. So this is how to use this
3:26
And for now let me stay on the normal one. And let's move to the white balance
3:36
So by tapping on this we can change the temperature of our picture And as you can see we can pick the incandescent light and the background also is changing here like that then the daylight cloudy light twilight
3:55
twilight shade and also warm fluorescent so this is how it works i suggest you to make experiments
4:06
with that and just have a good fun and let's go to the next one button here I want to show you
4:12
These are the image properties by tapping. This we get access to advanced image settings
4:18
As you can see here we can adjust the sharpness, hue, saturation, brightness and contrast
4:24
We can pick low, medium and high. So this is really cool here and this is really pro in this camera
4:32
This is not popular in standard cameras. So this is kind of pro mode here
4:39
really good to have this and now let's move to the next one button here so the
4:47
photo settings and let me start with set timer here by tapping on this we can change
4:53
the design of taking picture and as you can see we can pick from two seconds and ten
4:58
seconds so for now let me pick two seconds to show you how it works and let me take a
5:04
photo and as you can see the picture was taken with two seconds of delay so this is how it works for now let's turn it off and
5:15
let's move to the next one function here this is the capture number so here we can pick how
5:22
many shots we want to have so here we can add just the series of pictures we can pick 40
5:29
shots and 99 shots so this is really big and huge here and really cool also so when we tap on this one a button to take photo a little bit longer we can easily take as you can see the series of pictures so for now i will
5:46
i taken 12 pictures this is really cool here so let's go back to the settings and let's move to the
5:55
picture size by tapping on this we can change the quality of the picture and as you can see here we have
6:01
to pick. Of course I suggest you to keep this on the best possible which is 5 megapixs
6:06
And let's move to the preview size. By tapping on this we can change the ratio of our picture
6:11
We can pick standards and full screen so as you can see also the background here is changing when I change this
6:18
So for now let me stay on the standard one. And let's go to the end here by tapping on this one option we can easily manage the sounds of this camiwa so we can
6:31
Turn it on and turn it off like that. So this is how it works here
6:36
And also we can go to the video settings. Here, an important thing is the electronic image stabilization
6:46
So this is really helpful when we want to record the better video
6:51
So this is how it works. Now let's go back to the general settings
6:55
Slide a little bit down, as you can see here to the end
6:59
After turn it on, all of these. settings we sometimes want to go back to the auto settings we can do it by using this
7:05
option here at the end we'll store the faults so by tapping this we can reset camera
7:10
settings and go back to the original one so this is how it works here thanks for watching
7:15
subscribe our channel and leave the thumbs up