Up next in 10

Find out more about Oppo Find X3 Pro:
https://www.hardreset.info/devices/oppo/oppo-find-x3-pro/tutorials/
Hey, everyone! Today, we are going to share some awesome tips and uncover cool stuff that will make your Oppo Find X3 Pro even better. Get ready to find out about amazing tricks and features that will make your phone even more awesome. So, relax, kick back, and enjoy this fun video where we explore all the cool things your Oppo Find X3 Pro can do! If you want to know more about your Oppo Find X3 Pro, visit our YouTube channel.
What are the best tricks in Oppo Find X3 Pro? What kind of hidden features you can use in the Oppo Find X3 Pro? What are the top tips for Oppo Find X3 Pro?
#TopTricks #BestHiddenFeatures #OppoFindX3Pro
Follow us on Instagram ► https://www.instagram.com/hardreset.info
Like us on Facebook ► https://www.facebook.com/hardresetinfo/
Tweet us on Twitter ► https://twitter.com/HardResetI
Support us on TikTok ► https://www.tiktok.com/@hardreset.info
Use Reset Guides for many popular Apps ► https://www.hardreset.info/apps/apps/
Show More Show Less View Video Transcript
0:00
Welcome, and follow me as an App Po, Find the X3 Pro
0:04
and today I'll show you a couple tweaks and tricks you can do on this device. So, I'm going to start off with the sidebar
0:14
which is a copy of what Samsung has on their devices. And you can see this right here
0:19
this grayish bang on the side of the screen, so you can swipe on this
0:24
and this will pull out access to a couple different applications and also a couple of shortcuts, like screenshots
0:30
or screen recordings. You can select edit in here. There we go
0:35
And this will allow you to add additional shortcuts basically, or like tools, tuggles
0:41
I'm not exactly sure how to classify them. So you can record audio and quick notes
0:45
And below that we have applications. So here we can add more applications to the list
0:49
So just to demonstrate this, I'm going to add a bunch of them
0:53
There we go. And select it done. And now I have still my tools right here
0:58
and I can swipe down and have access to you. down and have access to a bunch of different applications. I believe if I open them up, yep, it opens up in also a pop-up view
1:07
So I can move that around, I'll see use it in this kind of state
1:11
and I can also have some other applications open at the same time. I can move it to the side, and this will then minimize
1:19
and give me the option to bring it back out whenever I need it
1:26
So there we go. That's a pretty nice feature. recommend utilizing it. So moving now into the settings and into the wall or home screen
1:37
and lag screen I'm going to show you a couple more options so we have the home screen
1:41
mode here we can change the home screen from for instance drawer mode to basically
1:47
having all your applications on your home screen if you want that or obviously if you
1:53
have the other way around you can swap to the drawer mode which will give you the pullout
1:57
drawer then going a little bit further down we have where is it
2:03
no there we go swipe down on home screen now by default this is set to shelf but under that we do have a couple options we have global search and more importantly we have the notification drawer When enabled you can swipe down anywhere on your home screen to get the toggles and notifications
2:21
So you won't need to basically go all the way down to pull down your notifications anymore
2:26
You can just do it from the bottom right here. So it's a really nice thing to have enabled
2:33
It does allow you to basically quicker or access the toggles in a much simpler way
2:39
or easier to access way. Let's pull it that way. Now, continuing on
2:46
we're going to go into the wallpaper and style. I guess we're going to allow whatever that is
2:51
And here we have a couple different options as well. So we have wallpaper, let's be honest, no one cares about that
2:57
But we have also always on display. So here we can enable your always on display
3:01
You can customize it also. I'm going to keep it off just because I like to have longer battery life
3:09
rather than always on display. But below that we have funds, so you can change the system funds
3:14
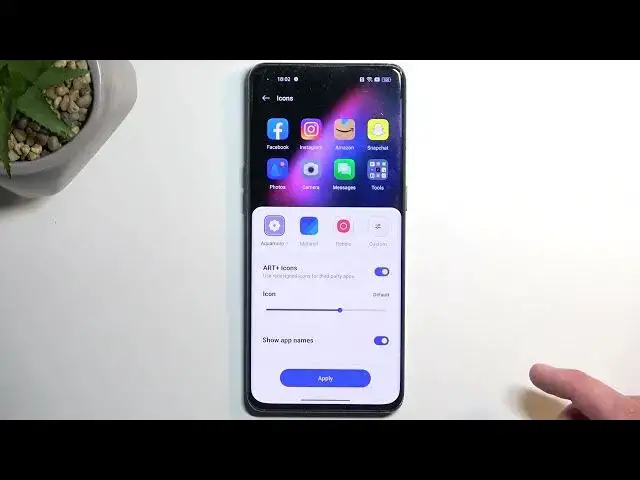
Also sizes. Icons. So if you have installed icon packs, you can choose them right over here
3:23
And you can also customize the ones that come pre-installed with this device
3:27
along with changing a couple other things, like removing, for instance, the names of the applications
3:32
or making the text smaller, increasing the icon size itself, or unifying the art
3:39
of these icons to be more similar because not every application will be or supported
3:45
that is a correct way so the themes for the icons or like icon packs don't always
3:51
cover every single application when that is the case this option should try to cover it
3:58
and just attempt to have it unified to the rest of the icons and below that we have
4:06
additional settings like colors quick settings fingerprints animations and edge lighting. So I could go over all of them, but what I employ is that you go through to them yourself
4:19
and change them to fit your exact liking. These are basically different kind of customization sections Just to kind of quickly just touch upon them colors allow you to change the colors of things like the toggles right here So as you can see by default they are blue and also these buttons
4:35
yellow, orange, blue, green, whatever. So if you choose some different ones, it will change the colors
4:40
You can also choose it based on the wallpaper, pretty nice option. Quick Settings, this just allows you to customize the Quick Settings
4:46
toggles, the shape of them. Fingerprint Animation, if you're using fingerprint sensor
4:51
it just gives you different animations. and edge lighting are the lighting on the side
4:54
That was a really quick rundown of the accessible settings right here
4:58
So let's go to the next options. So we're going to go into the
5:02
display and brightness and here we have a dark and light mode. So we can choose
5:06
between them. Now we do have Amelad display and the dark mode
5:11
here looks superb because the black levels are just fantastic. But obviously dark mode
5:17
might not be the best option for current season which is summer. And
5:22
doing the daytime when it's like super bright outside, dark mode is a little bit harder to see
5:29
even with a maxed out brightness. So I personally prefer to use light mode
5:32
but there's a better option, which is the scheduled. And when enabled, this will allow the device to swap it between these two modes
5:38
from sunset to sunrise or on a custom timer, basically giving you both modes at the same time
5:44
and picking the one that is better for you at the moment. So at nighttime, as an example
5:50
you won't be flashbangging yourself with your own device. Now, scrolling down, you have a couple additional options like screen resolution and refresh rate
6:04
So screen resolution will allow you to choose either the 1440p or 1080p
6:07
Now, that being said, in here I would probably recommend you to stay on the standard just because this is just a 6.5 inch display
6:18
So picking 1440p is an absolute overkill and it will consume more of your battery so
6:25
there's really no point for it. But if you think that your images or whatever the text and stuff like that are pixelated
6:31
for you, maybe you're just an eagle eye, then you could switch it to high
6:36
And going back we do have the screen refresh rate so we have high and we have standard For some reason this is set to standard at the moment so I going to switch it to high because this will give me a smoother animation when scrolling up and down
6:49
making the device feel much nicer than, but for instance, who is
6:54
although it's a nice device, let's not dispute that. But the animation will look buttery smooth
7:00
making this feel significantly better. Now, that being said, 120 hertz of fresh rate
7:05
which is the high option, will look better, but it will also consume a little bit more of your battery life
7:11
There is an upside to it. It isn't running at 120 hertz all the time
7:15
It's only running at 120 when it needs to. So as an example, right now, it would consider that it needs to
7:21
because we do have something moving on a display, like these animations right here
7:25
But if I go back, it automatically, or not automatically, but after like a second or two
7:31
it switches to 60 to preserve battery life. So, actually, I just swapped it myself by mistake
7:37
So there we go. But if you're planning to preserve battery life only
7:42
and you don't care about the smoothness of scrolling up and down, then you might want to switch it to standard instead
7:51
Now, moving on to another option, which is the gesture navigation. You can navigate to home screen
7:59
Yep, homescreen and lock screen, and here we have the system navigation, so this will redirect us
8:04
And by default, this device will come with gestures enabled. but if you want to use buttons, you can switch it right here
8:12
Now, I am going to stay with gestures just because that's what I like. I will add one more thing in here, which is the hide gesture guide bar
8:20
Guidebar is this little bar at the bottom. When enabled, it just completely removes it from view
8:26
And the navigations still work the exact same way as they did before
8:31
just giving a little bit of a cleaner look to our device. That's the only difference
8:37
So there we go, that would conclude tweaks and tricks I want to show you
8:42
So if you found this video helpful, don't forget to hit like, subscribe and thanks for watching
#Online Goodies
#Skins, Themes & Wallpapers