0:00
Welcome here I've got Sony Xpira 1 3 and I'm going to show you how to use shooter speed mode in the camera app at this device
0:15
So let's start by tapping on the camera button to open it and for now as you can see in the left corner we are on basic mode so let's pick it to change it
0:24
Now we have to slide a little bit down and pick shooter speed priority mode
0:29
Here we have short info so that this mode can manually control shooter speed to change how we capture moving objects
0:37
and the fast shooter speeds will appear to freeze an object in motion while slow shutter speeds can better capture motion blue
0:45
So let's have a look at this panel from the right. Here we can adjust the shooter speed at the first place
0:54
So by going to the left we can make our time of taking piece
0:58
taking picture much shorter from 1 and 8 thousand of seconds and by going to the right we can make it longer so let's check the longest here now
1:11
30 seconds so this is white choice and really professional spectrum and here we can also turn on autofocus to check where it is at our picture and turn on ael button look so now
1:28
we can half tap to the shutter to block settings when we need to save them and change the frame of our camera
1:37
Let's turn this off and move to this settings bar. Here the first one option we can manage is the drive mode with single shooting which is now
1:48
So now when we tap on the shutter we can take only one picture
1:52
Here we can also take burst shots by tapping on continuous shooting with high speed
1:58
So for now when we tap on the shutter a little bit longer we should take the service of pictures in a really fast way We have continuous shooting also with low speed so now we should get the same effect but in the lower speed
2:13
and here we can also pick self timer with 10 seconds or 3 seconds so now we can take a picture with delay of the time
2:23
so let's stay on single shooting now and move to the next one option the focus
2:31
Now we are on continuous autofocus. We can pick also the single shot autofocus or manual focus
2:38
so we get access to this slider where we can not just focusing manually
2:43
Now let's stay for example on this autofocus with continuous shot and move to the next one option also about the focusing
2:51
Here we can pick the area of our focus between white and center
2:55
And the next one option here we can adjust is the exposure compensation
3:01
so we can manage the light of our picture. By going to the right we can make it more bright
3:07
by going to the left we can make it more dark. As you can see
3:14
And here, the next one option is locked. This is the ISO, so the camera's sensitivity to light
3:20
Because this is half manual mode, we can adjust the shooter speed manually
3:25
and the ISO is automatically adjusted by camera to the best possible ever
3:31
The next one option I want to show you here is the metering mode so we can pick spot center and multi
3:39
Let's stay for example on spot and let's move here to flash mode and now we can manage our flash
3:46
We can't pick the auto because we are on manual mode so we can pick only few flash, red eye reduction, turn it off or pick the torch so we have it here turn it on every time
4:00
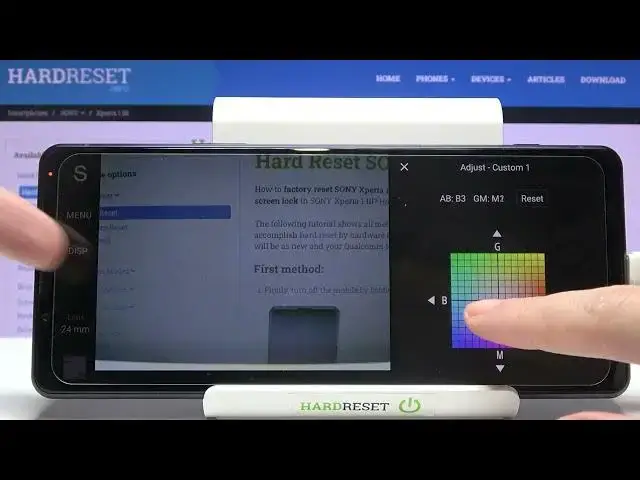
Now let's turn this off and move to the next one option. So the white balance, we are on auto white balance
4:06
and when we want to adjust it we can pick between the ready white balances here so the cloudy light daylight fluorescent light incandestine light and the shade light we can also adjust our custom
4:20
here so we get access to this panel and the white balance is the feature that we can control
4:30
the cold and warm tones of our photo so the blue and the red tones
4:37
of our picture with the light in the area where we have it. So this is how to adjust it
4:44
We can save it here also and apply or just be kind of ready light. Now let's stay on the
4:51
auto and move to the next one option. Face and eye autofocus. So here we can turn switch off
4:57
and oczywiście and when we have it turned it on the camera should recognize when we take the photo
5:05
of some human and see you. wear the human health face and the eyes and automatically focus on it with the better
5:15
result. The next one option here we can manage is the file format. We are in JPEG, we can
5:21
pick also RAF plus JPEG or only the RAF and the RAF format is used by professional
5:27
photographers by saving more details at the picture and post-producting them in
5:32
graphic programs. So this is really pro feature like the in the individual
5:37
really professional camera and let's move to next one option aspect ratio here we
5:43
can change camera frame camera size we are in form 3 let's pick 16 and 9 and as you can see the
5:49
background has changed it now another tab here and we can go to the square one one and 1 and we can also
5:57
pick 3 and 2 so this is how to manage it and the last one option on this settings bar is
6:04
kind of settings about the tones of our picture that are in color in contrast in brightness so we have a derange optimizer we can turn it on to improve our continuous shots with contrast and brightness we can pick here also auto hDR to improve the
6:27
parts of our photos that are in light and in the dark or we can turn it off here as we need
6:35
and here we have also option to lock this setting so when we adjust them manually and want to be
6:41
sure that we don't move them we can slide to lock them and this is how it looks like or unlock it here
6:49
Now let's move to the settings bar from the left. We have the menu so here we have some basic settings about the camera
6:58
Also they are like in this short axis here so we can adjust the shooting file format aspect ratio the exposure
7:09
the focusing and in the setup we have some basic settings. So I'm not going to focus on it right now
7:16
Let's move to the disk. Here we can turn on the leveler and the histogram
7:22
So also kind of tools that are helpful when we want to take a picture
7:27
Let me focus on leveler. This is useful when we want to be sure that we hold our device study
7:33
when we need to take straight picture. And when we have this green signs, we can be sure that it is straight
7:41
And another tab to turn. it off. Here let's move also to lens. When we tap here we can see four lenses and we can
7:49
manage them like that. And in each of these lenses we have also the only zoom. So this is
7:56
really pro that we can adjust it like that. I can show you also these lenses from the back
8:02
So this is how they look like. And this is how to use this settings. Thanks for watching
8:09
subscribe by our channel and leave the thumbs up