Up next in 10

Find out more: https://www.hardreset.info/devices/oppo/
Unlock your device effortlessly with our step-by-step guide on bypassing FRP (Factory Reset Protection) on OPPO A38. 🚀🔒 Whether you're troubleshooting or need to regain access, mastering this process ensures a smooth and hassle-free experience. Say goodbye to FRP hurdles and hello to full control of your OPPO A38. Subscribe now for more expert insights, and let's navigate FRP with confidence together!
How to Skip Factory Reset Protection on OPPO A38?
How to Skip Google Verification on OPPO A38?
How to Remove FRP on OPPO A38?
#frp #bypass #oppoa38
Follow us on Instagram ► https://www.instagram.com/hardreset.info
Like us on Facebook ► https://www.facebook.com/hardresetinfo/
Tweet us on Twitter ► https://twitter.com/HardResetI
Support us on TikTok ► https://www.tiktok.com/@hardreset.info
Use Reset Guides for many popular Apps ► https://www.hardreset.info/apps/apps/
Show More Show Less View Video Transcript
0:00
Welcome. InfoMany is an A38 and today I'll show you how you can bypass the Google
0:06
verification on this phone. Before I get started I'm going to, number one, touch upon the state
0:14
of this device so you can see that it is locked that's telling me to draw the pattern to unlock it
0:19
and without it you technically couldn't finish the setup. Now with that being said for the
0:25
bypass of this meaning without providing anything, we will need, unfortunately, another device
0:32
another Android device that has access to Play Store. And that's really the only thing that we'll need
0:39
Unfortunately, it's also one of the more crucial parts that you will be required for this
0:46
So with that being said, we, number one, going to prep this device
0:54
So starting off, we're going to back out to the Wi-Fi connection page
0:58
if you are at the beginning of the setup, meaning where you get to select your language
1:03
progress forwards through it, but if you already seen the same page as I did, the verification one, then you go back instead
1:10
until you get to this page right over here. Now here we're going to select the information icon
1:16
So the eye, now I am going to cover it up because once I press it, it will show a QR code for the Wi-Fi
1:22
which I do not want to show. So this doesn't actually show anything yet
1:33
So, and here we are going to select. So we're going to select the share button and pretty sure that will show it
1:47
Yep, there we go. So you can see part of the QR code
1:51
And below you have nearby, so you want to click on it. There you go
1:56
I can uncover it. So once you press on the nearby, it shows you this page
2:02
And here we're going to select. So continue
2:13
Select allow. Okay, there we go. So that's what we wanted. Now I am covering this screen just because I'm not exactly sure at one point it won't actually
2:21
show the password for the Wi-Fi, which sometimes happens. So in here you'll get this button right here, Need Help Sharing
2:33
So once you press on it, it will open up the help and feedback section
2:40
And in here what we're looking for is three dots and then you want to select Share Article
2:47
This will bring up a couple different options to share it. We are interested in the messages
2:54
So there we go messages new message And then in the two field just honestly spam any buttons
3:09
That doesn't really matter. Good enough. This will then paste the link to the inputted number
3:18
So I want to get rid of it from our message because we don't actually care about this article
3:25
And in here you're going to type in www. YouTube.com. Now I want to stress this
3:31
It is important to add the extension, WWW, without it. When you try to open up the link that once you send it will be created
3:40
it will open up YouTube in a pop-up window, which will not give us access to the options that we need
3:45
So make sure you add this extension. Therefore, it will open up YouTube in its full screen application form
3:59
So there we go, I'm going to send it. Keep in mind, I don't have a SIM card inserted
4:03
You can see right here no SIM card. And this number is just a... Well, not really a number
4:10
So I'm not really sending this to anyone, but it still appears as I sent message
4:14
And here we're going to top on Load Preview. And then you want to just top on the image
4:19
and this will open up YouTube, like I mentioned before. Let's allow on the pop-up
4:26
And here, we will now... go to and quickly check. So we're going to navigate into the settings
4:35
So click on the account and then Settings. Next, we're going to select About and Google Privacy Policy
4:51
This will open up our browser. Here we're going to, if you get this kind of pop up
4:56
we're going to select use without an account. No thanks. And once it's loaded up, we want to navigate to hard reset that info slash bypass
5:09
So this is a link. Now if you need a moment to write it down yourself to pause the video
5:27
Here you want to scroll down to the Settings app
5:42
Simply click on the icon. And this will actually open up our Settings application
5:50
And in the settings, we want to navigate to Home screen and Lockscreen
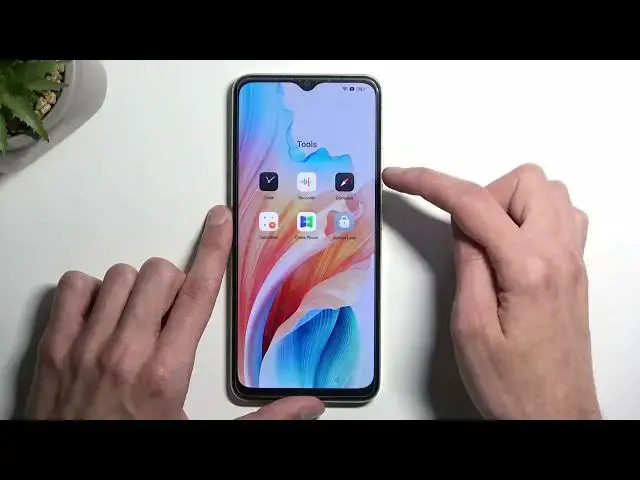
5:56
then select home screen layout and this glitches out and as you can see opens up our home screen so in here we going to swipe to the right and we looking for Tools folder so right over here
6:14
and we want to open up the clone phone application, so this one right here
6:21
We will need to allow a bunch of different things in here, so let's..
6:29
now we get the settings first. because we're not getting any kind of pop-up
6:38
So anyway, in here I guess we're going to select that this is the new phone, so right over
6:44
here, and allow, and then the other device is another Android. And it generates a QR code
6:56
So we're basically prepped for this. Next thing we're going to do is grab our second device
7:11
I'm going to navigate to Play Store and we're looking for clone phone application
7:18
Sorry for that. Anyway, and here we're looking for, I believe it's the first one, yep, it says Oppos
7:33
So yeah, that's the one. Now it could be told actually the Oneplus and RealMe one will also work
7:38
as it's basically the same company. Anyway, I'm going to select install
7:47
I'm going to open it up. And agree and continue
8:00
And we'll have a bunch of different things that we need to agree to. So it's going to start popping them up like this
8:06
So here we're going to select Settings. Tuggle this on. And you want to go back
8:10
Again, Settings. Tuggle on. Go back. Start migrating. Again, settings. Find the clone phone application here
8:21
Tuggle on. Go back. Go back once more. Think sure migrating will be whatever
8:28
Okay. Again, settings. Enable, go back. while using the app allow it will require a bunch of access to different kind of things on your
8:39
phone like storages contacts and all that stuff because the app allows you to migrate all that data
8:45
over so it needs to actually have access to it anyway we're going to select allow to everything
8:52
and it opens up the camera next thing is you want to use this phone camera to scan the QR code
9:03
and you can see it connects these two devices together Let give it a second because it needs a moment to actually connect them And you can see it shows up that there is some photos to copy over and yeah
9:22
Now let me quickly check what we need to migrate from here. Okay, so we're going to deselect everything
9:33
So click right here. There we go. This will deselect everything and we want to click on the apps right here
9:43
We don't want to check all of them. We just want to click on the text right here. This will show us all the applications
9:48
And in here we can select any kind of application. Now, the smaller, the size, the better
9:54
So I'm going to select something like the TurboVPN. And click on the checkmark and select Start Migrating
10:07
Now, in here it might say that it failed to migrate, but whatever the case may be
10:17
yep, so failed one, it doesn't actually matter. When we click on done, you can see that it now allows us to select the navigation method
10:27
so I'm just going to select gestures. I'm going to skip this later, done, and get started
10:36
this will open up our home screen. Now we're not done just yet
10:41
So I'm going to get rid of this other device because it's served it purpose
10:46
Next we're going to do on our locked device, which is technically still locked
10:51
as we're going to navigate into the settings. And in here, we want to select additional settings
11:00
scroll all the way down to backup and reset, reset phone, erase a little
11:06
all data, erase all data, and press on the erase all data once more
11:12
So once you select this button right here for the second time, it will start factory resetting
11:18
your device and this process will take about like five minutes to finish up or however long
11:22
this device goes through a reset. Once it's finished, you will be taken back to the setup
11:27
screen, at which point this device will be fully unlocked and you can go through the setup
11:32
in whatever way you want to. Now I'm not going to go through it on the video
11:36
because it's honestly just a single click and then nothing happens. It's a lot of just waiting for the device to finish resetting
11:44
Once it resets it, it's fully unlocked. You're on the setup screen and you can set it up, like I mentioned, whatever way you want to
11:52
So pressing that Erase Data button for the second time will conclude the bypass
12:00
So with that being said, hopefully you found this very helpful and if you did, don't forget
12:04
to hit like, subscribe and thanks. for watching