Up next in 10

We invite you to visit our website and find out more about GARMIN Vivoactive 4s: https://www.hardreset.info/devices/garmin/garmin-vivoactive-4s/
Learn how to connect your GARMIN Vivoactive 4s smartwatch to an iPhone seamlessly with our step-by-step tutorial. Discover the simple process of pairing your devices via Bluetooth and syncing data effortlessly. Stay connected and maximize the functionality of your smartwatch with our expert tips for connecting the GARMIN Vivoactive 4s to an iPhone.
How to connect a GARMIN Vivoactive 4s watch to an iPhone? How to pair GARMIN Vivoactive 4s smartwatch with an iOS device? How to set up GARMIN Vivoactive 4s smartwatch?
#GARMINVivoactive4s #iPhone #GARMINWatch
Follow us on Instagram ► https://www.instagram.com/hardreset.info
Like us on Facebook ► https://www.facebook.com/hardresetinfo/
Tweet us on Twitter ► https://twitter.com/HardResetI
Support us on TikTok ► https://www.tiktok.com/@hardreset.info
Use Reset Guides for many popular Apps ► https://www.hardreset.info/apps/apps/
Show More Show Less View Video Transcript
0:00
Welcome. In front of me, I have Garmin Vivo Active 4S, and I'm going to show you how to pair this watch with the iPhone
0:12
Before we start, you can pair this watch with an iPhone in two ways
0:16
The first way is to do it through the setup process of the watch. So basically, if the watch is brand new or it's been reset to the factory default settings
0:23
and the second way is to do it through the settings after the watch has been already set up
0:28
because you can set up the watch without connecting it to a phone
0:32
First, I'm going to show you how to do it through the setup process, and then I'm going to show you how to do it through the settings
0:39
Okay, so let's continue. Let's start by turning on our watch, and you can turn it on by pressing and holding the upper button
0:47
Once you see the garment logo on the screen, you can release the button and wait until the watch turns on
0:58
Okay, after the watch turns on, you will see the hello message on the screen
1:03
Once you see it, you can tap on the screen to continue, and now you should see the list of languages on the screen
1:09
and you can scroll through this list by swiping up and down on the screen
1:16
So find the language you would like to use on your watch. Once you find it, tap on it to select it
1:22
And as you can see, now we're being asked if you want to pair our watch with a phone
1:26
If you want to pair it with a phone, tap on the checkmark to confirm, and the watch will enter the pairing mode
1:34
It looks like this. So now let's download and install the Garmin Connect application on our iPhone
1:40
So to do it, open the app store on your iPhone. Of course, make sure you have the internet connection and Bluetooth enabled
1:49
Once you do, open the app store, go to the app store, tap on search, type in Garment
1:56
connect and tap on search and on the list of apps you should see this application
2:03
Garmin Connect you can tap on the get button next to it to download the application
2:09
and let wait until the application is done installing and after the application is done installing you can tap on the open button to open it In the app you may see a couple of pop about permissions
2:25
For example, to use Bluetooth. This one is required, so tap on Allow
2:30
And now we need to log in into a Garmin account. If you don't have an account, you can tap on Create Account button
2:36
I already have one, so I'm going to tap on Sign In, check the box right here, tap next
2:41
And then we need to enter the email and password to login. So I'm going to do that
2:49
Okay. Then tap on next to login. After you log in, you may see more pop-ups about permissions
3:01
For example, notification permission. This is useful if you want to receive the notifications from your iPhone on your watch
3:07
If you want to do it, tap on allow. If you don't care, you can tap on don't allow and deny it
3:11
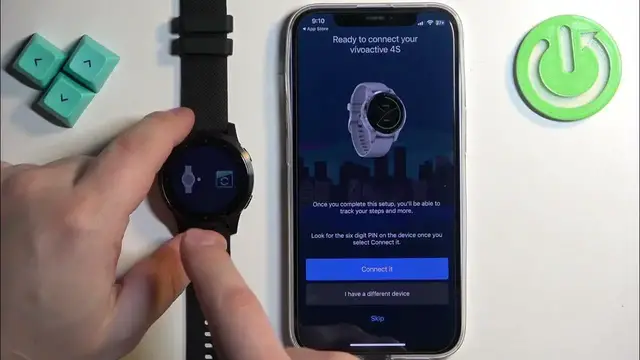
And as you can see, the app detected are. Vivo Active 4S watch
3:16
If it doesn't detect it, you can press the lower button to go back
3:20
like this, tap on the checkmark again to re-enter the pairing mode
3:27
and the app hopefully finds your watch. And once it does, tap on connected
3:32
enter the code from the watch to confirm. Like that. Allow ordinary permission for the notifications
3:51
Here tap on next. Right here we can set up the sleep time
4:03
This is useful if you want to use something like do not disturb mode during sleep
4:08
So basically you want to mute the notifications when you're sleeping. If you want to use this feature, you can set it up
4:13
you can set it up or set up the bed time by tapping on the bed time
4:17
So basically the time on which you go to sleep, then we have the wake time, so the time on which you wake up
4:26
And once you're done, you can tap on next, then you can tap on yes or no
4:30
depending if you want to turn on, you do not disturb mode during sleep or turn it off
4:36
Here we can select preferred hand or wrist And next right here we can agree to send the data to our new device I going to tap on no and tap next
4:46
And right here we can set up goals for like steps, water and taking and stuff like that
4:51
If you want to edit the goals, tap on edit goals. If you want to keep them default, tap on default goals
4:57
And if you decide to edit the goals, you will see this page
5:02
And here you can change the values by simply tapping on the box
5:06
and changing the numbers. So, adjust it to your liking and tap on next
5:13
Right here we can agree for the to allow the location permission. This is useful if you want to track, for example, your routes when you're running
5:22
cycling and stuff like that on the map. If you want to track it on the map, allow the location permission
5:26
If you don't care and you want to keep it disabled, tap on skip
5:33
Next, we have the calendar access. This is useful if you want to track the events on calendar and stuff like that
5:39
So if you want to do it, tap on allow calendar access. If you don't care, tap on skip
5:48
Here we can tap on manage permissions, and it's going to move us here
5:52
and we can allow some permissions like Bluetooth and stuff like that
5:55
But we're going to go back to the app, and we're going to tap on skip
6:01
So we're going to skip this step. Then we can tap on sync. As you can see, we have a problem with syncing rather, so I'm going to tap on skip sync for now
6:16
Okay. Then I'm going to skip the tutorial. You can go through it if you want to by tapping on next button
6:24
Here I'm going to tap on dismiss. And as you can see, we have the data in the app
6:31
For some reason, it's not loading completely, so there's some issue. here, but at the tab you should see the image of your watch
6:39
Once you do, you can tap on this image to open the devices page, and here you can select
6:44
your Vivo Active for S. As you can see, we have the page for our watch, and we can change a couple of things like
6:49
settings for the appearance, sounds and alerts and stuff like that. Okay so that how you pair the watch through the setup process Now I going to show you how to do it through settings So I going to disconnect the watch from the phone
7:08
Okay. So to pair it through the settings, basically you need to enter the pairing mode
7:26
on your watch to do it. Let's press and hold the lower button to open the menu
7:31
then scroll through the menu, find the settings icon, and tap on it. Then scroll down and find the option called the phone
7:40
Once you find it, tap on it. And here, now scroll down and find the option called Perphone
7:48
And once you find it, tap on it. The watch will enter the pairing mode
7:51
and now you can download and install the application, basically, log in it
7:55
and it should detect your watch. But if you already have the application installed, you can open
8:04
tap on more, garment devices, and tap on a device. And it should detect your watch, and you can tap on connected
8:15
enter the code from your watch, tap on pair and basically repeat the steps we did before so allow the permissions or deny them
8:31
set up the bedtime goals and stuff like that And here we have our watch at the top
8:50
You can also tap on garment devices right here in the menu. And you should see Rovivo Active 4S and you can tap on it to open the device page
8:58
Okay. And that's how you pair this watch with the iPhone. Thank you for watching
9:05
If you found this video helpful, please consider subscribing to our channel and leaving the like on the video
9:16
I'm going to be able to