Up next in 10

iPhone 8 Jailbreak tools:
https://www.hardreset.info/devices/apple/apple-iphone-8/faq/jailbreak/apple-jailbreak-v14/ Let's watch the simple way to jailbreak Apple devices. Follow our steps and find the way to jailbreak iPhone or iPad without MacOS. In this video, you will see the tutorial with iPhone 8 with 12.x to 13.7 iOS.
On this Jailbreak your iOS Device can erase all of your data. All described operations you are doing at your own risk. If want saves your data do a backup before start. The battery should be at least 50% charged before the start.
How to jailbreak iPhone 8 Cellular with iOS version 13.7 and older? How to jailbreak iPhone 8? How to install Cydia? How to jailbreak Apple device? How to install Cydia on Apple phone? How to jailbreak iPhone on Windows? How to jailbreak iPhone 8 without the MacOS?
Follow us on Instagram ► https://www.instagram.com/hardreset.info
Like us on Facebook ► https://www.facebook.com/hardresetinfo/
Tweet us on Twitter ► https://twitter.com/HardResetI
Show More Show Less View Video Transcript
0:00
Welcome, from me is an iPhone 8 with an iOS 12 point something and today I'll show you
0:14
how to jailbreak the device. Now going straight at it, this process will work for majority of the devices, so basically
0:23
iOS 12 all the way up to the newest one which I believe is 14
0:28
That's why I'm not really bothering specifying which iOS version that is, it doesn't really
0:31
matter here. So, to get started there's a couple of things that you will need
0:36
A cable that you connect to your PC, a PC and also a USB stick right here
0:41
The USB stick can be as big as a 1GB, anything above it is kind of redundant, you'll only
0:47
need about 100MB space on it, but it does need to be basically empty, so you will need
0:54
to basically put in a program on it as a bootable software, which I believe requires
1:01
you to in a way format it, so keep that in mind
1:05
But once you have it, we can begin the process, so number one, we're going to go to our web
1:10
browser, to the 3U website, as you can see, 3U.com and from there you want to download
1:17
their software. So it's right over here, click the download, and save it, as you can see I already have
1:25
it, actually two of them, let's do it once more, so you can see that I'm saving it up
1:30
I already also installed it, so there is no need for me to do that
1:35
So once you install it, simply search for it, so 3U, and as you can see you'll have
1:40
the 3U tools. So in this regard it's still downloading, I already, like I said, installed it before
1:47
so that's why I can open it up, but once you download it, simply install it as well
1:51
and then open it. So from there we're going to grab our USB stick, and let's plug it into our computer
2:03
There we go. Now by default, when you plug it in, you should see your USB stick, but if you already put
2:10
in the software on it, your stick actually won't be showing up, as you will see right
2:15
now, it's plugged in right now, and as you can see it doesn't actually show up here
2:19
so that is something that I'm going to show you at the end, how to fix
2:26
So once you open up the software and you have the stick in your computer, go to the flash
2:31
and jailbreak right here, then select jailbreak, tap on make Chakran jailbreak USB flash device
2:41
drop down menu, select your USB SD card, as you can see that's the only one that I have
2:46
accessible right here, and select start making, and as you can see there is the information
2:52
all data on the device will be cleared, so like I said, if you have anything on that
2:56
stick that you're going to be using for this, back it up beforehand, everything from it
3:00
will be completely gone. So from there let's just select start, mirror, ok so apparently the fail error comes up all
3:10
the time, or at least once whenever you try it, so just simply go back to it, start, and
3:16
as you can see now it goes fine. And once it's done simply close it, and close this, so the USB is now ready to go
3:32
And from here we will need to power off the computer, so I'm going to go select, restart
3:43
and from here you want to start pressing F11, I believe it's F11, depending also on what
3:48
computer and motherboard you have in your computer, sometimes it's something like F8
3:52
or 9, sometimes F10, for me I believe it's F11, but I guess we'll see, so simply start
3:59
just pressing the key constantly, once it actually restarts, right now, there we go
4:07
so right now I'm pressing F11 constantly, and it looks like it's supposed to be F2 on here
4:17
Oh, ok, so it looks like it automatically booted to F11, now I'm going to quickly actually
4:30
show you something that you couldn't really see, for me after pressing F11 it automatically
4:36
boots into the USB, which might not be the case for everyone, so let me quickly restart
4:42
the computer, and press F2 I believe it was, so it's boot menu, so some of you might see
4:54
basically this right here, so what we want to do is basically boot into our USB, which
5:01
will be, where is it, it looks like we only have to actually change the settings right
5:11
here to prioritize the USB first, which, let me quickly find it, the advanced frequency
5:24
nope not here, now if you're wondering, the settings on how you navigate through here
5:31
are basically all over here, so arrows, enter, plus, minus, system, there we go, so there
5:46
are the boot options, priority, so we have boot option one, and it's the selected to
5:51
be SD card at the moment, as you can see, so with this being set as a first option
5:59
it will prioritize whatever it's plugged in, that's why it automatically booted into
6:03
the USB, but if there is nothing plugged in there, it will then resort to the second option
6:08
which will be Windows for me, so from here you simply change it, it's probably gonna
6:15
be the other way around, so Windows will be first one, and then USB will be second, so
6:19
simply check it in, and that's about all you have to do here, so yeah, and from there simply
6:27
go to save and exit, and select save and exit setup, and let's press F11, or actually
6:38
just as a, okay, so it automatically boots, I didn't even press anything, give it a moment
6:52
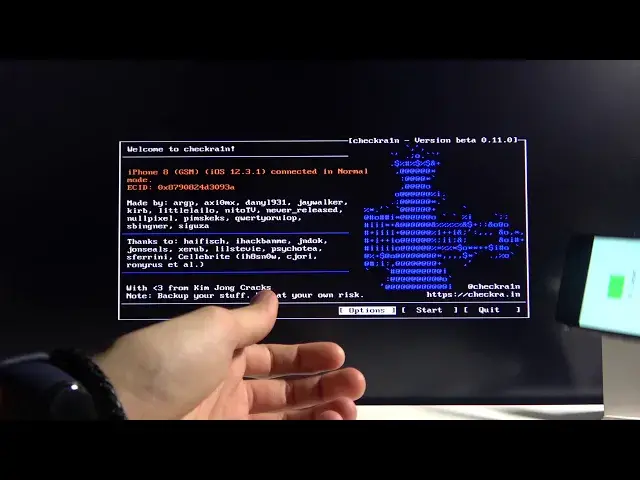
it goes through the dialog boxes right here, and from here again we're gonna be using the
6:57
arrow keys to navigate through here, as you can see, so while you see this open right
7:02
here, the check run software, simply plug in your device, and as you can see, start
7:12
became clickable, so I'm gonna mention right off the bat, if you're using any kind of newer
7:20
version, as you can see for me right now, it's the iOS 12.3.1, but if you're using something
7:26
like, I believe like the newest one, which is 14, I don't know exactly, if you're one of those
7:32
people, start will be constantly grayed out till you go into the options right here, so select
7:37
options and enter, and from here you wanna select the first option, allow untested iOS, iPad and
7:44
tvOS versions, and once you select it, basically like this, from there go back, and start should
7:54
be accessible from there, but like I said, my version is completely supported, or tested, so
8:00
start is accessible for me when I plug it in, so once it is, simply select start, enter, and go to
8:07
next, and we will need to put in the device into the recovery mode, or actually DFU mode I believe
8:12
but let's see if it's, so as you can see right now, it's doing this on its own, there is give
8:22
us a guide on how to put the device into the DFU mode, so once it's off, or in this case in recovery
8:29
mode, what you wanna do is hold the power key and volume down, and from there you're gonna let go
8:36
of the power key, and keep holding only volume down, and it is quite time-sensitive as you can
8:43
basically see right here, so first and hold the volume key down together for four seconds
8:49
it doesn't really say four seconds, it just says four, and then release the side button and keep
8:55
holding the volume down for 10 seconds, so you can either press start right there and begin it
9:01
or just try to do it without actually pressing start, that might be easier, so grab the phone
9:07
right now, and volume down right here, power, now I'm not holding it just yet, I'm gonna first press
9:13
start, so now I'm holding it, and you have the countdown right here, so we're gonna let go of
9:21
power now, and keep holding volume down, and it did succeed, now if it fails, the program will tell
9:34
you that it didn't work, and you can start over again, basically the software puts you straight
9:40
back into trying it again if you failed, you can also see right here, it's right now installing
9:45
the jailbreak, and from there you can see that there is a done button, or there you go, now you
9:54
can see it, it's right here, so simply select enter, and we're done with the jailbreak, and now from
10:03
here simply create it, not sure if it's gonna restart the computer or not, looks like it's not
10:11
gonna restart it, so let's do it manually, I'm also gonna unplug the USB, and like I said I'm
10:19
gonna show you how to get back the USB to be actually readable and usable again, so let me
10:32
unplug this from here, now like I said jailbreak is completely finished, this is more of a finished
10:38
up process with the USB, okay so from here I'm gonna replug the USB, go, and what you want to do
10:56
is open up a disk utility, so I believe this is this, create and format hard disk partitions
11:16
let's open that up, I'll give it a moment, it takes a bit of time for it to actually load as
11:26
you can see, I mean normally it wouldn't, but this computer is kind of slow, there we go, so I reopened
11:38
it, and from here we can see the disk one, that is the removable one as you can see right here
11:44
which is our SD card, which has been formatted and right now if we go into our computer
11:55
there we go, once is enough, there we go, you can see that it's still not visible right here
12:02
so to combat this simply can basically select, let's see, properties, actually, there we go, can I actually do anything
12:20
let's go simple new volume, and there it is, 120 something gigabytes, cool, and let's finish it up
12:31
format, okay, and close, and now if we go back, you can see it right over here, so there is our SD card now
12:43
and it just disappeared, let me try that again, and there it is, so you can see that it is working now
12:54
and it's fine, we just needed to format it, but yeah, so that was just how I wanted to show how to get back the usability of that USB stick
13:06
so that is in a way how you would jailbreak your device and also fix your USB after that
13:11
and if you found this very helpful, don't forget to hit like, subscribe, and thanks for watching
13:24
you
#Computer Security
#Software
#Operating Systems