0:00
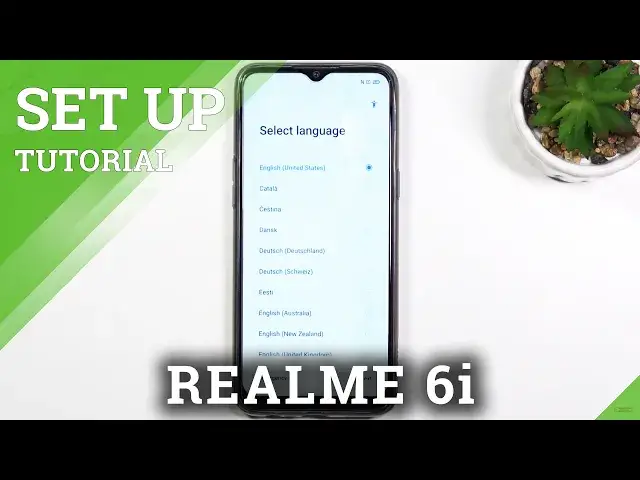
Welcome, from the realme 6i and today I'll show you how to go through the setup process
0:12
of this phone. So when you boot it up for the first time, you will be presented with the screen right
0:17
here where you get to select your language. Now for me it's an incorrect one so I'm gonna stick with English and then select next
0:25
Again choose your region and from here you need to agree to terms of service I'm gonna
0:32
say most fun part. So all you need to do is actually select the first option, the user agreement and rest
0:41
are optional so you can disregard it if you don't care. Now you can also tap on a blue text to read exactly what you're agreeing to
0:47
Now on the next page you have the option to connect to Wi-Fi
0:52
You can completely skip this if you don't feel like doing it or you just can't do it
0:55
at the moment so simply skip it. Now by skipping it you lose the ability to have the date and time be set automatically
1:02
at least as long as you're not connected to Wi-Fi and also the Google login page won't
1:08
show up during the setup process. I can still access it later on through settings though
1:13
Now no matter if you chose to connect to Wi-Fi or didn't, you'll get this thing right here
1:18
the Wi-Fi assistant which is a really nice little feature. Automatically select best Wi-Fi so if you select this it will choose whatever the Wi-Fi
1:28
is best for you at a given moment assuming it can pick from multiple ones
1:32
And then if whatever the Wi-Fi you have around you are just utter garbage you can also check
1:37
this on and this will switch you to mobile network instead. Now with the second option I would suggest to be careful with it because if you don't
1:48
have much mobile data to spare this might drain it way quicker than you probably used
1:53
to when it would be switching to mobile network instead of Wi-Fi when it considers Wi-Fi as crap
2:01
So anyway let's go to the next page and from here we have Google services, we have location
2:08
scanning, sending user and diagnostic data. If you don't like it you can disable it, if you want it keep it on, if you're not sure
2:15
read it from there, scroll down and select accept. Turn on location, I disagree
2:23
Now this is completely up to you if you want it or not. Now next page is the screen lock so you can set up a screen lock right here
2:31
We have a choice between pin pattern or password. Now by default it's going to go into this longer pin, a six digit one and one thing
2:39
that bugs me with realme is their naming and their password. That's not a password, numeric codes are pins not passwords and here there's more of it
2:50
so we have pattern, four digit password, it's a pin, then four to sixteen digit, pin and
3:00
then we actually have something that deserves the name password which is the normal alphabetical one
3:07
So we can select whichever one we want, I'll stick with the pin right here
3:11
So let's draw our pin, then redraw it once more to confirm it and there we go
3:18
Now it automatically goes to the next option for you to unlock the device which is a face
3:22
ID and if you choose to skip it it will also go to fingerprint so you can add both of those
3:28
or one or none depending on how you like. I'm just going to skip it
3:32
Now I have recommended auto update overnight and home screen icons so this is just a style
3:37
right here that you can pick from, as you can see a couple of different icon types so
3:41
select which one suits you and going back and the update overnight is just an option
3:46
for updating your device if there is an update to it. Next page, import data so you can basically grab your old device, load an app called clone
3:58
phone, you can get it from play store on your older device, then all you need to do is connect
4:04
the two devices together and you can select whatever you want to move over from your old
4:08
device to this one. It's fairly easy to use and straightforward, really simple and nice
4:15
But I'm setting it up as new so I'll be selecting later and this finishes up the setup
4:21
So select get started and you should get access to the home screen
4:26
So if you found this very helpful don't forget to hit like, subscribe and thanks for watching