0:07
I'm Fredrik from HTC Desire 20 Plus and today I'll show you how to enable and set up the
0:12
Do Not Disturb mode. To get started, you want to pull down the notification panel and find the Do Not Disturb mode
0:19
It looks like it's for me right over here. So once you find it, I do recommend you to hold it
0:25
This will quickly take you to the settings. There we go. And from here we can customize it
0:31
So we have things like calls and messages right at the top. So you can tap on calls, allow calls from anyone, contacts, favorites, or no one
0:42
I'm going to select no one just to show off this option, which is the second thing, allow
0:46
repeated callers. So if someone calls you twice within a 15 minute period, the second time around, they
0:51
will be able to get the calls through completely bypassing the first option right here
0:58
So even though I have selected that don't allow any calls, if they meet that requirement
1:04
for allow repeated callers, I will get the call. Now if you're wondering what would be the purpose of this, considering Do Not Disturb
1:13
mode should block calls, this is primarily for emergencies, I would call it
1:19
People don't usually call you twice within a 15 minute period, and if they do, they most
1:23
likely have a really good reason for it. So this will allow them to reach you
1:28
Now going back, we have messages. So same as calls, messages from anyone, contacts, favorites, and a no one
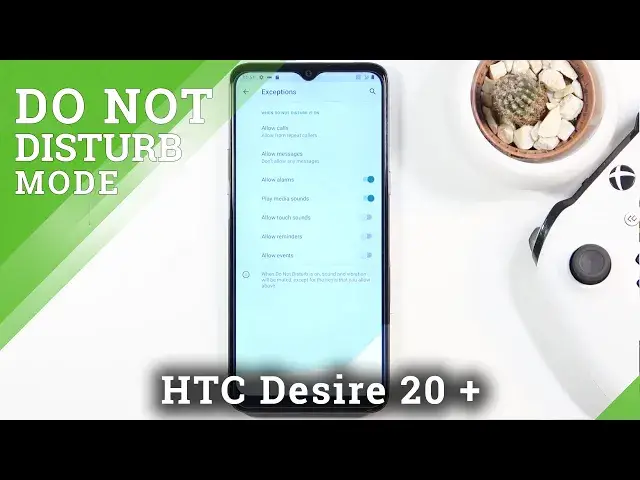
1:34
So select whichever one you want. Also have see all exceptions. So in here we again have the calls and messages, but we also have a couple toggles
1:42
So we have allow alarms, play media sounds, touch sounds, reminders, and events
1:47
So if there is something, one of those things that you want to have in doing Do Not Disturb
1:51
mode, then check them on. Then we have also visual disturbances, so notifications, pop up banners, and stuff like that
2:02
You can go in there and customize what kind of notifications you will be getting
2:07
Duration, the default duration, meaning whenever you tap on the toggle right here, this defines
2:13
how it will work. So we have until turn off, so meaning when you tap on it, you will have to tap on it
2:18
again to turn it off. Then for a specific amount of hours, which if you customize it here, if you set specific
2:25
amount of hours, that will be the amount of hours it's going to work for every single time
2:31
So right now if I tap on OK, every time I tap on the Do Not Disturb mode, it will turn
2:35
on for four hours. But if you go with ask every time, let me just show you, it will basically give you
2:42
that window of choices every single time, and you can change the amount of time that
2:47
will be working for every single time you want. So you can keep changing it
2:51
It won't be a static timer. And lastly, we have the schedule, which allows you to set up a schedule
3:00
So the Do Not Disturb mode will turn on and off automatically based on the provided time
3:05
and day of the week. So once you have set it all up in here, if you decided to go with the schedule, you don't
3:12
really need to turn it on, assuming you already turned on the schedule
3:15
But if you decided to not go with the schedule route, all you need to do is find the toggle
3:20
and this time around simply tap on it. Now like you also seen, I selected to ask me every time, so that's why it's bringing
3:25
up the window. If you went the same route, all you need to do is just either select one of the two options
3:30
and tap on Turn On, and you're done. And that is how you would enable and customize the Do Not Disturb mode
3:38
So if you found this very helpful, don't forget to hit like, subscribe, and thanks for watching