0:07
In front of him is an Aces ROG phone 3 and today I'll show you how to enable and set up the
0:13
Do Not Disturb mode. And to get started let's pull down the notification panel, expand it and you should find
0:20
a toggle somewhere here. Oh there it is. So once you find it, you can tap on it to enable it, well, in whichever way it's set by default
0:35
But what I would recommend you to do is actually hold this, and this will take us to the settings
0:41
where we can customize exactly how it works. So let me quickly wipe out the screen because it is a little bit reflecty at the moment
0:51
There we go. So hopefully that will last a little bit longer. So from here, we have a couple of things
0:57
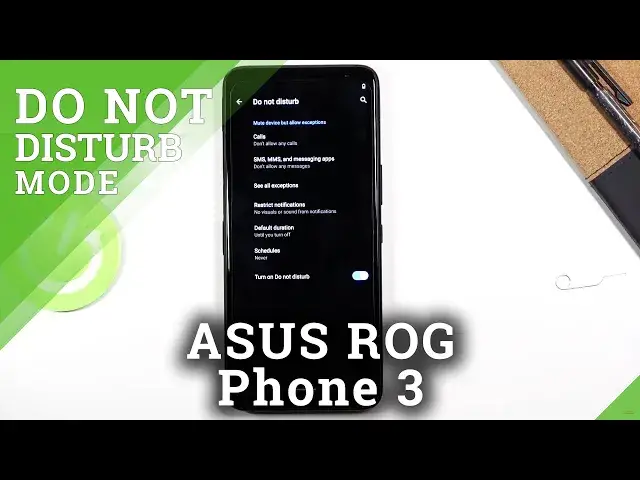
options we have things like calls messages all exceptions but let's start with calls so
1:04
calls there we have once we tap on allow calls options that are here are basically anyone contacts favorites and no one now you can select whichever one you want I going to go with the Don Allow Any Calls which is basically no one
1:21
because there is an option right here, allow repeated callers, which will allow anybody to reach you
1:27
completely bypassing the Don't Allow Any Calls option, as long as this is enabled and as long as they need the requirement
1:33
of calling you twice within a three-minute period. So they really would need to be desperate at that point
1:38
to call you twice within a three-minute period. So this will be a really good option for emergencies
1:44
People basically spam call till you pick up and this will allow them to reach you actually
1:49
So going back we have messages and options here are exactly the same as with the calls, minus
1:56
the allow repeated callers. Then going back all exceptions, again calls, messages repeat, but we have also a couple toggles
2:05
so we have alarms, play media sounds, touch sounds, allow reminders and events
2:09
So if you want some of them, cigar them, if you don't want them, keep them disabled
2:15
Then going back, we have restrict notifications. Here we have the option to basically select how notifications behave during the Do Not Disturb mode
2:23
And we have two preset ones so we have no sounds phone notifications or no visual or sound from notifications Now we can also go into custom and customize what can or cannot be shown or make sound
2:37
Then going out, we have also the default duration. This will touch upon the fact that when you tap on the toggle you have two options in a way
2:48
so we have for one hour or you can set it to be more. So for instance, for the middle option for the one or whatever hours you choose
2:55
once you tap on okay and when you tap on the toggle right here
3:02
this will enable it for as many hours as it's set right here right now once you tap on okay
3:10
And then we have also Ask Every Time, which in my opinion is the best option
3:15
So once you go for the Ask Every Time and you actually tap on a toggle to bring up this window
3:21
and give you the two options that we had before, but it will just bring that option every single
3:25
time. So from here you can select it to until you turn it off or for one hour with
3:31
the ability to actually add more hours which is better than you had before if
3:36
you go for the time specific because from there you set it once and you cannot
3:40
change the time that will run through So apart from that lastly we have a schedule and this will simply allow us to add a schedule so do not this thermal turns on and off automatically So we can name it
3:54
whatever you want. And as can see days of the week, start time and time, alarms can override
3:59
end time and do not disturb behavior. I would go with the user defined because the other
4:04
ones are predefined for you. So the one that we have the first one, the default one user defined is
4:11
the one that we have literally created right now. So once you set it up it will
4:17
automatically be enabled so keep that in mind. But apart from the schedule that
4:25
you have option to set you can still top on it yourself on a toggle like so and
4:31
then simply turn it on once you choose one of the options or if you have selected it
4:35
before then after you top on the toggle it will automatically become enabled. and then you can also quickly tap on it to disable it at any time
4:45
And that is basically how you'd set it up. So if you found this very helpful, don't forget to hit like, subscribe, and thanks for watching