0:02
Infoom is a Xiaomi Redmi Note 7 and today I will show you how to bypass the Google
0:10
verification screen. So to start off we will need to connect to Wi-Fi
0:16
So go to the setup process as you normally do till you get to this point
0:20
So as you can see I'm already connected to network. So once you are, you have to then scroll down from the network list and you will see at the bottom add network so you have to top on that
0:30
you'll have the SSID field so you want to tap here and type in YouTube.com
0:36
so YouTube.com like so then select it and top on these like two circular kind of chain
0:49
looking icon right here okay and we're now in YouTube. Need to be on a search for hard reset and
0:59
info and then tap on whichever link from the channel in the channel you'll see a link
1:18
to a website in the description as you can see right here so
1:23
already reset that info stop on that link and choose browser agree and continue
1:36
And we're now in the browser on the website. So from here, tap on the three bars to gain access to the menu and choose download
1:46
From the download field, do you want to search for Android 8? Like so, let's just search
1:57
Scroll down and tap on the download. button and again scroll down and once more tap on the download and allow and okay
2:08
you'll see starting download and soon after it should see there we go download
2:13
serviceful tap to open there we go so from here tap on the application so we can
2:20
install it you get immediately blocked by browser that you don have permission so you need to tap on the settings and then enable it and just go back and now we should be able to install it no problem okay cool allow give it a moment it scanning and now
2:40
can open it so once you open it you have two buttons now the first thing we want to do is
2:47
google account manager apk install stop on that and choose for version 6.0 and same premise we need
2:53
to go into settings, enable this go back and then install with the difference that this time
2:59
we don't need to open it, we can just go back and it will take us back to the
3:04
frp bypass app. So once that's installed then you want to tap on the bypassed frp and choose
3:10
browser sign in and again tap on the three dots here and choose browser sign in
3:16
Tap on okay and you should now see google. So from here we can put in a email
3:23
address that we wish to use. I can also create one. As you can see, I would probably advise to do it on a computer instead of one here
3:32
But you can use an existing one, create one for this purpose
3:36
It doesn't really matter, just as long as you have an account that you can put in here, which I do, so I'm going to use that one
3:48
Let's stop on next. And then I'm going to put in the password
3:53
before I do you can pay attention to the email address so it's hard to reset info one
3:58
and it's going to be the email address that later on should be visible as a
4:03
account added in a field that normally before would be verify your account this will
4:08
appear as account added even though I would I will not add anything past this point
4:14
so let me just put in password really quickly Okay, then I can see it's signing in
4:28
Once it's signed in, it takes you back to the app and we're primarily done with the app so we can
4:32
now hold Power key and choose reboot. As you can see, we're automatically connected, let's just proceed on again
4:53
skip the step it going further so normally this is the point where Google would show us that you need to verify your account Just don copy
5:08
And there we go. So you can see account added. I have not added anything at this point
5:13
And it says hard reset info one and that's the account that I have added in the previous
5:19
before we rebooted the device. So you should see the same thing. I love your email
5:25
should be different so then we can just stop on next and proceed with the setup now at
5:31
this point you just want to get access to the home screen so it doesn't really matter what you choose right here just go through it really quickly so we can go
5:41
into the settings on the home screen just skip this so as you can see we're now on the home screen but the process isn't finished just yet
6:11
so from here it's go into the settings scroll all the way down and we're going to go into
6:17
where is it probably additional settings let's see I'm gonna just search for it
6:32
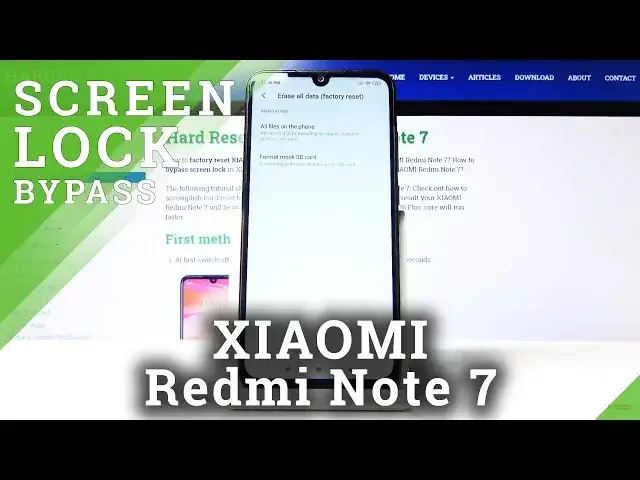
backup and reset there we go that's what we're looking for and from here
6:42
There we go. At the bottom you have erase all data factory reset. So top on that, all files on the phone
6:55
There we go. So at the bottom. So at the bottom. And we need to wait about 20 seconds, 10 seconds
7:12
for this message and another 10 seconds for another. There we go
7:18
It just gives you a warning that basically performing this operation will remove all the data from the device
7:24
That includes also your account that we have added But what it doesn say it also removes the account that was previously on the device as well So the account that was previously blocking us and we needed to verify will now be completely removed
7:39
and the device will be completely clean of any kind of leftover from the previous user
7:48
So this will take probably several minutes, so I'll be back once the setup screen is visible again
7:55
So, the Okay, so as you can see, now we're done with the reset so we can proceed with this setup
8:34
Now this time around you can set up your device as however you like. This device is fully unlocked so we can log in to your Google, no problem
8:43
or you can just completely skip the Wi-Fi connections and stuff like that, which I will do
8:48
So let's start off by choosing a language. I can see skip, there we go
9:00
I will also kind of speed up the setup process. Skip this skip
9:07
I'm going to be able to be. And as you can see, now the process
9:42
and the devices fully unlocked now. So that is how you would bypass the Google verification screen
9:47
and if you found this very helpful, don't forget to hit like, subscribe, and thanks for watching