0:00
We are glad to welcome me on a hard reset YouTube channel and in this video I would like to review the interface and buttons of the DJI Mini 3 Pro
0:12
So as you can see I have the drone itself, the newer version of the remote controller and the more classic version of it
0:20
So let's begin with the drone itself. So here is the camera that is mounted onto the very great gimbal that allows it to stay stable at ultral
0:29
times and regardless of the flying and how do you fly it it will always stay stable
0:36
Thanks to this built in gimbal, here is the charging and battery indicators
0:42
Here is the power button. Those are the sensors that allow you or drone not to fly into some obstacles once you fly it
0:53
in the normal or celia mode. Those are also another sensors. you also have them at the bottom over here and all over the place, making sure that the drone
1:04
is covered from all positions. What else? Here you also have the slot for microSD card as well as the charging input or output, whatever
1:17
just the port that allows you to plug the wire in and either charge your drone or transfer the files from and to it Here is the battery that you can take off by holding those two triggers at the sides So hold them in and then drag the battery out
1:34
What else? Here you have obviously the drone legs, to have the propellers mounted
1:47
Well, use this to fly obviously. And well, well, that's about it as far as the drone goes
1:55
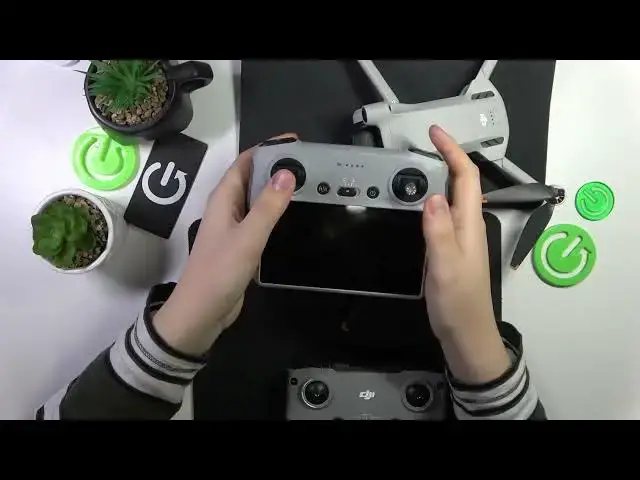
On this newer version of the remote controller, here are your joysticks
2:00
So this, by default, this joystick is responsible for gaining an altitude and dropping it
2:06
and moving, well, not left to right, but just rotating. This joystick is responsible for by default once again because you can remap those controls
2:19
default responsible for moving forwards and backwards, left and right. Here is the power button
2:25
here is the screen that you use. Here is the switch that allows you to switch between Celia
2:30
normal and sport mode, respectively. Here are the LED indicator lights. This button allows you
2:36
to return your drum to home or pause it. Here you have the start recording button or end
2:43
recording button as well as the button that allows you to take photos during your flight This allows you to zoom in and out I mean dial this dial allows you to zoom in and out and this one helps you to move your tilt your camera upwards or downwards Here you also
3:01
have two buttons at the back that are programmable and you can assign whatever action you want them to do
3:08
At the bottom you have the charging port that you insert the charging wire in, also some mounting
3:14
interfaces. Here if you were to open this compartment here you also have the space
3:21
for another micro sd card. This time for the controller itself if you were to
3:26
record a screen or something and also another host port that once inserted gives
3:36
you more functions and allows you to well just do more stuff with your
3:40
controller but well that's the topic for a whole another video. so I will not stop on it right now
3:47
What else? I guess that's pretty much it. The older controller is somewhat the same
3:51
with the difference that you have this mounting rack here that you put your phone in like that
4:01
And you use it instead of this screen here. Just download the DJI Fly app
4:05
and well everything else is identically same. Here you have also those joystick
4:10
By the way, you can take them from here and well mount them if you need to like that and use those joystick the same way we used the joystick The joysticks there
4:24
You also have this switch and button that allows you to switch between sign
4:28
Well, not silly, excuse me. This is the sign mode. Sign, normal and sport modes
4:34
Here is the pause to return home button. Another FN button that allows you to
4:39
that is the programmable button, programmable button that allows you to assign any functions you want on it
4:47
Set list of functions. Here is the power button, obviously. Here is the button that allows you to switch between camera modes
4:59
This button allows you to either start and stop video recording or take a photo
5:04
depending on which mode your drone is in right now, video or photo mode
5:08
and you can also use this dial to zoom in and out
5:15
Or actually, I'm not 100% sure whether this dial is for zooming or tilting the camera
5:22
So, well, that's on me, that's my bad. But else here you also have the charging interface and that's about it
5:30
So thanks a watching. Thanks for your attention. And bye-bye