0:07
And following is an Apo FindX2 Pro, and today I will show you how to record the screen on this phone
0:13
So to get started, pull down a notification panel, expand it, and you should find a screen recording toggle somewhere on the second page, at least that's where it is by default
0:23
It's can see right here in the top right corner. So you can either tap on it to and simply toggle it on after you click it
0:29
after you granted access to everything that it wants. There we go
0:34
And once you do it, we'll bring up this tiny little window right here with a couple different options
0:38
If you're doing this for the first time, it tells you what it is. So tap to record, obviously, red circle or square
0:44
Then below that we have settings, and below that we have just an exit. So this will close this little panel right here
0:50
So we can start off by probably going into these settings. And as can see, by default, we will have this tiny little window right here
0:57
with I guess some important settings that you can keep changing. I know these will probably be the ones that you might
1:04
if you record often, you might find use for. So we have the record system sound and record a microphone sound
1:11
Now, by default, it's going to be system, but you can also add a microphone or just microphone and no system
1:17
It's completely up to you. It's really nice that we can also record both of them at the same time
1:22
But if you're planning to do this, I would recommend you to use headphones for this
1:27
a microphone will be recording the speaker sound and creating an unwanted echo effect because of this because system sound will be then recorded twice But apart from that I can also top on more settings Let me just close this some more settings
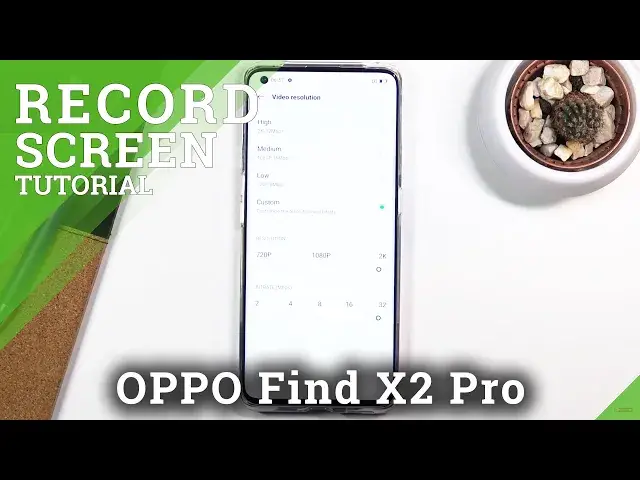
1:43
And in here we have a couple additional settings. So we have things like video resolution, which is set to medium
1:49
Now, usually that would be referred as high, but because it's like 1440P display
1:55
we can make the recording go higher to 1440p or custom where we can choose the
2:01
resolution and the bit rate of it. Now if I remember correctly I'll pose one of
2:09
this weird we're this weird recording way that you can choose different
2:16
resolutions and size of the file won't change but the bitrate will change it
2:20
so you could record at 720p and it will for instance have I don't know a
2:27
gigabyte per minute which is a hypothetical number and you can record it
2:31
2K and again one minute will also have one gigabyte but if you change the bit rate
2:36
this will either increase that size or decrease it which kind of kind of well not
2:41
really what I'm used to and just works weirdly but anyway so that being said if
2:48
you're struggling with space on your phone you might want to drop the bitrate probably 16 will make it look decent enough already the way you can see the
2:59
bit rate being lower is when you're recording moving screen so if you're switching between pages flipping or recording a game
3:07
when the screen is in motion it will have this kind of semi look to it and once it stops moving it will after a second gain full focus and recorded at what the resolution would be so the higher the bit rate
3:20
is the better the image will look like during motion so go back um then below that we have frame
3:28
rate so we have dynamic which will probably be well not probably but it will basically determine
3:35
when it needs to be 60 or lower now Personally, I prefer to lock it to 60 and just record it always at that frame rate, but you
3:42
can drop it lower if you want to, or set it to dynamic
3:47
Video encoding format, so just keep this out as it is. We also have the option to include a front-facing camera in the video, if that is something
3:55
that you want to do. And show screen touches, which will just create a semi-transbranded dot on a screen to signify
4:00
where you were touching the display while recording. And that's about all the settings that we have in here
4:06
So let's close this off. back to the toggle, top on it again, and simply tap on the record button. And as you can see
4:14
it's now recording. So, let me go. So also, there's the dot that you can see under my finger
4:24
and recording. Also move this around. So whatever I will do right now is being recorded
4:34
So yeah, once you're done, again, simply I deposit and resume it
4:38
whenever you open some app or something loads like that and keep recording
4:42
or if you don want to you can just click on the square and it will save the recording And before I progress to showing you where you can find that recording I will mention one little thing which might be important to some people
4:56
If you're planning to record things like some video streaming applications just so you can have it saved, I guess, don't even bother
5:04
A majority of the video streaming like Hulu, Netflix, and anything else like that, Amazon Prime
5:10
basically have access to your device in a way to the point that they know that you're trying to record something
5:16
and all you will get is just a black screen. Even though you will be able to see that something is playing on display
5:22
the video recording just records nothingness, just black void. On that recording you will have sound
5:28
but no visual, anything visual, apart from maybe like the status bar and that's it
5:33
So you don't really even want to bother with it. And now, going to the actual recording
5:40
let's see, all you need to do is find the... gallery up, so here it's called Photos, and you can see it right here, or if you go into
5:47
the album section, you can see it under screenshots. And let me just play it for you, so there we go, it's already playing
5:54
So that is basically it. So that is how you could record your screen
6:12
and if you found this very helpful, don't forget to like, subscribe, and thanks for watching