Up next in 10

More tutorials with OPPO Find X2 Pro:
https://www.hardreset.info/devices/oppo/oppo-find-x2-pro/
Find the best tricks for OPPO Find X2 Pro. Here we present the list of top tips in OPPO Find X2 Pro. Become a pro user by using hidden features, cool settings, and useful otpions.
#Oppotricks #OppoTips #OppoFindX2Pro
Follow us on Instagram ► https://www.instagram.com/hardreset.info
Like us on Facebook ► https://www.facebook.com/hardresetinfo/
Tweet us on Twitter ► https://twitter.com/HardResetI
Support us on TikTok ► https://www.tiktok.com/@hardreset.info
Use Reset Guides for many popular Apps ► https://www.hardreset.info/apps/apps/
Show More Show Less View Video Transcript
0:00
Welcome
0:07
I'm following you say Apo FindX2 Pro and today I'll show a couple tweaks and tricks you can do on this phone
0:13
So starting straight off we're going to go into these settings and then display to find the refresh rate
0:19
So display on brightness and let's see. There are more we have the screen refresh rate that looks to be set to
0:29
auto, but we can change it to 120 or 60. Now, the difference between those two, unfortunately, Apple doesn't give you like any kind
0:40
of nice animation to showcase this off, so I'm going to try to explain it in a way that hopefully
0:46
people will understand. So imagine a screen refresh rate as a slideshow
0:51
By default, basically almost every device normally has a 60 hertz refresh rate, meaning in a
0:57
single second you will see 60 different image. So when you're moving from point A to B on a screen, so for instance scrolling
1:04
throughout that scroll, if it's going one second, it's 60 frames. That's going to be displayed
1:09
If you change it to 120, well, then you have twice as much content being shown on the screen
1:14
making it look way smoother than the 60. And I'm going to maybe try to show this off
1:21
So right now it's at 60, and by scrolling up and down, you can..
1:26
I'm doing it quickly. it's not really doing it quickly just so we can see the
1:31
the way the text it jumps around it's kind of like well not very good looking right you can kind of see
1:37
you don't really see the smooth motion you just kind of see different images of it
1:43
like text being just stuck in single places right but if we go change it to where was it display
1:51
if we change it to 120 you should start seeing a bit of a smoother motion to it
2:00
So let's go back here. And you can see that the text, you don't really see that the text kind of like it was before
2:08
Now unfortunately the camera is recording at 60, so everything past this
2:12
It's not really recorded, so you don't really get the full experience of what 120
2:17
is doing to the screen. But you can already kind of see that way I'm scrolling up and down
2:24
It is just kind of like a smooth motion. There is no almost like a slideshow feeling to it Now obviously this is going to look in person way way better than it does on the camera So I highly recommend you to just try both of them see the differences
2:42
And then at the end of the day, if you don't like it, I would say set it to 60
2:47
because that will give you a little bit more battery life. But if you feel that the extra or reduced battery life is a worth trade-off
2:55
then I do recommend you to go with the 120. It just makes the entire phone feel so much better
3:01
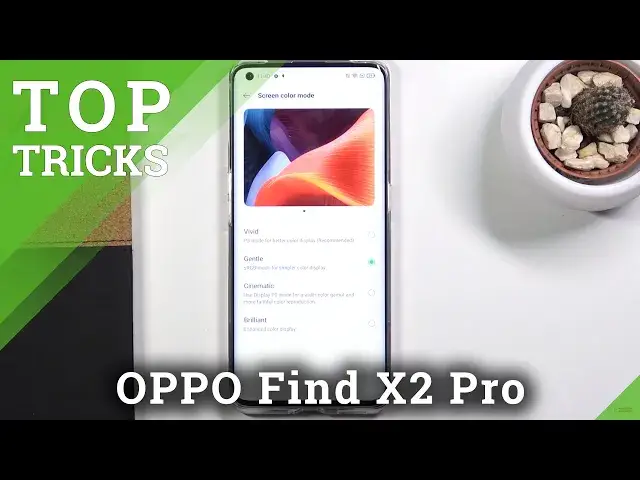
Now, moving on to the next option, it's going to be the screen color mode, which is kind
3:07
of self-explanatory. Again, it's in the same place, so on the display and more, you have screen color mode
3:13
And by default, it is going to be always, on basically, almost every phone, said to vivid
3:18
Now, vivid, in certain cases, doesn't look too great, in my opinion
3:21
So as you can see right here, these colors right here are a little bit, in my opinion, too saturated
3:26
They're almost like glowing. We do have a couple additional ways. so we can choose whichever one you want now
3:34
it looks like there is also a mode that is even more saturated than the vivid one
3:38
so this one is just taken to a whole new extreme level
3:42
but the majority of us if you like vivid then it's all fine
3:48
if you find it a little bit too saturated then you can change it to gentle
3:51
which will reduce the saturation of it a little bit and make it look a little bit more accurate
3:58
now moving on to this the next option, it's going to be the UltraVision engine and now it's again in a display
4:08
but it is right here. And the name doesn't really describe what it does exactly, so once you tap on here and enable
4:15
you can see that there is two additional things. So it makes standard content, so non-HDR content that doesn't have high dynamic range
4:24
It will basically convert it into high dynamic range to make it look a little bit better on
4:28
the Amolet display. And additionally, it will also try to smooth out the video boost its frame rate to 60 frames from the typical 24
4:39
So for instance, if you're watching a movie, movies are almost exclusively, maybe with an exclusion of couple specific titles, almost exclusively at 20, I think, 4 frames always
4:52
So this will boost it into 60. now. In normal circumstances, this is a really nice option
5:01
I personally do prefer 60 frames almost in everything. In movies, though, it might sometimes look a little bit wonky
5:08
So it starts looking almost fake unrealistic kind of like a soap opera So it is going to be up to you if you like this specific toggle or not
5:19
If you don't, if you find it, if you find that it makes the content look a little bit worse
5:24
in terms of movies specifically, and by all means just disable it
5:29
But the conversion from standard dynamic range to high dynamic range is a fairly decent one
5:34
So moving on to the next option, it's going to be the gesture navigation to make the screen look a little bit nicer and overly the navigation of the device feel a little bit better
5:46
So to enable this, we're going to go into convenience tools in our settings right over here, navigation, and from here you'll have swipe gestures from both sides
5:56
And it does give you this animation right here, how to use this or navigate to your device
6:01
I'm going to just show you it might be a little bit easier to see it actually in action
6:07
so as you can see you have you don't have the buttons anymore
6:11
so to go back as you usually did with the bug button
6:17
what you have to do now is swipe from the side as you can see it will bring up an arrow like that
6:22
from either side now this works to a specific point on the screen
6:26
I believe it's somewhere like our long here if you try to swipe from all the way top
6:31
it won't work. That is so certain applications that have this panel that you can pull from the side
6:38
that is so you can actually still pull it out instead of going back. Now, unfortunately for me, it is a little bit difficult to swipe from the
6:47
from all the back gestures because of this screen protector that isn't necessarily curving along the glass
6:53
so I can basically grab the screen protection here. It does make it really difficult to swipe
7:01
But the home gesture and the recent gesture is still fairly easy
7:06
So to go home, basically swipe up. Let me just brace the phone, there we go
7:12
So just a simple swipe up. And then if you want to go to recent, you swipe up and hold
7:18
And this will go to recent. Now additionally, I will give you a little tweak or tip
7:24
If you have never used gesture navigation, when you're trying to go home or into recent
7:29
try not to swipe on the screen up but start the swipe off of the screen
7:36
This will basically ensure that the home gesture or basically back or home recent gesture
7:44
will work correctly This is a fairly subtle tip but it helps a great deal And now moving on to the last option it going to be the smart sidebar Now I can barely see it because of the
8:01
screen protection right here but I believe it's right here. Let me just try it out. Yep
8:07
that is the screen protection or not screen protection but the smart sidebar. So if you're already
8:15
it and you know what it does then I don't really have much to say but basically when you
8:19
pull it outside by a simple flick it will bring up a couple different shortcuts
8:26
which you can edit also have settings and or several several applications which you can
8:32
launch from here you can also add more if you want to and also if you grab it like this
8:39
as you can see it becomes you can move it around you can also move it to the other side if you
8:44
you don't want it on this side so you can basically choose where it is located at and additionally
8:51
if you just don't like the smart sidebar at all you can simply remove it by going into the
8:58
convenience tools and finding smart sidebar and from here you can either change the transparency
9:05
have several different options right here but if you want to disable it you just do this when it's gone
9:14
if you want to use it but you want to maybe change it a little bit. You can change the transparency of it
9:19
As you can see right now it is a little bit more visible. I can make it basically completely invisible so you do need to remember where it is
9:25
We can also have floating bar on full screen. Recent apps. So this recent apps basically when you get it, it will show you apparently recent apps right here
9:40
which I believe is this top section right here. Now we also should be able to add apps to here, but I don't seem to remember how to do it
9:50
Oh, there we go. Do I actually have the scroll option, and from here we can add more apps along with different tools
9:56
So we have voice recording. We can remove the ones that are already here, and we can add any kind of app that we want to from our app list
10:06
So, that being said, this would conclude all the tweaks and tricks I wanted to share
10:11
And if you found this very helpful, don't forget to hit like. subscribe and thanks for watching