0:00
Welcome, my name is Appo Find X2 Pro and today I'll show you how to capture
0:12
screenshot on this device. So to get started you will want to open up the
0:16
content that you wish to capture. I'm gonna be using settings as an example for this and once it's open and visible on screen press power key and volume
0:24
down at the same time. It's a simple click and you will see this image pop up
0:29
here so we have two options share to slide up and then scrollable screenshot
0:34
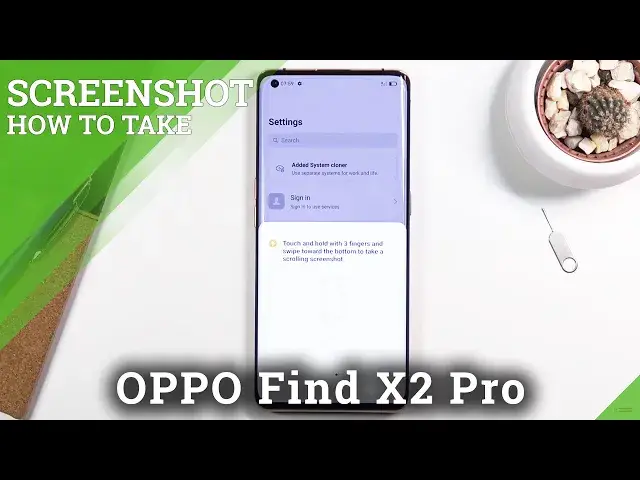
if you slide it down. Now also if you're capturing your screenshot for the first
0:38
time it will bring up this little guide to also let you know that it can capture a screenshot and a couple different ways of capturing it using gestures so in
0:46
this case three fingers. So as you can see the default one and the two finger
0:52
swipe down or two finger three finger swipe down will result in basically the
0:57
same thing as pressing the power key and volume down with the difference of
1:01
using your fingers so it might be a little bit easier and more convenient
1:06
Then on the second one we have here a selective screenshot so you can just
1:12
hold your fingers three fingers and it will make an area which you can resize
1:16
to select a specific portion of the screen and then lastly we have the
1:21
scrollable screenshot which again three fingers hold and then swipe all the way
1:25
down will result in a scrollable screenshot. Although this option is the
1:29
most annoying one out of all of them normally three screenshot as you can see
1:34
works fairly flawlessly. Also if you hold get this page or this thing we can
1:40
resize it right again works fairly well but in terms of a scrollable one I do
1:46
recommend you just to capture a screenshot and do this. There's no
1:51
content here so I advise you on doing this way it's gonna be much easier you
1:56
always have the pop-up and you only need to swipe it down because if you try to do this way as you can see you first need to hold the fingers so you see this
2:03
thing up here then slide it down all the way and make it basically that all the
2:09
three fingers swipe off the screen at the same time if you don't it will
2:13
consider this to be a portion of a screenshot as you can see like it is
2:18
right now this for me didn't work so I'm just gonna quit and let's just try
2:23
to do that once more so okay so as you can see this time it worked but it needs
2:30
to be fairly precise and it has a lot room for error so so that's why I
2:37
recommend you just to do a simple screenshot and then swipe the image down for well this to open and once you have the scrollable option as you can see it
2:45
will automatically as you've seen at me stop it it will start scrolling down but
2:50
it can basically stop it by touching on it and from there you can also scroll
2:53
down yourself however far down you want to go up on the check mark once you
2:57
satisfied again check mark and this will save it now all those screenshots that I
3:02
have captured can be found in our photos application you can see right here
3:06
they're all smack in a metal here or if we go into the albums we should have a
3:10
screenshot album as well where we can find all the screenshots so there we go
3:18
so that being said that is how you'd capture different screenshots or
3:22
different methods of capturing screenshot and if you found this video helpful don't forget to hit like subscribe and thanks for watching