0:00
Welcome, my full name is Realme7 and today I will show you how to setup the device
0:11
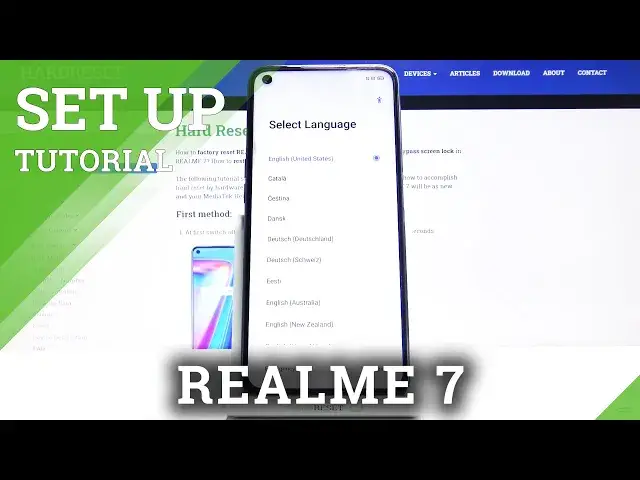
So when you boot it up for the first time, you will be presented with the setup screen
0:15
as you can see right now. So from here, simply select your language, which I'm going to stick with English, and
0:22
from there select next, choose your region, again next, and on the next page we have the
0:29
terms of service, so obviously we do need to agree to the first one, that we agree to
0:33
the user agreement, and the two additional ones below that, so privacy and I think like
0:40
update or whatever, those are optional as you can see based on the grey text right over
0:44
here and here, so we don't actually need to agree to those if you don't want to
0:49
And from there tap on next, and then we'll have the ability to connect to the WiFi
0:55
Now this step is completely optional, if you don't have a WiFi network near you, you can
0:59
simply skip it, which that's what I'm going to do, and the only thing that you will miss out on is the ability to log into Google, if you would want that, you can do that still
1:06
later on after the setup is complete, simply connect to WiFi in the settings, and from
1:11
there go to accounts and add Google. But nonetheless, continuing on, so here we will have the WiFi assistant, now this is
1:19
a fairly nice option, so basically if you have multiple WiFis in your area that you
1:24
are connected to, it will choose the best one, the fastest, and basically if for instance
1:29
the WiFi that you're connected to right now just kind of sucks, your device automatically
1:33
switches to the better one, so let's select that. And once you do, you also have another option that if both of the WiFis, or whatever WiFi
1:40
you're connected to, suck, and your mobile network is faster, then it will switch to
1:46
mobile network. Now I would discourage you from enabling this option if you have some kind of limited data
1:52
plan, so if you have like only a gigabyte or so of mobile data, this will drain it quicker
1:59
than normally, so just keep that in mind. But if you have plenty of data, for instance like 10 gigs or more, then just by all means
2:10
enable it, you probably won't really feel any kind of difference in the data plan right there
2:15
From there let's go to next, and then we have Google services, so we have location scanning
2:19
and send user and diagnostic data. Now you can read what they do exactly by just tapping on a dropdown and having it written
2:26
right up here, and if you don't like it, simply disable it
2:30
Again here as well, you can disable it. From there scroll down and tap on accept to go to the next page where you can set up a
2:37
screen lock. Again, this is completely optional, you can skip it if you don't want to, but you know
2:41
what, I'm gonna set it up anyway right here. And when you tap on the setup, it will automatically default to a six digit PIN, but you can choose
2:48
a different method, so you have also option of pattern, four digit password, 4216, 4216
2:56
alphabetical, or just cancel. I'm gonna go with the pattern, and from there let's draw the pattern, redraw the pattern
3:03
and there it is, it's set. Now it also automatically goes to the face recognition, so if you want to you can add
3:08
it in. Basically all it does is just look at your face and be like, okay, that's about it, but
3:15
I'm gonna skip it. And you can then also add a fingerprint, again if you don't want to you can just tap on cancel
3:22
and that will be it. If you choose to do so, simply tap on the fingerprint sensor and just scan your finger
3:29
And then we have recommended, so update overnight, and home screen icons
3:33
So I'm not really sure why I recommend it as home screen icons, but all you have here
3:38
are just couple different styles of icons as you can see. So choose whichever one you just like more
3:45
And then update overnight, it's just an option, your device will update during night if you
3:52
want it enabled, if you don't care, keep it off. And go to next, import data, and here we can import data from our old device
4:00
And now this is done through an application, so it will guide you and tell you that you
4:04
need to download an application on your old device, and from there step by step guide
4:10
to how to connect your devices, and from there you can simply choose what you want to transfer
4:14
But because I'm going to be setting it up as new, I'm going to go for later
4:19
And that's about it. Tap on get started, and we should be on the home screen
4:23
And there we go. So if you found this very helpful, don't forget to hit like, subscribe, and thanks for watching