Up next in 10

Bypass Google Verification OPPO Find N2 Flip - Unlock FRP Oppo 2023 / Skip Google Lock Without PC
Jul 27, 2024
OPPO Find N2 Flip Remove Factory Reset Protection:
https://www.hardreset.info/devices/oppo/oppo-find-n2-flip/faq/bypass-google-verification/realme-android-13-google-account-bypass/
In this video, we will show you how to bypass Google verification on OPPO Find N2 Flip and unlock FRP Oppo 2023 without using a PC. If you have been struggling to access your phone due to the Google lock, then you've come to the right place. We will guide you step-by-step through the process to help you unlock OPPO Find N2 Flip and activate it without Google account. Let's remove factory reset protection in just a few minutes. This unlock FRP method works with all OPPO phones with Android 13.
How to unlock FRP in OPPO Find N2 Flip? How to remove factory reset protection in OPPO Find N2 Flip? How to bypass Google account verification in OPPO Find N2 Flip? How to skip Google lock on OPPO Find N2 Flip? How to bypass Google Account protection in OPPO Find N2 Flip with Android 13 and security patch 01.2023?
#OppoFindN2Flip #BypassGoogle #unlockfrp
Follow us on Instagram ► https://www.instagram.com/hardreset.info
Like us on Facebook ► https://www.facebook.com/hardresetinfo/
Tweet us on Twitter ► https://twitter.com/HardResetI
Support us on TikTok ► https://www.tiktok.com/@hardreset.info
Use Reset Guides for many popular Apps ► https://www.hardreset.info/apps/apps/
Show More Show Less View Video Transcript
0:00
Welcome. Infronomy is an app poe find the N2 flip and today I will show you how can bypass
0:06
the Google verification on this phone. So to get started I'm going to quickly go into a couple things that we will need for this process
0:18
because they will be crucial for it. Number one I will be internet connection now this
0:23
probably everybody has access to but number two which might be a little bit more difficult
0:26
to come by will be another Android device. Now I will be using some RealMe device right here but you can use any kind of other Android
0:35
device. So we're going to start off with the other device, which obviously you need to have access to it
0:42
I'm going to move this to the side for now. And here, you want to navigate it to Play Store and you're
0:53
going to look for Apple clone phone. Now I'll be honest on this Real Me device probably had the best example because it doesn't
0:59
show up but if I open up my Samsung device, just quickly go in here, you can quickly see
1:06
that when I search for the same thing, Apollo clone phone, it automatically will auto fill
1:11
and it shows it up as a suggested application right here. That's what you want to download
1:14
the Apollo clone phone and install it. It's the color OS1. Now the reason I think it's not showing
1:20
up right here is because this device is ReelMe and Reel Me and Apo I believe have the same parent
1:26
company and because of that they will be sharing a couple things. like for instance this clone phone app now the name is the same it looks a little bit
1:36
different at least the icon of it but the interface is basically exactly the same so
1:41
I'll attempt to use this one which comes baked into the device and we'll see if
1:48
that works obviously if it won't I'm just going to download this on my other device and
1:51
do it there but this is the one that comes with the device so yeah I'm gonna move this
1:57
to the site and I'm just going to quickly show you one more thing so once you
2:01
download your app you'll need to granted access to a bunch of different
2:05
things so let's just open it up so agree and continue gonna need to navigate
2:11
to settings and then find the name of the app that it opens up in a list toggle
2:15
it on go back again settings taggle it on go back start migrating settings
2:23
taggle it on go back Again, settings, on, back. Then it will ask for a couple different things like access to camera while using the app
2:36
All of this can be selected to while using the app. Now it will need a bunch of personal info access like contacts, messages and so on
2:48
Now this is all understandable because this app gives us the option to migrate everything, including
2:53
contacts, photos and all that stuff. So it needs access to this content to be able to move it from there
3:00
So you do need to grant it access to all of these things
3:07
And there we go. It will turn on the camera and you're good to go
3:11
Now moving back to our device, the locked one. You can see it is locked, obviously I can close this and it will tell me to use Google account instead
3:20
So anyway I just begin So to start off if you are at the very beginning like right here progress through the setup till we get to the Wi connection page
3:31
Like this one, connect to your network. I have already done so
3:35
And once you have connected to it, you want to click right here on this eye icon. Then you want to select Share, nearby, turn on, need help sharing, and then top on a tweet
3:47
that's right here in the corner, and select Share article. From here you're going to share it using messages
3:56
New message. 2. You can type any kind of random number. Good enough
4:07
Now just to kind of also prove one more thing, you don't even need a SIM card in here
4:12
So just to kind of showcase this. You can see there is no SIM card whatsoever in this device
4:30
So you don't need any kind of SIM card in here. Anyway, moving back to here, so once you type in some random number, you can select the article
4:38
that it automatically paste in the message field, remove it, and then type in www. YouTube
4:51
Now, before you send it, I do want to stress it the first portion, the
4:57
WWW that is crucial. It might seem like such a stupid little thing
5:03
but you need to add that beginning. If you don't, it will
5:07
open up YouTube in a pop-up window, which will not work. If you add the WWW
5:15
it opens it up in its own dedicated application, which is what we need
5:19
And if you already send this message without, so just like this portion that is visible right here, then you
5:26
will need to restart or re-format the device and start over. But if you do it with this, like I mentioned, with this crucial portion, when you send it
5:38
just hop right here, so top to load preview, and then top on the image, and it opens up
5:45
in this in a YouTube own application, which is what we need
5:49
Now here, all we need to do is simply navigate to the account icon
5:57
We're going to go to Settings about Google Privacy Policy, Accept and Continue and No Thanks
6:06
And this will open up our browser. Now, in the browser, we will navigate to Hard Reset. Info slash bypass
6:19
Now, if you need a moment to copy this link yourself, do pause the video
6:34
Now, from here, you're going to scroll down and you'll find this little up right here
6:40
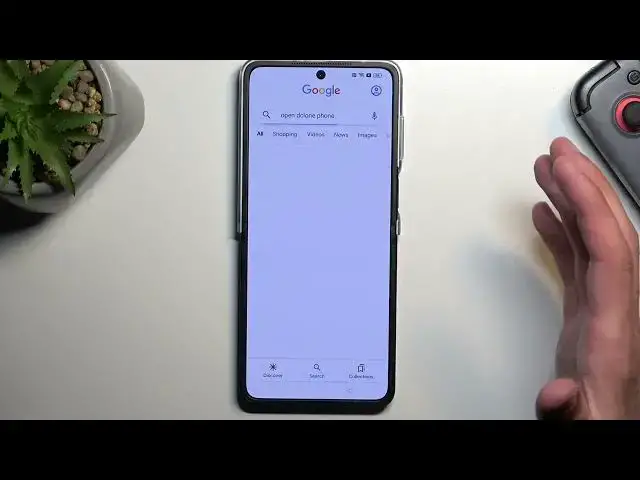
Google search up. I'm going to click on it, and here we will click on the microphone
6:49
And once it activates the mic you want to say open the clone phone up or just the clone phone Now if you struggle with getting it to open yourself
7:02
because it needs to be verbally told to the device, you can play me back on the speakers to the device
7:09
and hopefully this will work. So anyway, Open the clone phone
7:24
Now that didn't work. Open the clone phone up
7:40
For some reason it's not really working. Open the phone clone app
7:55
Again, not it. Open the clone phone. Now maybe this will work
8:08
So now I'm gonna check it out. This is the app that we need
8:12
It's telling us to sign in so no. Open the Apppo phone clone up
8:23
Open the phone clone. Open the phone clone
8:33
There we go. So it took me a couple of tries to get it correctly
8:41
It used to be open the clone phone, which was opening it up, but apparently it changed
8:46
to open the phone clone. So switch up of the words, clone phone phone to phone clone
8:52
It's technically we're telling the device to open a completely different app
8:55
because the app is actually called clone phone while we're telling it
9:00
open the phone clone, which opens up this app, which is what we needed anyway
9:07
but I just kind of wanted to point it out why it took me so many tries because
9:11
appo and Google apparently don't really work together too well I have no clue but anyway as you can see it opened up finally so from here we're
9:23
going to select that this is a new device and again same process we're going to allow everything
9:30
now migrate data from other android as you can see it opens up this camera application
9:37
I'm going to go here I'm going to open up the app and we'll see if this one works
9:52
It looks like it is. So as you can see it will start to just gather info on how much data is on the device
10:05
And from here all you need to do is select all, then deselect all
10:11
And we going to go to apps section here and you can select any one of these apps just one will do so what is some kind of small up oh there we go LinkedIn is only 818 kilobytes so that what
10:32
I'll select it doesn't matter what app you select you can select any kind of app so once you
10:38
select any one of the app that you want click on the checkmark and then select start migrating
10:44
Can I use a pattern instead? There we go
10:58
Oh, we need to enter some crappy verification code. So, let's see
11:14
Huh? There we go
11:30
As you can see, transfer complete, I'm going to select done. It's also done here, so click on done
11:40
And as you probably realize, we are right now at the the end of the setup when it's telling us to select our navigation method and select one of them
11:50
You can choose whichever one you want. From there we're going to skip later. Done
12:00
Get started. And as you can see we have now access to our home screen
12:06
So we're almost done. There is one last thing that you want to do which is navigate two settings
12:11
scroll all the way down to additional settings again scroll down to backup and reset
12:18
reset phone erase all data then erase all data and remove ESM profile which
12:28
will be probably prefer preferable and you're gonna select that once more this will
12:32
begin a factory resetting your device at which point once that process is
12:37
completed you will be taken back to the setup of your phone at which point
12:41
you can set up your phone however you like. It will be fully unlocked at that state
12:45
once you press on this button so yeah the device basically fully unlocks it. Now just to
12:50
explain what will happen and why we need to do this last step, when you perform a factory
12:56
reset of the device through settings like I'm telling you to do right now, doing so Android
13:01
is basically forced into removing all kinds of protection that has been put on this
13:06
device prior to the reset. So by doing it through the settings
13:11
the phone is forced to unlock itself in a way. So that's why you want to do this right now as a last step
13:17
Like I said, unfortunately it will bring you back to the beginning of the setup, but the device will be fully unlocked so you can go through it however you want, add whatever you want
13:25
I can also skip connecting to Wi-Fi if you don't want to do so
13:29
So anyway, with this being said, if you found this very helpful, don't forget to hit like, subscribe, and thanks for watching
13:41
Thank you